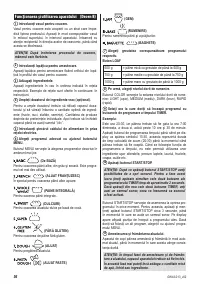
Хлебопечки Zelmer BM1000(Часть 2) - инструкция пользователя по применению, эксплуатации и установке на русском языке. Мы надеемся, она поможет вам решить возникшие у вас вопросы при эксплуатации техники.
Если остались вопросы, задайте их в комментариях после инструкции.
"Загружаем инструкцию", означает, что нужно подождать пока файл загрузится и можно будет его читать онлайн. Некоторые инструкции очень большие и время их появления зависит от вашей скорости интернета.


140
3
Put the ingredients.
The ingredients must be put into the baking tin the order
speciied in the relevant recipe. Examples of recipes can be
found in this instruction manual.
4
Fill in the bulk additive dispenser (optional).
In order to complement the dispenser, lift the lid of dispenser
and pour the optimum amount of additives (fruit, nuts, raisins,
beans). The quantity of additives depends on individual
preferences. Then close the lid until you hear a click.
5
Plug in the appliance.
6
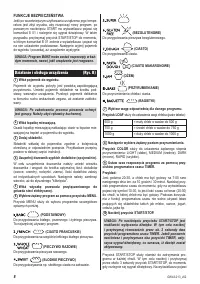
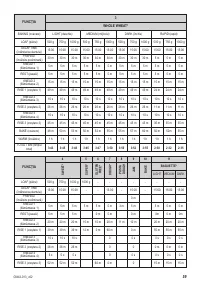
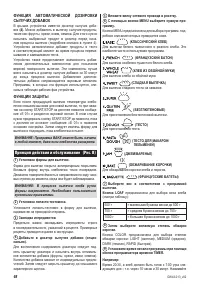
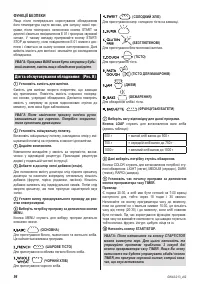
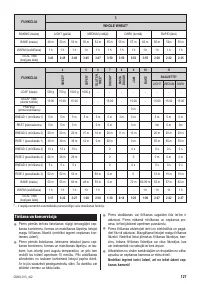
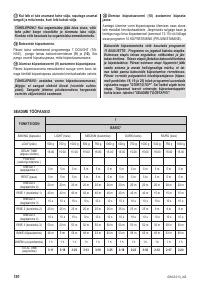
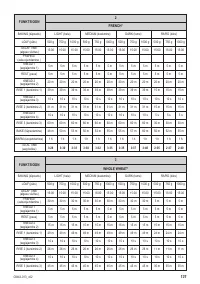
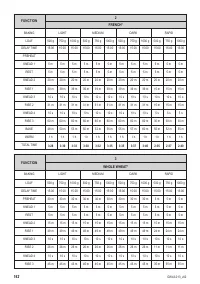
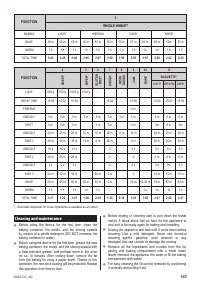
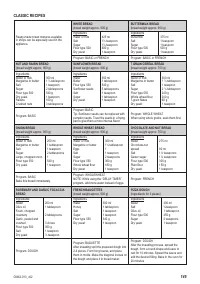
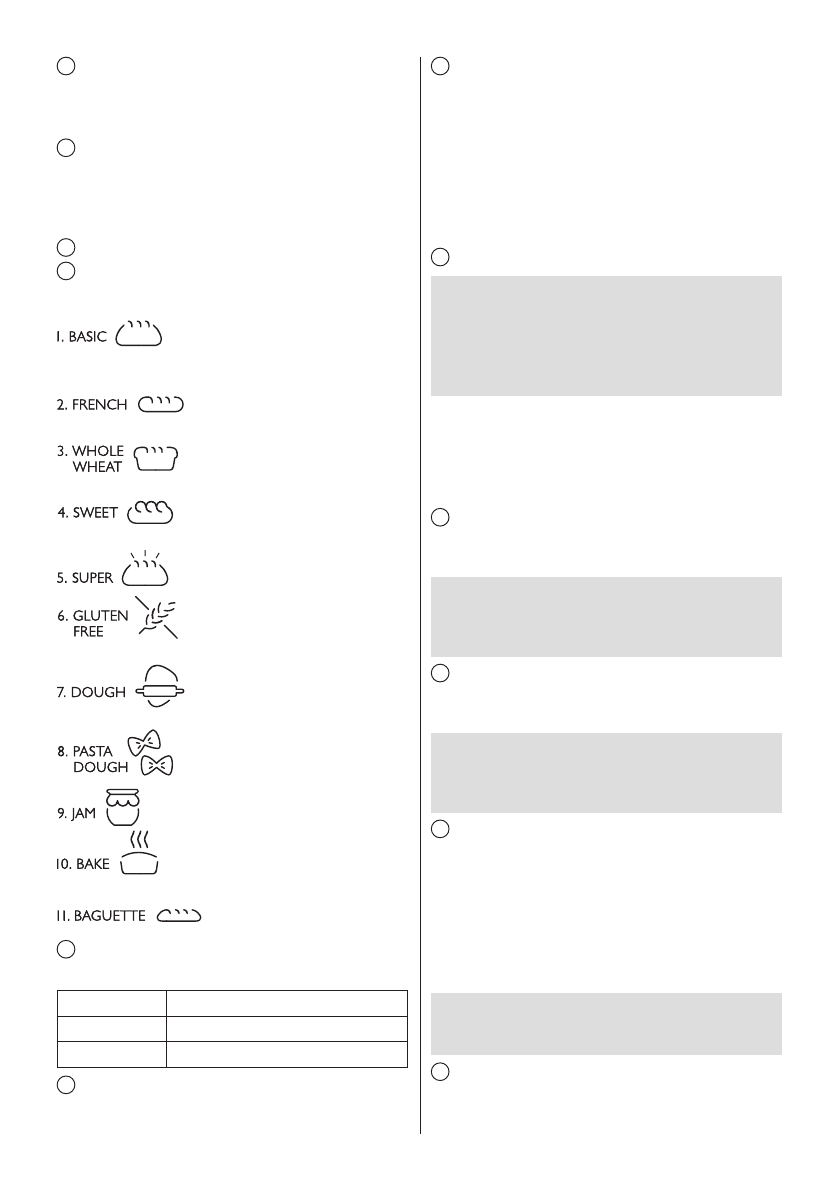
Select the desired program using the MENU button.
The MENU button is used to select the programs described
below.
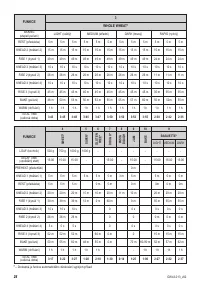
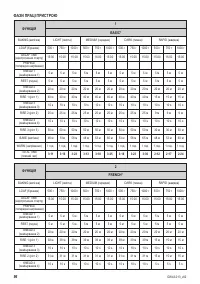
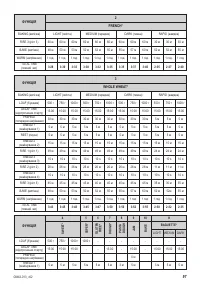
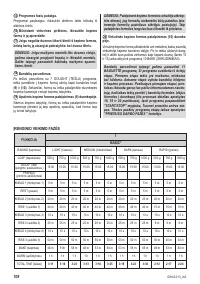
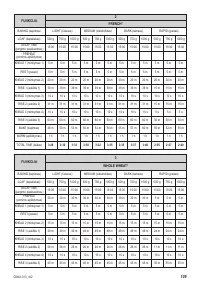
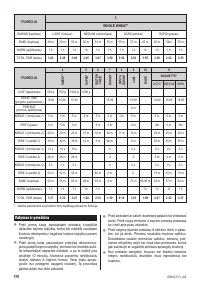
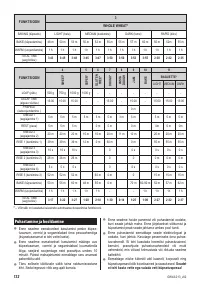
For white, wheat and rye bread. This is the most commonly
used program.
For the preparation of a particularly light white bread.
For whole meal bread.
For preparing e.g. sweet leavened dough.
For making gluten free bread.
For making dough.
To brown bread or cakes.
7
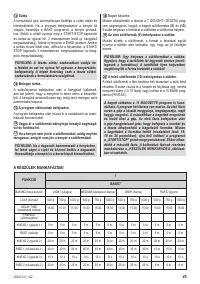
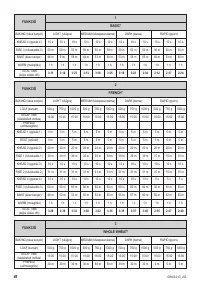
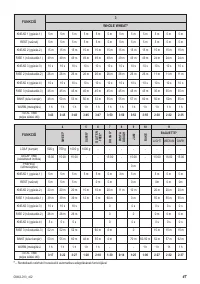
Select the weight appropriate for the given program.
LOAF button
is used to set the weight of the bread (see table):
500 g
= for small bread up to 500 g
750 g
= for medium bread up to 750 g
1000 g
= for large bread up to 1000 g
8
Select the desired browning level.
The COLOR button is used to set the desired browning level.
LIGHT, MEDIUM, DARK, RAPID.
9
Set the program start time by means of TIMER
program selector buttons.
Example:
It is 8.30 p.m. and the bread must be ready for the next morning
by 7.00 a.m., i.e, in 10 hours and 30 minutes. Press the TIME
button until the symbol 10.30 appears on Press the program
selector buttons, until you see 10:30 on the LCD - it is the time
from now (20:30) to the moment, when the bread is ready.
When working with the timing function never use perishable
ingredients such as milk, eggs, fruits, yogurt, onions, etc.
10
Press the START/STOP button.
CAUTION! After pressing the START/STOP button you
can turn off the sound. In order to do this press and
hold both of the TIMER buttons for approx. 2 seconds.
If you press and hold both of the TIMER buttons for
a second time, you will hear a sound signal informing
that sound is on again.
The START/STOP button is also used to stop the program at
any time. In order to do so, press and hold the START/STOP
button for about 3 seconds until you hear a beep. The initial
position of the selected program will show on the display.
If you want to use a different program, select the program
using the MENU button.
11
Mix and knead the dough.
The bread baking machine mixes and kneads the dough
automatically until it reaches the right consistency.
NOTE: During the phase of stirring and kneading
of dough, the lid of the appliance should be closed.
During this phase it is possible to add small amounts
of water, liquid or other ingredients.
12
Leave the dough to rise.
After the last kneading cycle the bread baking machine is
heated to the optimal temperature for the rising of the dough.
NOTE: During the dough growing phase close the lid
and do not open it until the end of baking bread. The
photos are only intended to present the phases of the
dough growth.
13
Baking.
The bread baking machine automatically sets the baking
temperature and time. If the bread is too light at the end of
program, use the BAKE program to brown the bread. In order
to do so, press and hold the START/STOP button for about
3 seconds (until you hear a beep). Then press the BAKE
button. When the desired browning level is reached, stop the
process by pressing and holding the START/STOP button for
about 3 seconds (until you hear a beep).
NOTE: During dough baking phase lose the lid and do
not open it until the end of baking bread. The photos
are only intended to present the phase of baking.
14
Warming.
Once the baking process is over, the buzzer goes off to
signal that the bread can be taken out from the appliance.
The 1 hour warming time starts immediately.
GW43-013_v02
Содержание
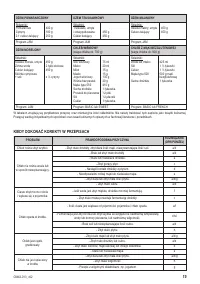
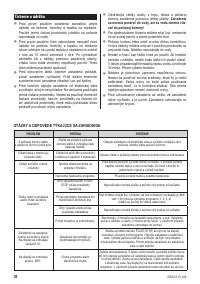
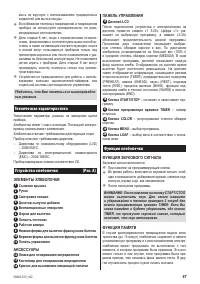
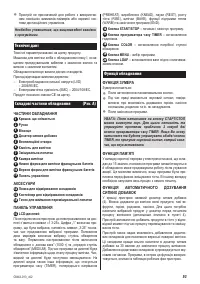
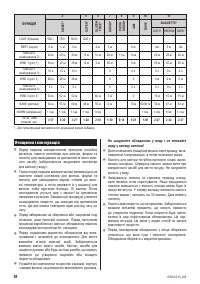
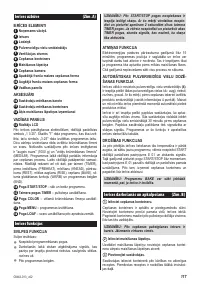
- 61 ЭЛЕМЕНТЫ ХЛЕБОПЕЧКИ; Функции хлебопечки; ФУНКЦИЯ ЗВУКОВОГО СИГНАЛА
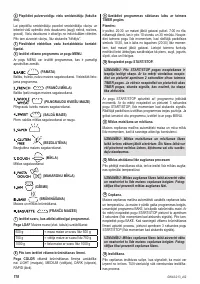
- 62 ВНИМАНИЕ: Программа BAKE может быть начата
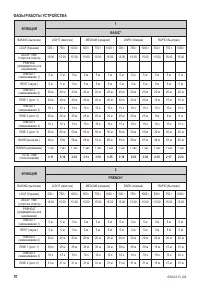
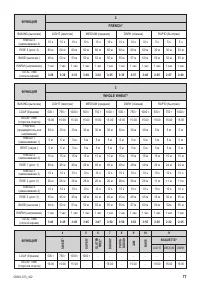
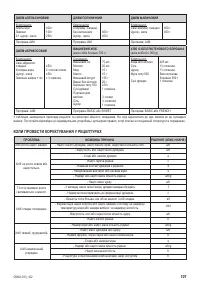
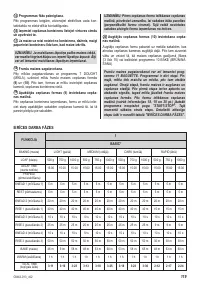
- 64 ФАЗЫ РАБОТЫ УСТРОЙСТВА; ФУНКЦИЯ
- 66 Очистка и консервация; Не
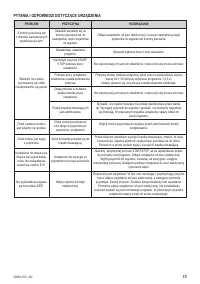
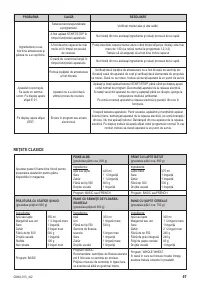
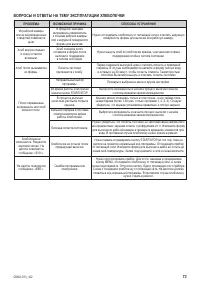
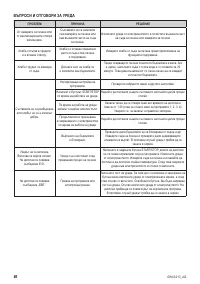
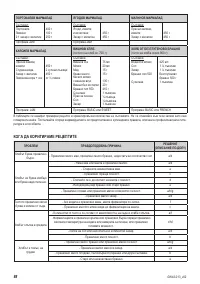
- 67 ВОПРОСЫ И ОТВЕТЫ НА ТЕМУ ЭКСПЛУАТАЦИИ ХЛЕБОПЕЧКИ
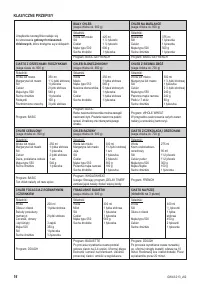
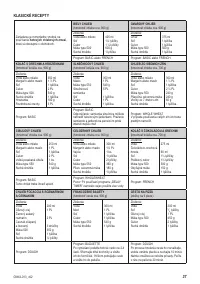
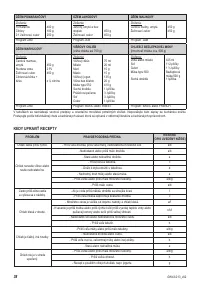
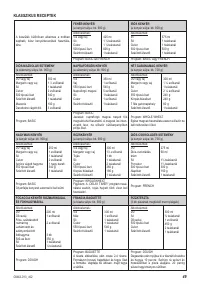
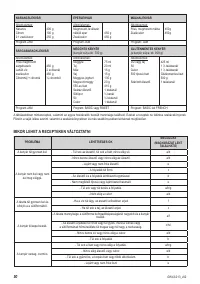
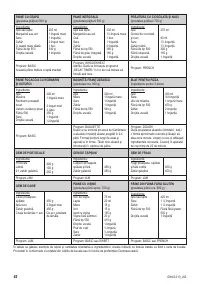
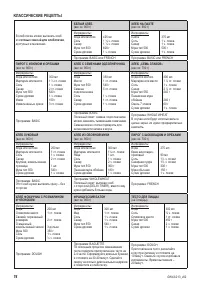
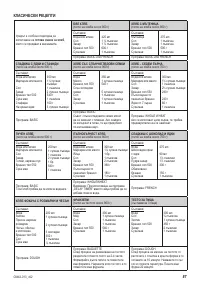
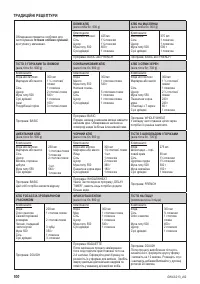
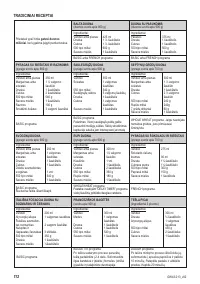
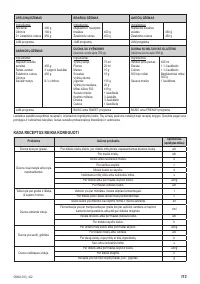
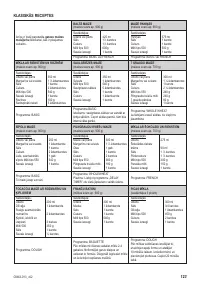
- 68 KЛАССИЧЕСКИЕ РЕЦЕПТЫ
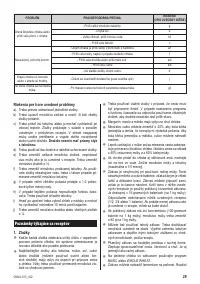
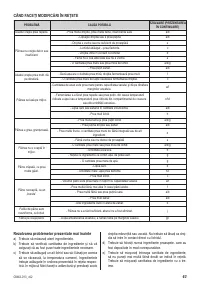
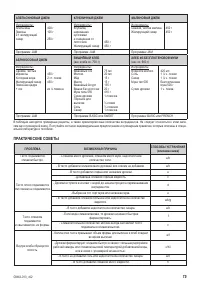
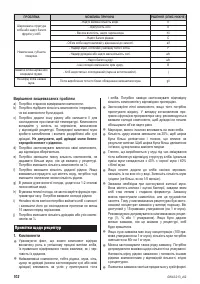
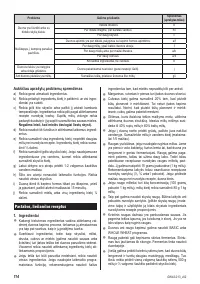
- 69 ПРАКТИЧЕСКИЕ СОВЕТЫ
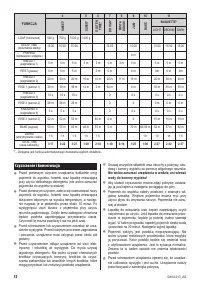
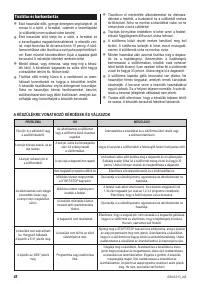
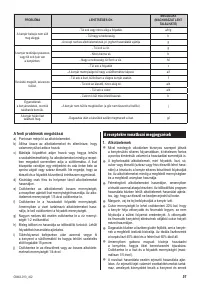
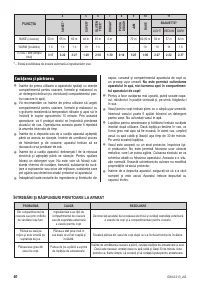
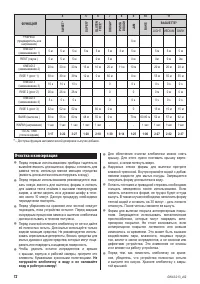
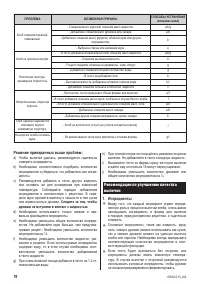
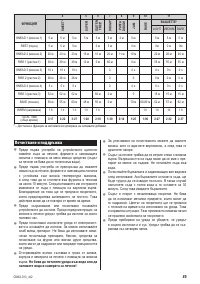
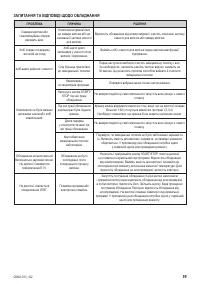
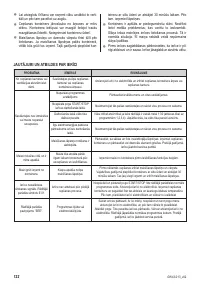
- 70 Решение приведенных выше проблем:; Следите за тем, чтобы
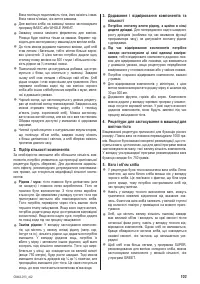
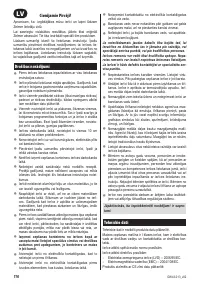
- 71 В хлебопечку ингредиенты надо закладывать
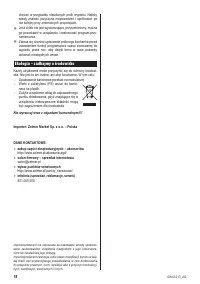
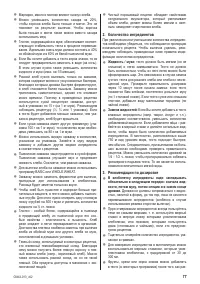
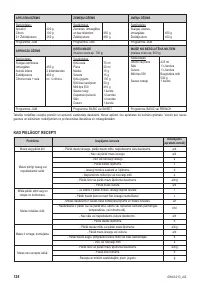
- 72 Экология – забота о окружающей среде; Не выбрасывайте прибор вместе с коммуналь; Рецепты для выпечки в хлебопечке


