
Котел Kospel EKCO.L1 36 z - инструкция пользователя по применению, эксплуатации и установке на русском языке. Мы надеемся, она поможет вам решить возникшие у вас вопросы при эксплуатации техники.
Если остались вопросы, задайте их в комментариях после инструкции.
"Загружаем инструкцию", означает, что нужно подождать пока файл загрузится и можно будет его читать онлайн. Некоторые инструкции очень большие и время их появления зависит от вашей скорости интернета.


Bosch Power Tools
1 609 92A 01G | (9.1.13)
English |
13
– With the nail pusher
14
pressed, carefully guide the
magazine slider
13
toward the front until the nail pusher
is over the last nail, thus pushing the nail strip in the
magazine completely to the front.
Note:
Do not let the magazine slider snap back without
guiding it. Otherwise, the magazine slider could become
damaged, and there is danger of your fingers being caught
or pinched.
Operation
Actuation system
Single actuation with safety run
With this actuation system, the discharge lock-off
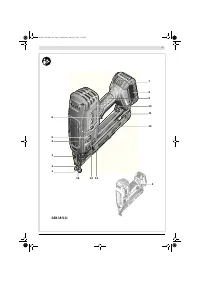
2
must
first be firmly pressed against the workpiece. A fastener is
not discharged until the trigger
6
is pulled.
Afterwards, further discharging procedures can only be ac-
tuated, when the trigger and the discharge lock-off have
first been set back to the starting position.
Starting Operation
Block the actuation system and remove
the battery before making any adjust-
ments, changing accessories, or placing
the power tool aside.
This safety measure
prevents accidental starting of the power
tool.
Inserting the battery
Use only original Bosch lithium ion batteries with the
voltage listed on the nameplate of your power tool.
Using other batteries can lead to injuries and pose a fire
hazard.
– Insert the charged battery
8
into the handle until it can
be felt to engage and faces flush against the handle.
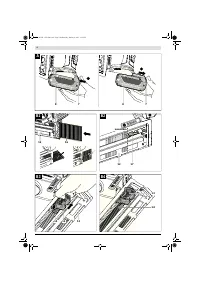
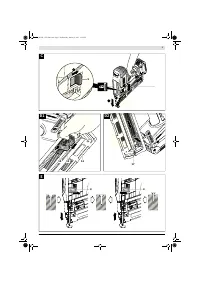
Shooting Nails (see figure C)
– Firmly position the outlet
15
or the rubber workpiece
protector
1
on the workpiece until discharge lock-off
2
is pressed in completely.
– Afterwards, briefly press trigger
6
and release again.
A nail is discharged.
– Allow the power tool to bounce back from the work-
piece.
– For another driving procedure (shot), completely lift
the power tool from the workpiece and position it firmly
at the next desired location.
If the trigger 6 and the discharge lock-off 2 are
pressed and held longer than 1 second after firing a
nail, it is possible that further nails are fired due to a
kickback-effect.
Blocking the Actuation System
Block the actuation system before making any adjustments
on the power tool, changing accessories, placing the ma-
chine aside for longer breaks or after finishing work.
Working Advice
Block the actuation system and remove
the battery before making any adjust-
ments, changing accessories, or placing
the power tool aside.
This safety measure
prevents accidental starting of the power
tool.
Check the proper function of the safety and actuation de-
vices, and the tight seating of all screws and nuts each time
before using.
Disconnect a defective or not properly operating power
tool immediately from of the power supply and contact an
authorised service agent for Bosch power tools.
Do not perform any incorrect manipulations on the power
tool. Do not disassemble or block any components of the
power tool, such as the discharge lock-off.
Do not carry out “emergency repairs” with unsuitable
means. The power tool is to be maintained regularly and
properly (see “Maintenance and Cleaning”, page 13).
Avoid any tampering and damage to the power tool, e. g.
from:
– Imprinting or engraving,
– Retrofitting measures not approved by the manufactur-
er,
– Guiding along templates manufactured of hard material,
e. g. steel,
– Dropping on or sliding over the floor,
– Using as a hammer,
– Applying any kind of force.
Make sure to check whatever is below or behind your work-
piece. Do not shoot nails into walls, ceilings or floors, when
persons are behind them. The nails can burst through the
workpiece and injure someone.
Do not shoot a nail onto an already driven-in one. This
could cause the nail to deform, the nails could become
jammed or the power tool could move uncontrolled.
When the power tool is used under cold ambient condi-
tions, the first nails will be driven in slower than usual.
Once the power tool has warmed up during working, nor-
mal operating speed will be regained.
Avoid blank shots in order to reduce the wear of the impact
striker.
For longer work breaks or after finishing work, block the
actuation system and empty the magazine if possible.
Emptying the Magazine (see figures D1
–
D2)
– With the nail pusher
14
pressed, pull the magazine slid-
er
13
to the rear until the last nail is free; then carefully
guide the magazine slider toward the front to the begin-
ning of the magazine
12
.
Note:
Do not let the magazine slider snap back without
guiding it. Otherwise, the magazine slider could become
damaged, and there is danger of your fingers being caught
or pinched.
– Turn the power tool so that the nails in the magazine
slide back to the magazine spring
17
.
– Push the magazine spring down and allow the nails to
slide past the nail pusher
14
out of the magazine
12
.
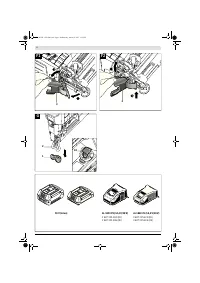
Adjusting the Depth Stop (see figure E)
The driving depth of the nails can be set with thumbwheel
4
.
– Empty the magazine
12
.
(See “Emptying the Magazine”, page 13)
–
Nails are driven in too deeply:
To reduce the driving depth, turn thumb-
wheel
4
in anticlockwise direction
.
or
Nails are not driven in deep enough:
To increase the driving depth, turn thumb-
wheel
4
in clockwise direction
.
– Refill the magazine.
(See “Loading the Magazine”, page 12)
– Test the new driving depth on a test workpiece.
Repeat the worksteps as required.
Clearing Jams (see figures F1
–
F2)
Single nails can become jammed in the shot duct. If this
should occur frequently, please contact an authorised ser-
vice agent for Bosch power tools.
Note:
When the driver blade does not return after clearing
a jam, please contact an authorised service agent for
Bosch power tools.
– Release the trigger
6
.
– Block the actuation system (see “Blocking the Actuation
System”, page 13) and remove the battery
8
.
– Empty the magazine
12
.
(See “Emptying the Magazine”, page 13)
– Press clamping lever
3
down so that the shot duct
opens.
– Remove the jammed nail. For this, us a pair of pliers, if
required.
– Close the shot duct, hang the clip of clamping lever
3
in-
to the hooks on the shot duct and then push the clamp-
ing lever up again.
– Refill the magazine.
(See “Loading the Magazine”, page 12)
Changing the Workpiece Protector (see figure G)
The workpiece protector
1
at the end of the discharge lock-
off
2
protects the workpiece until the power tool is correct-
ly placed for the driving procedure.
The workpiece protector can be removed and replaced.
– Pull the workpiece protector from the discharge lock-
off.
– Push the new workpiece protector via the open end
over the discharge lock-off.
Note:
A spare workpiece protector can be stored at the top
side of magazine
12
. For this, push the workpiece protec-
tor into the depot
10
.
Transport and Storage
When transporting the power tool, block the actuation sys-
tem (see “Blocking the Actuation System”, page 13), espe-
cially when using ladders or moving in an unusual stance or
posture.
At the workplace, carry the power tool only by the handle
9
and with the trigger released
6
.
Always store the power tool disconnected from the battery
and at a dry and warm location.
When not using the power tool for a longer period of time,
apply a fine oil coating to steel parts. This prevents the for-
mation of rust.
Maintenance and Service
Maintenance and Cleaning
Block the actuation system and remove
the battery before making any adjust-
ments, changing accessories, or placing
the power tool aside.
This safety measure
prevents accidental starting of the power
tool.
For safe and proper working, always keep the ma-
chine and ventilation slots clean.
If the machine should fail despite the care taken in manu-
facturing and testing procedures, repair should be carried
out by an after-sales service centre for Bosch power tools.
In all correspondence and spare parts order, please always
include the 10-digit article number given on the type plate
of the machine.
– Press switch
5
toward the left to block
the actuation system.
This prevents a nail from being shot out,
even when the discharge lock-off
2
is po-
sitioned against the workpiece and the
trigger
6
is pulled.
– Press switch
5
toward the right to disen-
gage the actuation system.
The actuation system is now released.
– Press switch
5
toward the left to block
the actuation system.
This prevents a nail from being shot out,
even when the discharge lock-off
2
is po-
sitioned against the workpiece and the
trigger
6
is pulled.
OBJ_BUCH-1335-004.book Page 13 Wednesday, January 9, 2013 1:22 PM

