Кондиционеры Daikin FWG-AT - инструкция пользователя по применению, эксплуатации и установке на русском языке. Мы надеемся, она поможет вам решить возникшие у вас вопросы при эксплуатации техники.
Если остались вопросы, задайте их в комментариях после инструкции.
"Загружаем инструкцию", означает, что нужно подождать пока файл загрузится и можно будет его читать онлайн. Некоторые инструкции очень большие и время их появления зависит от вашей скорости интернета.

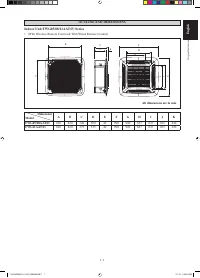


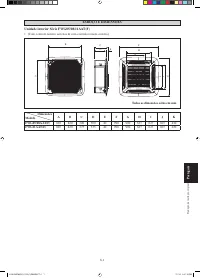


1-10
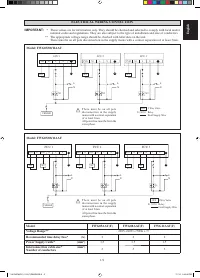
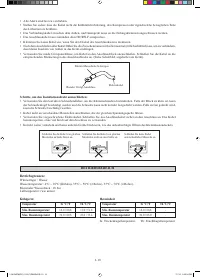
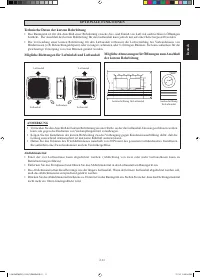
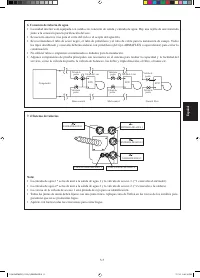
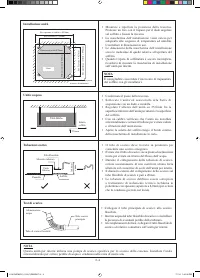
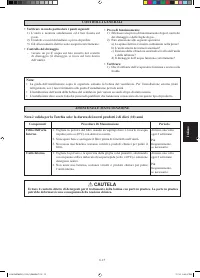
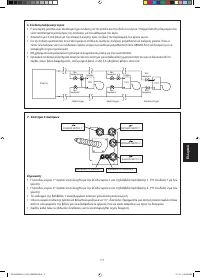
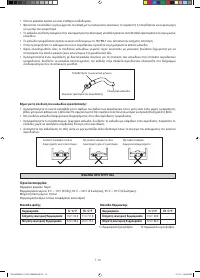
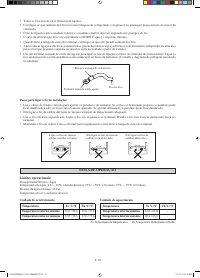
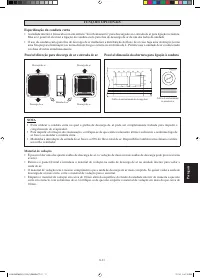
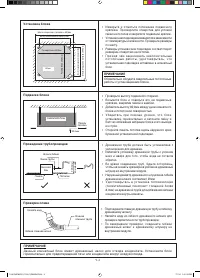
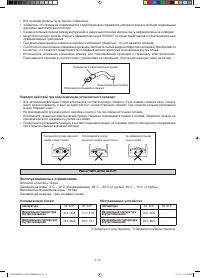
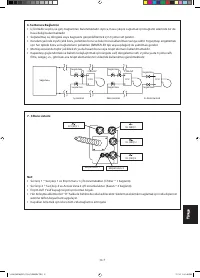
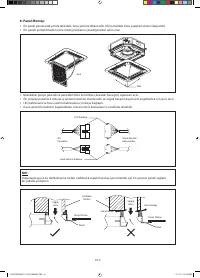
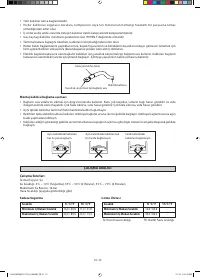
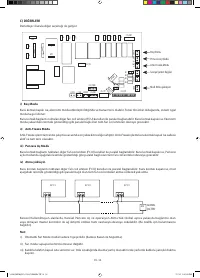
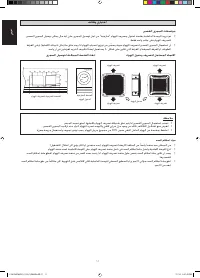
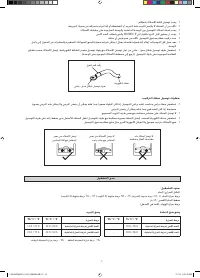
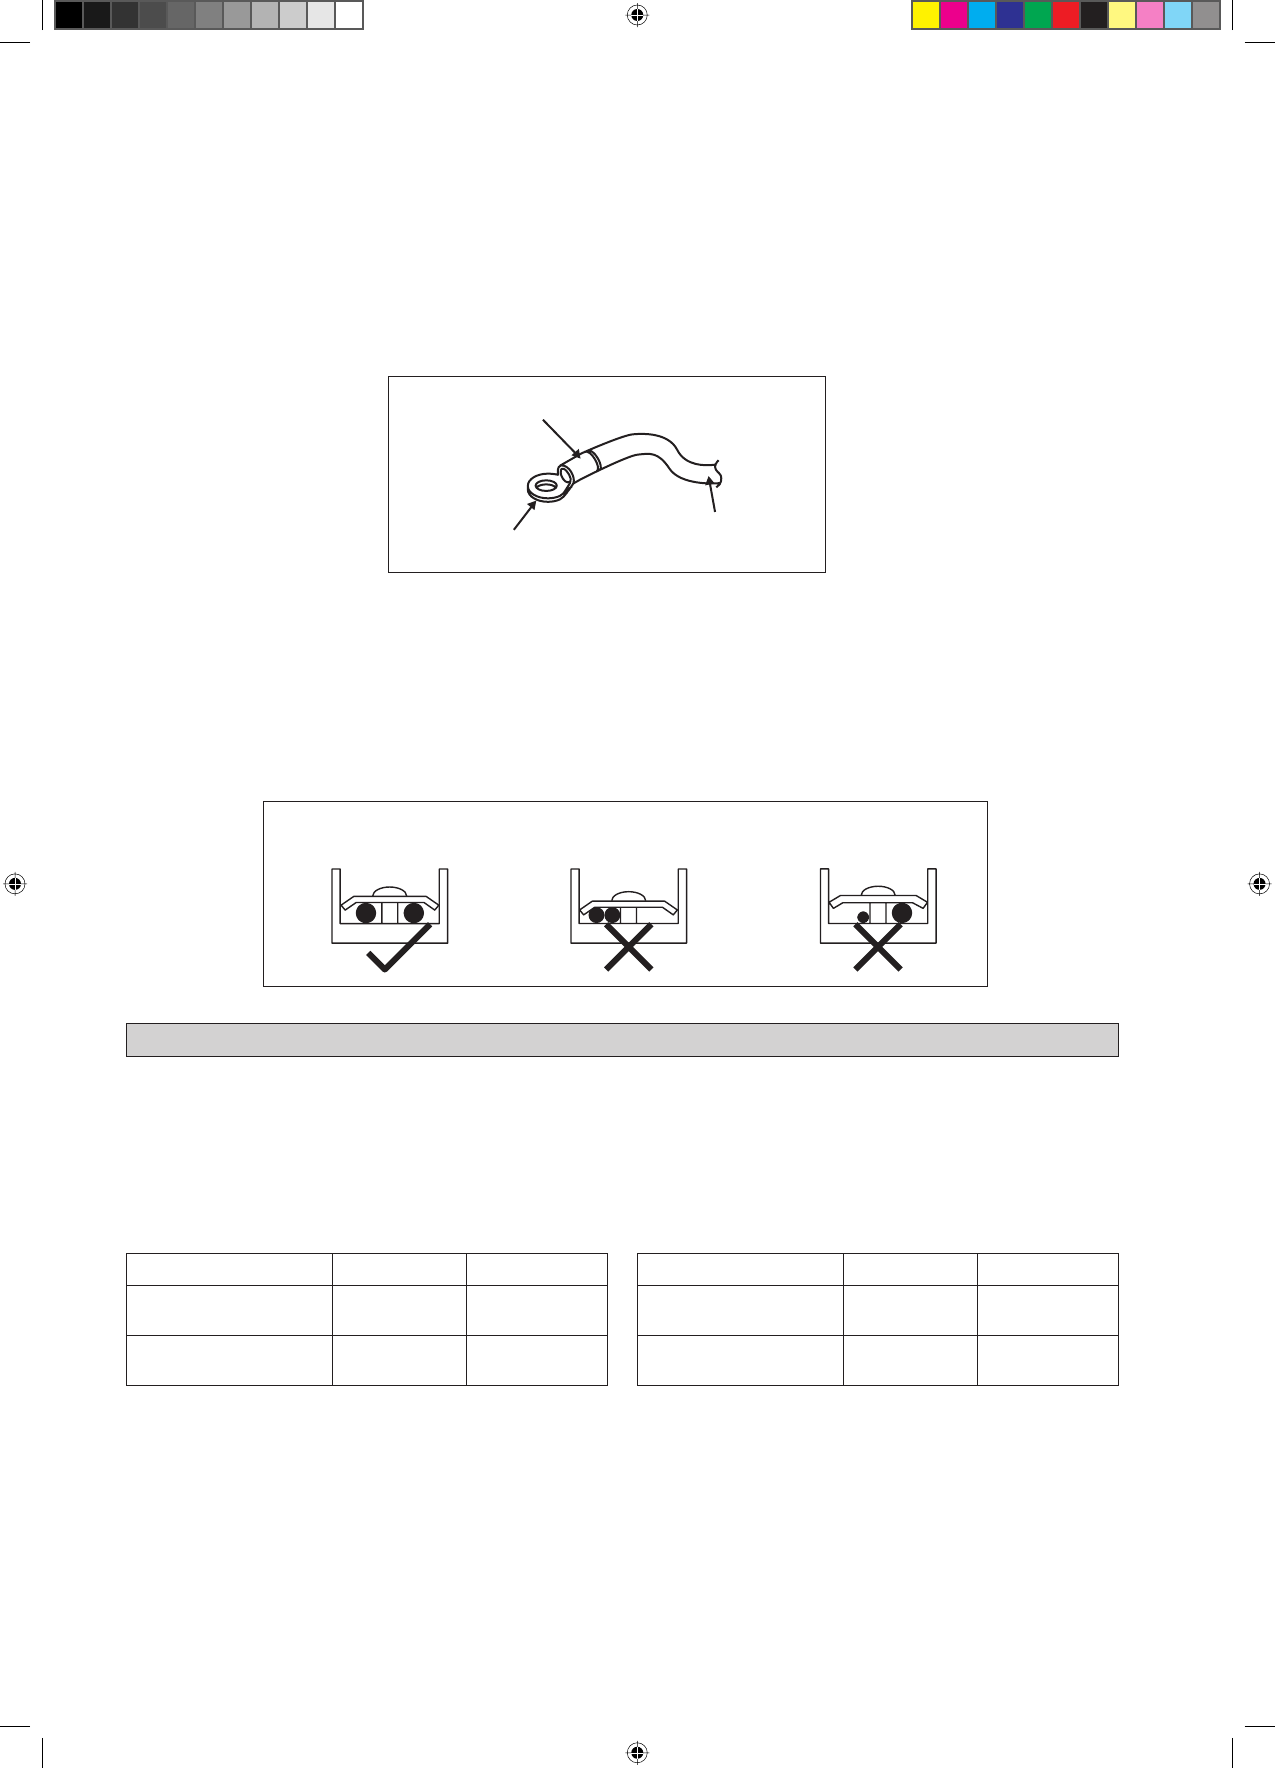
Attach insulation sleeve
Round crimp-style terminal
Electric wire
Connect wires of the
same gauge to both side.
Do not connect wires of the
same gauge to one side.
Do not connect wires
of different gauges.
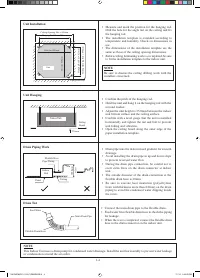
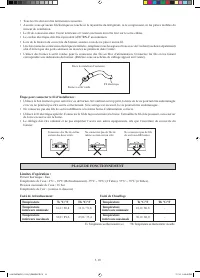
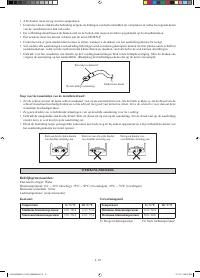
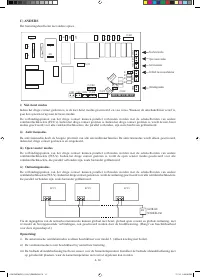
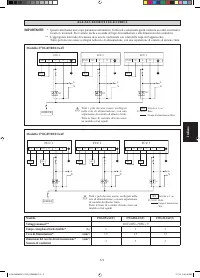
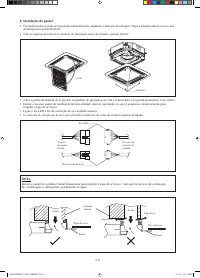
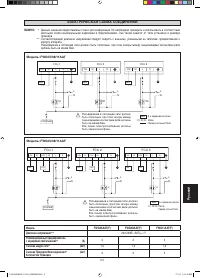
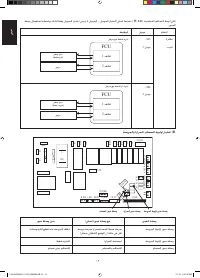
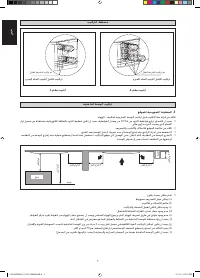
Step to connect the installation wire:
Used the correct screwdriver for tightening the terminal screws. If the block is too small, the mad of the screw might be
damaged and the screw will not be properly tightened. If tightening too hard, screw might be damaged.
Do not connect wire at different gauge to the same proper supply terminal.
Use specified electric wire. Connect the wire securely to the terminal. Lock the wire down without applying excessive
force to the terminal.
Keep wiring in mat order and not to obstruct other equipment such as popping open the terminal box lid.
•
•
•
•
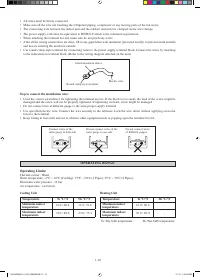
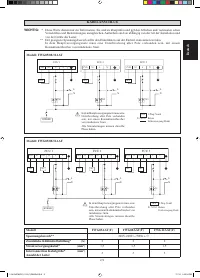
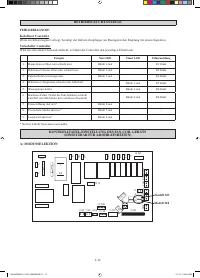
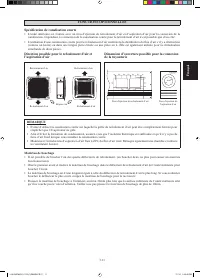
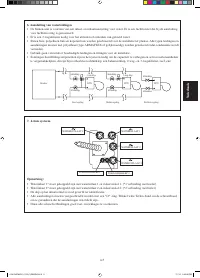
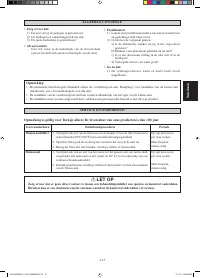
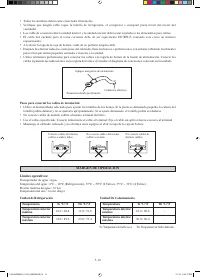
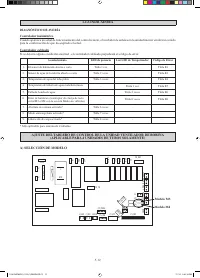
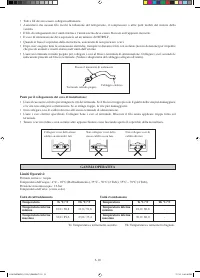
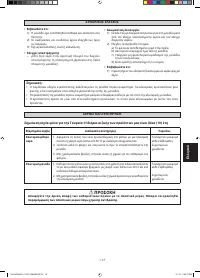
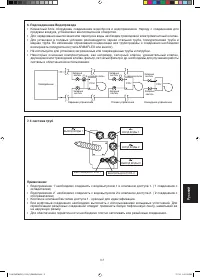
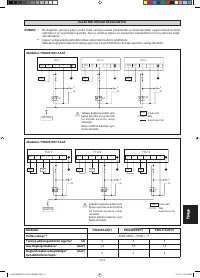
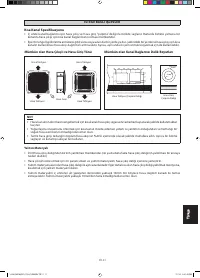
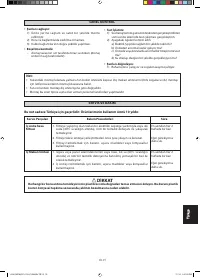
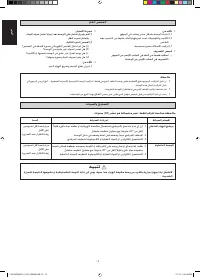
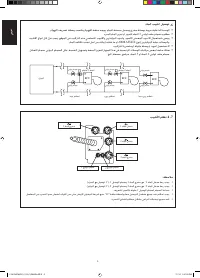
Operating Limits:
Thermal carrier : Water
Water temperature : 4°C ~ 10°C (Cooling), 35°C ~ 50°C (2 Pipes), 35°C ~ 70°C (4 Pipes),
Maximum water pressure : 16 bar
Air temperature : (as below)
Cooling Unit
Heating Unit
Ts: Dry bulb temperature.
Th: Wet bulb temperature.
OPERATING RANGE
Temperature
Ts °C/°F
Th °C/°F
Minimum indoor
temperature
16.0 / 60.8
11.0 / 51.8
Maximum indoor
temperature
32.0 / 89.6
23.0 / 73.4
Temperature
Ts °C/°F
Th °C/°F
Minimum indoor
temperature
16.0 / 60.8
-
Maximum indoor
temperature
30.0 / 86.0
-
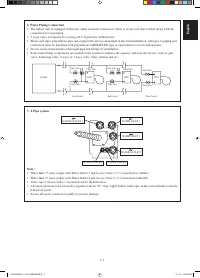
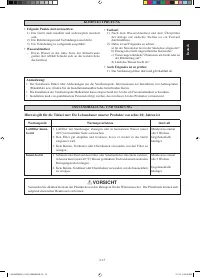
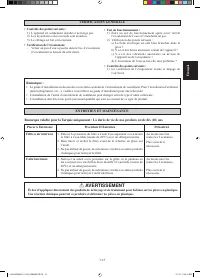
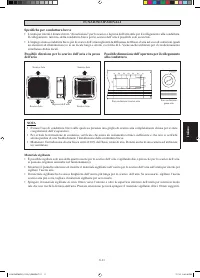
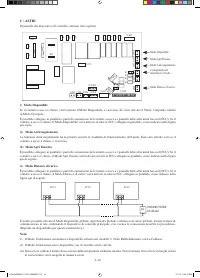
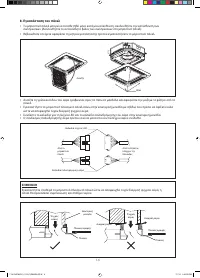
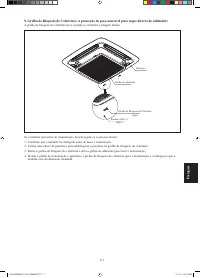
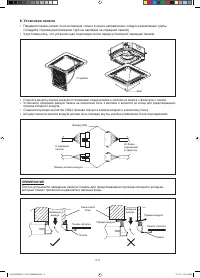
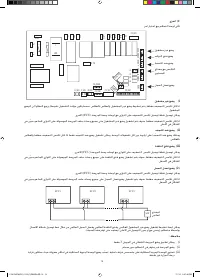
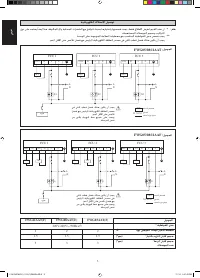
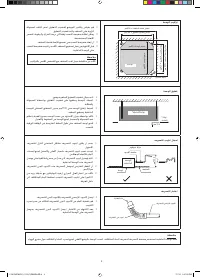
All wires must be firmly connected.
Make sure all the wire not touching the refrigerant piping, compressor or any moving parts of the fan motor.
The connecting wire between the indoor unit and the outdoor unit must be clamped on the wire clamps.
The power supply cord must be equivalent to H07RN-F which is the minimum requirement.
When attaching the terminal box lid, make sure do not pinch any wires.
After all the wiring connections are done, fill in any gaps/holes with insulation (procured locally) to prevent small animals
and insects entering the unit from outside.
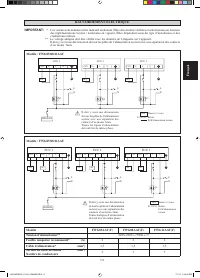
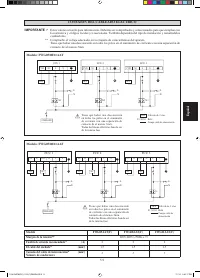
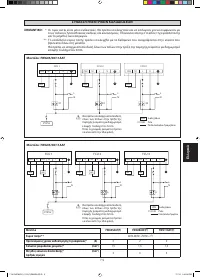
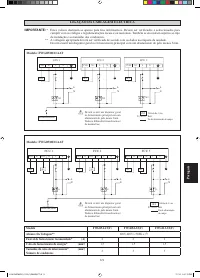
Use round crimp-style terminal for connecting wires to the power supply terminal block. Connect the wires by matching
to the indication on terminal block. (Refer to the wiring diagram attached on the unit).
•
•
•
•
•
•
•
1 IM-CKEW(DC)-1013(1)DAIKIN-EN.i10 10
1 IM-CKEW(DC)-1013(1)DAIKIN-EN.i10 10
7/1/14 2:39:06 PM
7/1/14 2:39:06 PM
Содержание
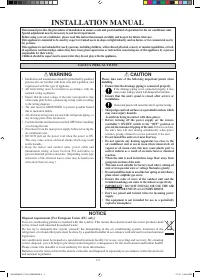
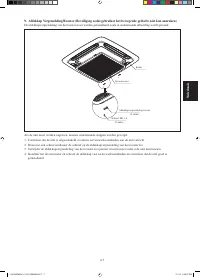
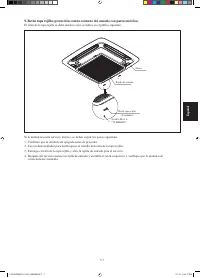
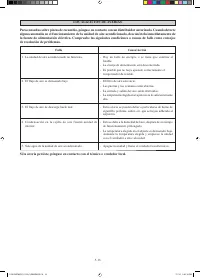
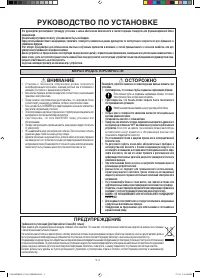
- 132 МЕРЫ ПРЕДОСТОРОЖНОСТИ; ВHИMAHИE; Удостоверьтесь, что сливные трубы соединены надлежащим образом.; Если сливные трубы не соединены надлежащим образом, это может; Остерегайтесь контакта с этими местами.; Если этого не сделать, при включении питания вентиляторы; РУКОВОДСТВО ПО УСТАНОВКЕ; ПPEДУПPEЖДEHИE
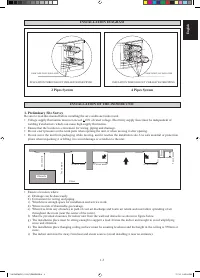
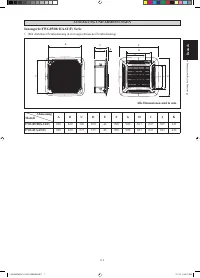
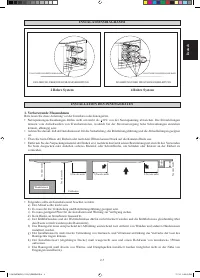
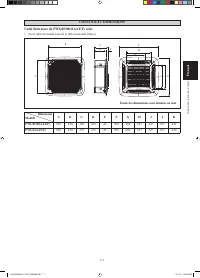
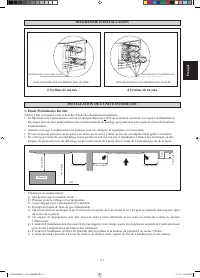
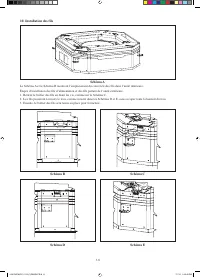
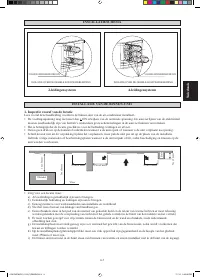
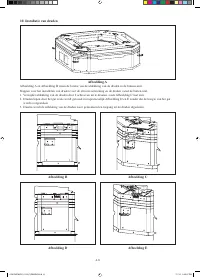
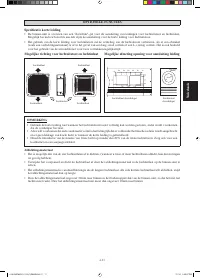
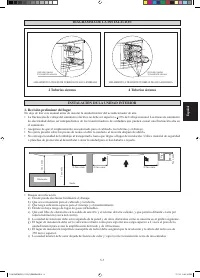
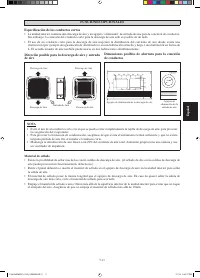
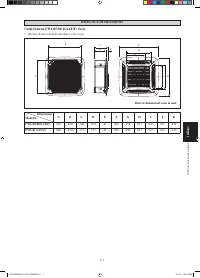
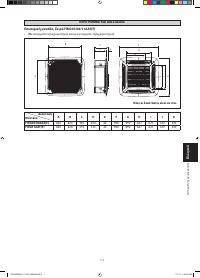
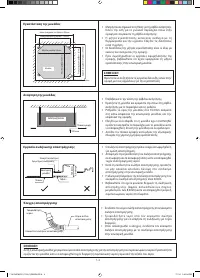
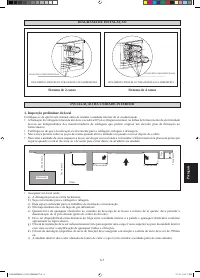
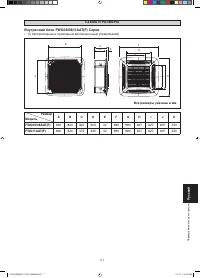
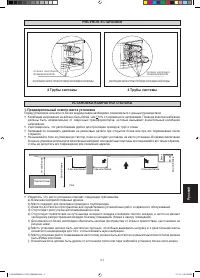
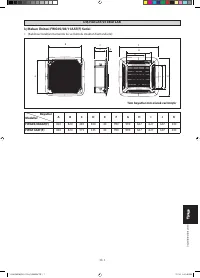
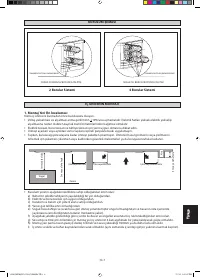
- 133 РИСУНОК УСТАНОВКИ; Убедитесь, что место установки отвечает следующим требованиям:; Предварительный осмотр места установки; Трубы системы
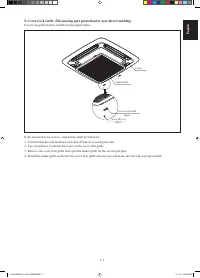
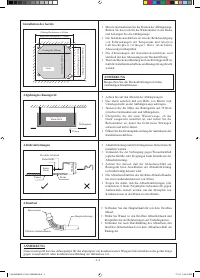
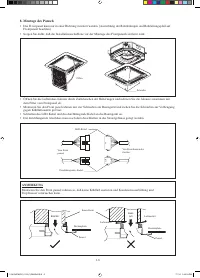
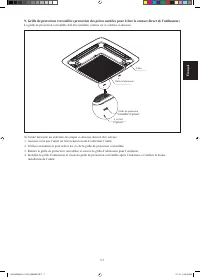
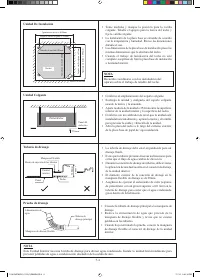
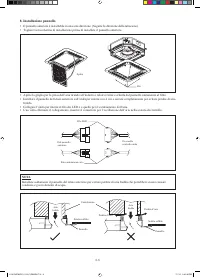
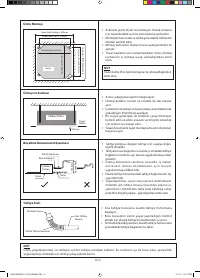
- 134 Обязательно обсудите сверлильные потолочные
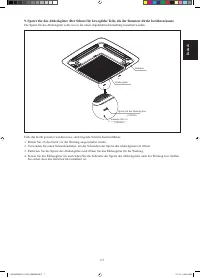
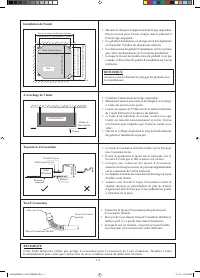
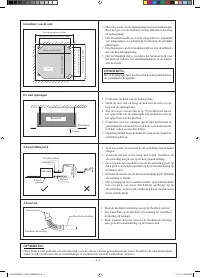
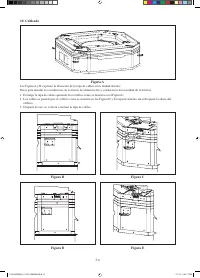
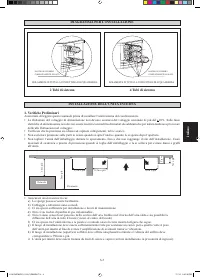
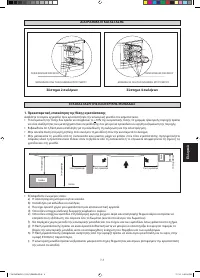
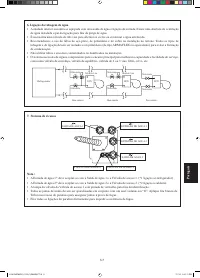
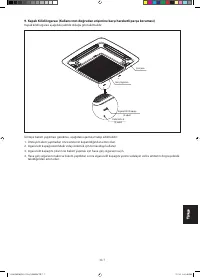
- 135 Подсоединение Водопровода; Водоприемник 1
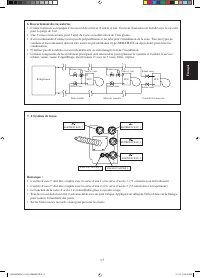
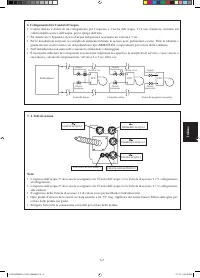
- 136 ПРИМЕЧАНИЕ
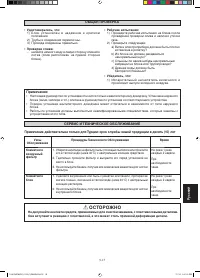
- 139 должны быть не менее 3мм.
- 140 Эксплуатационные ограничения:
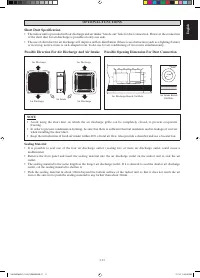
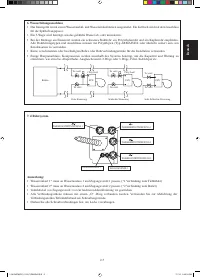
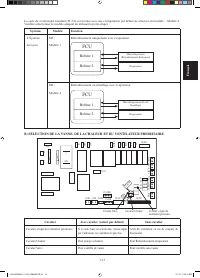
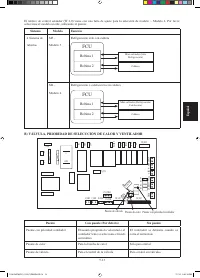
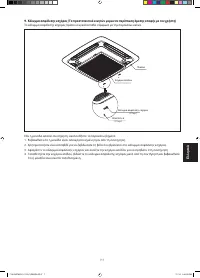
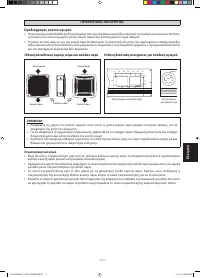
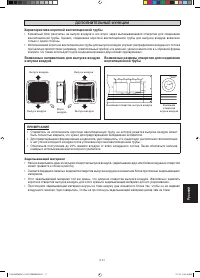
- 141 Характеристика короткой вентиляционной трубы
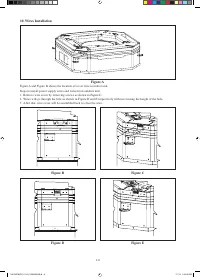
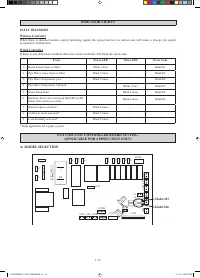
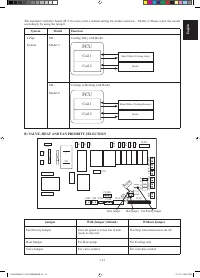
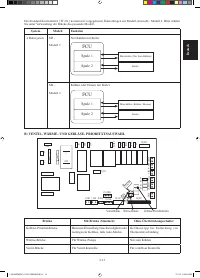
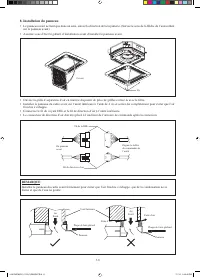
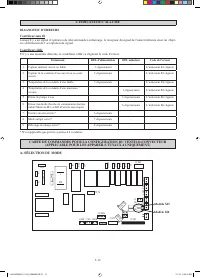
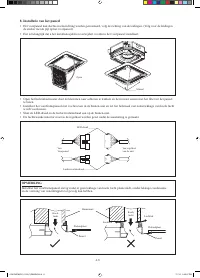
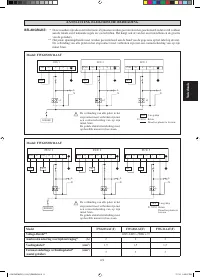
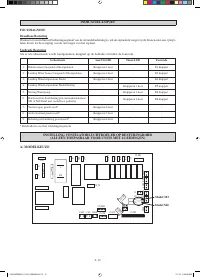
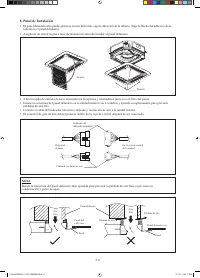
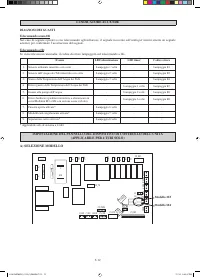
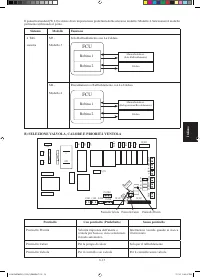
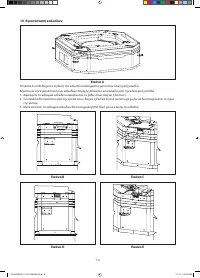
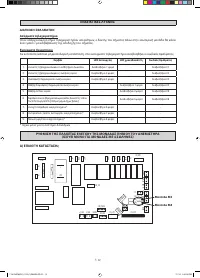
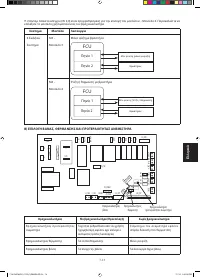
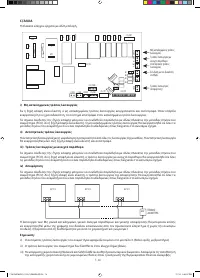
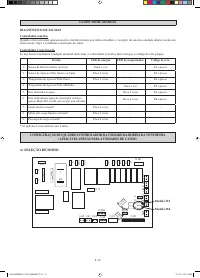
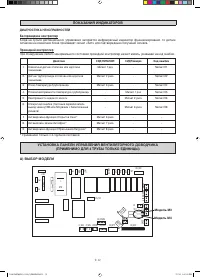
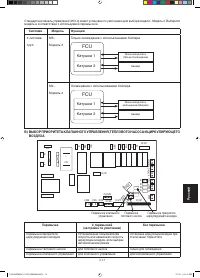
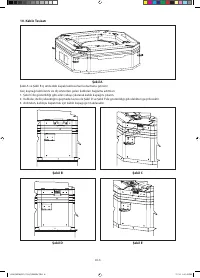
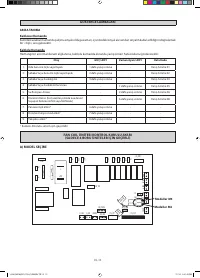
- 142 ПОКАЗАНИЯ ИНДИКАТОРОВ; Действие; УСТАНОВКА ПАНЕЛИ УПРАВЛЕНИЯ ВЕНТИЛЯТОРНОГО ДОВОДЧИКА; Модель M3
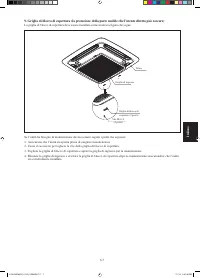
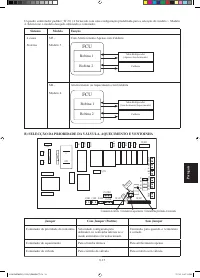
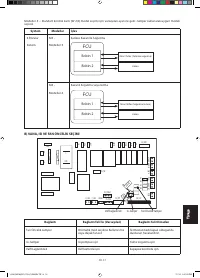
- 143 ВОЗДУХА; Катушка 1; Катушка 2
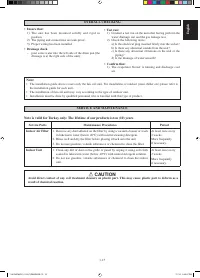
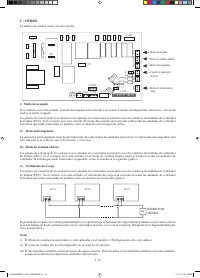
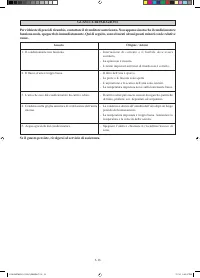
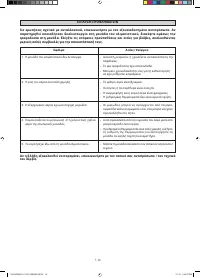
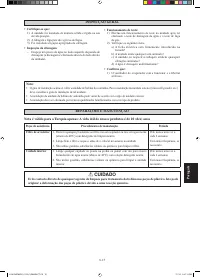
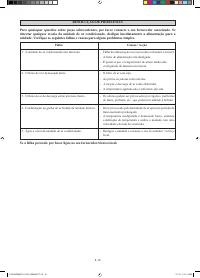
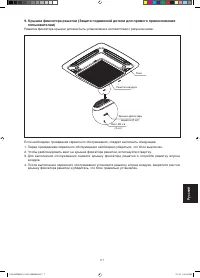
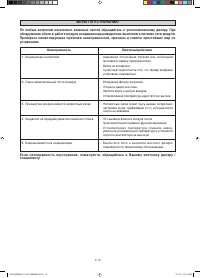
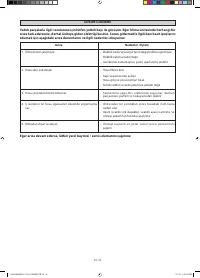
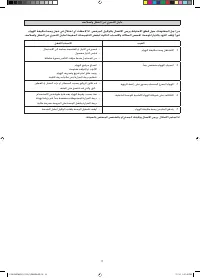
- 145 ОCTOPOЖHO; Узлы
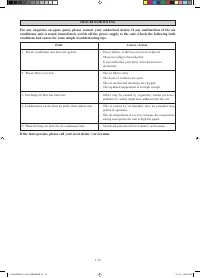
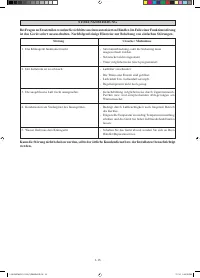
- 146 МЕРЫ ПО УСТРАНЕНИЮ; Неисправность


