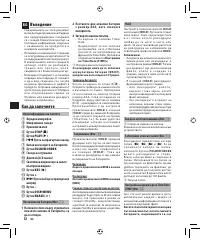
Диктофоны Olympus VN-6500 - инструкция пользователя по применению, эксплуатации и установке на русском языке. Мы надеемся, она поможет вам решить возникшие у вас вопросы при эксплуатации техники.
Если остались вопросы, задайте их в комментариях после инструкции.
"Загружаем инструкцию", означает, что нужно подождать пока файл загрузится и можно будет его читать онлайн. Некоторые инструкции очень большие и время их появления зависит от вашей скорости интернета.


9
EN
• If you press the
STOP
(
4
) but ton
d u r i n g a m e n u s e t u p o p e r a t i o n ,
the recorder will stop and apply the
items that were set to that point.
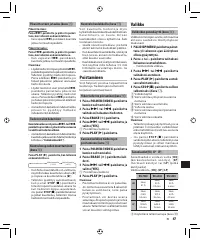
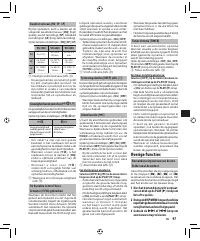
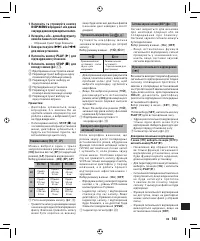
Recording Modes [HQ SP LP]
The recording mode can be chosen
f r o m [
H Q
] ( h i g h q u a l i t y s o u n d
recording), [
SP
] (standard recording)
and [
LP
] (long-term recording).
In Menu mode selection...[
HQ
], [
SP
], [
LP
]
VN-7500
VN-6500
VN-5500
HQ
Approx.
81 h.
Approx.
40 h.
30 min.
Approx.
20 h.
5 min.
SP
Approx.
215 h.
50 min.
Approx.
107 h.
55 min.
Approx.
53 h.
40 min.
LP
Approx.
1208 h.
30 min.
Approx.
604 h.
15 min.
Approx.
300 h.
30 min.
1
Current recording mode (Fig.
i
)
• The recording time shown above
i s f o r o n e c o n t i n u o u s f i l e . T h e
av a i l a b l e r e co r d i n g ti m e m ay b e
shorter than specifi ed if several fi les
are re corde d. (Use the remaining
t i m e a n d r e c o r d e d t i m e o n l y a s
references.)
Microphone Sensitivity [
h
]
Microphone sensitivity is adjustable to
meet your recording needs.
In Menu mode selection...[
g
], [
i
]
g
i
High-sensitivity
mode that records
sounds in all
directions
Low-sensitivity
mode suited for
dictation
• To ensure successful recording, make
a test recording to select appropriate
m i c r o p h o n e s e n s i t i v i t y b e f o r e
recording.
• If you select [
g
], we recommend
setting the recording mode to [
HQ
]
to best take advantage of the higher
sensitivity.
• I f y o u s e l e c t [
g
] , b a c k g r o u n d
noise may be high depending on the
recording conditions.
1
Current microphone sensitivity
(Fig.
o
)
Using the Variable Control
Voice Actuator [VCVA]
W h e n t h e m i c r o p h o n e s e ns e s t h at
sound has reached a preset volume,
t h e b u i l t- i n Va r i a b l e Co nt r o l Vo i ce
A c t u a t o r ( V C VA ) s t a r t s r e c o r d i n g
automatically, and stops it when the
volume drops.
P a r t i c u l a r l y h e l p f u l f o r e x t e n d e d
r e c o r d i n g , t h e V C V A n o t o n l y
c o n s e r v e s m e m o r y b y t u r n i n g o f f
recording during silent periods, but
also makes playback more ef f icient
and convenient.
In Menu mode selection...[
On
], [
OFF
]
• During recording, press the
+
and
–
buttons to adjust the VCVA level
in 15 levels.
• The record/play indicator light is lit
during recording. When the recorder
is in Standby mode, the Record/Play
indicator light fl ashes and [
VC VA
]
fl ashes on the display.
1
VCVA indicator (Fig.
;
)
System Sounds [BEEP] (Fig.
a
)
Informs a button operation or a wrong
operation of the recorder by sound.
System sounds may be turned of f.
In Menu mode selection...[
On
], [
OFF
]
• If the alarm playback function has
been set, the alarm will sound at the
scheduled time even if the system
sounds are disabled.
Alarm Playback Function [
k
]
Yo u c a n u s e t h e a l a r m p l a y b a c k
f u n c t i o n t o s o u n d t h e a l a r m t o n e
for 5 minutes at the scheduled time.
Within this 5 minutes, pressing any
but ton other than the
HOLD
switch
s t ar t s the re corder to p lay b ack the
preselected file.
I n M e n u m o d e s e l e c t i o n . . . [
S E T
] , [
O n
] ,
[
OFF
]
Af ter selecting [
SET
], press the
PLAY
(
`
) button to set the time.
• With the alarm playback function, only
one fi le can be played back. Select a
fi le for the function before setting the
time.
1
Alarm indicator (Fig.
s
)
To cancel an alarm playback:
For [
k
] in the menu mode, select [
OFF
] and
press the
PLAY
(
`
) button.
• Regardless of the selec ted folder,
o n c e t h e a l a r m p l a y b a c k i s s e t ,
i t o p e r a te s e ve r y d ay u n l e s s t h e
setting is canceled.
• To view the current setting, select
[
On
], and press the
PLAY
(
`
) button.
• The alarm tone stops automatically
i f n o b u t t o n i s p r e s s e d w i t h i n 5
minutes af ter the alarm starts. The
fi le is not played back in this case.
• If the recorder has no recorded fi le
i n t h e s e l e c te d f o l d e r, t h e a l a r m
playback function is not available.
• Alarm p lay back o ccur s ever y day
unless it is set to [
OFF
].
Timer Recording [TIMER]
Yo u c a n s c h e d u l e f o r a u t o m a t i c
recording, specif ying the star t time
and end time of recording. When the
timer-controlled recording completes,
the setting is released.
In Menu mode selection...[
SET
], [
On
], [
OFF
]
Af ter selecting [
SET
], press the
PLAY
(
`
) button to set the time.
1
Timer indicator (Fig.
d
)
To cancel the timer setting:
For the timer in the menu mode, select [
OFF
],
and press the
PLAY
(
`
) button.
• To view the current setting, select
[
O n
] , a n d p r e s s t h e
P L AY
(
`
)
button.
• W i t h t h i s f u n c t i o n , y o u c a n s e t
only the star t and the end time of
recording. The current set tings of
t h e r e co r d i n g m o d e, m i c r o p h o n e
s e n s i t i v i t y, V C VA a n d f o l d e r a r e
applied for the settings before you
set timer-controlled recording.
• The setting exceeding the remaining
recording time is not allowed.
• You can record at any time even if it
is not within the specifi ed recording
dur ati o n . H oweve r, i f that makes
t h e r e m a i n i n g r e c o r d i n g t i m e
insuffi
cient for the timer-controlled
re co rding, the re co rding will not
complete.
• I f a ny o p e r a t i o n i s o n g o i n g , t h e
t i m e r - c o n t r o l l e d r e c o r d i n g i s
overridden.
Other Functions
Moving File between Folders
You can move files recorded in folders
[
F
], [
G
], [
H
] and [
I
] to other folders.
The moved file is added to the end of
the destination folder.

