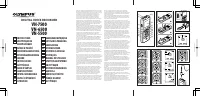
Диктофоны Olympus VN-6500 - инструкция пользователя по применению, эксплуатации и установке на русском языке. Мы надеемся, она поможет вам решить возникшие у вас вопросы при эксплуатации техники.
Если остались вопросы, задайте их в комментариях после инструкции.
"Загружаем инструкцию", означает, что нужно подождать пока файл загрузится и можно будет его читать онлайн. Некоторые инструкции очень большие и время их появления зависит от вашей скорости интернета.


8
EN
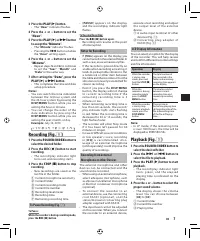
Canceling Playback (Fig.
p
)
To Stop:
Press the
STOP
(
4
) button.
• The recorder stops in the middle of
the fi le being played.
To Resume Playback:
Press the
PLAY
(
`
) button again.
• Playback will resume at the point of
interruption.
Forwarding and Rewinding (Fig.
q
)
Fast For ward:
While the recorder is during playback mode,
press and hold the
9
button.
• When you release the
9
button, the
recorder will resume normal playback.
Rewind:
While the recorder is during playback mode,
press and hold the
0
button.
• When you release the
0
button,
t h e r e c o r d e r w i l l r e s u m e n o r m a l
playback.
Notes:
• T h e e n d o f t h e f i l e i s l o c a te d by
p r e s s i n g a n d h o l d i n g t h e
9
button during fast forwarding. The
recorder will pause at the end of the
fi le. If you do not release the
9
button, the recorder will continue
to fast forward.
• The beginning of the fi le is located
by pressing and holding the
0
b u t t o n d u r i n g r e w i n d i n g . T h e
recorder will pause at the beginning
o f t h e f i l e . I f y o u d o n o t r e l e a s e
the
0
but ton, the recorder will
continue to rewinding.
• W h e n t h e i n d e x m a r k i s s h o w n
in the middle of a fi le, it will stop
temporarily in the position of the
index mark.
Locating the Beginning of the File
While the recorder is during playback mode
(playbac k or play bac k in slow/fast mode),
press the
9
or
0
button for wards or
rewinds to the beginning of the next file or
the file being played respec tively.
• I f a n i n d e x m a r k i s e n co u n t e r e d
m i d w ay, p l ay b a ck b e g i ns at th at
p o i n t ( S e e “
I n d e x M a r k s
” f o r
details).
Changing Playback Speed (Fig.
w
)
While the recorder is during playback mode,
press the
PLAY
(
`
) button.
Normal speed
Slow playback
(- 25 )
Fast playback
( 50 )
• When the slow playback mo de is
selec ted, the [
J
] appears and, for
the fast playback mode, [
K
] appears
on the display while the recorder is
playback.
• The recorder stops playback when
you press the
STOP
(
4
) button while
playback in the slow/fast mode, or
when it reaches to the end of the
fi le. If you once press the
STOP
(
4
)
button and start playback again, the
recorder will playback fi les in normal
speed as well.
Listening with Earphone (Fig.
e
)
You can listen to files by connecting
earphones to the earphone jack. If an
earphone is connec ted, the speaker
d o e s n’ t e m i t s o u n d . S o u n d w i l l b e
played back monaurally.
• To avoid irritation to the ear, insert
the earphone af ter you turn down
the volume level.
• When you listen with the earphone
during playback , do not raise the
v o l u m e t o o m u c h . I t m a y c a u s e
h e a r i n g i m p a i r m e n t a n d l o s s i n
hearing ability.
• Earphones are not supplied. You can
use any standard 3.5mm monaural
earphone or headphone.
Erase
You can easily erase unnecessar y files.
Sequential file numbers are reassigned
automatically.
Erasing One File at a Time (Fig.
r
)
1
Press the
FOLDER
/
INDEX
button to
select folder.
2.
Press the
9
or
0
button to
select the file to be erased.
3
Press the
ERASE
(
s
) button.
4
Press the
9
or
0
button to
select [
YES
].
1
File to be erased
5
Press the
PLAY
(
`
) button.
Erase All Files from a Folder (Fig.
t
)
1
Press the
FOLDER
/
INDEX
button to
select the folder to be erased.
2
Press the
ERASE
(
s
) button twice.
3
Press the
9
or
0
button to
select [
YES
].
1
Folder to be erased
4
Press the
PLAY
(
`
) button.
Notes:
• An erased fi le cannot be restored.
• If operation is not executed for 8
seconds during the set ting, it will
return to the stop status.
• Co m p l e t i o n o f e r a s i n g m ay t a ke
several seconds. Do not attempt to
remove, replace batter y or attempt
any othe r f unc tio ns o n the voice
recorder during this period because
data may be corrupted.
Menu
Basic Operation of the Menu Mode
(Fig.
y
)
Us i n g t h e m e n u f u n c t i o n , yo u c a n
change various settings according to
your preference.
1
While the recorder is during stop mode,
press and hold the
DISP
/
MENU
but-
ton for 1 second or longer.
2
Press the
+
or
–
button to select what
you would like to set up.
• The selected menu item flashes.
3
Press the
9
or
0
button to
change the setting.
4
Press the
PLAY
(
`
) button to con-
firm the setting.
5
Press the
STOP
(
4
) button to close
the menu. (Fig.
u
)
1
Menu setting screen
2
Move the selection one position
up/increase the number
3
Move the selection one position
to the lef t
4
Confirm the setting
5
Move the selection one position
down/decrease the number
6
Move the selection one position
to the right
Notes:
• The recorder will stop if you leave
it idle for 3 minutes during a menu
setup operation, when a selec ted
item is not applied.

