
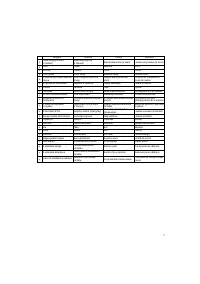
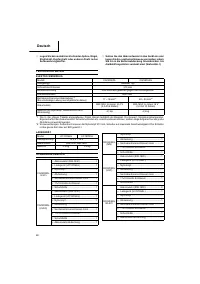
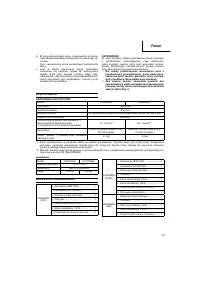
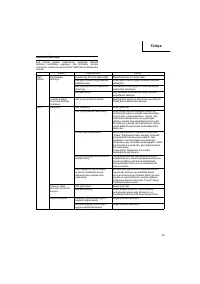
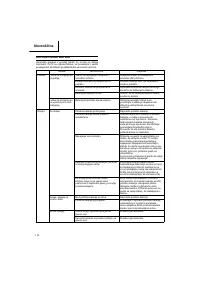
Триммеры Hitachi CG18DSDL-R4 - инструкция пользователя по применению, эксплуатации и установке на русском языке. Мы надеемся, она поможет вам решить возникшие у вас вопросы при эксплуатации техники.
Если остались вопросы, задайте их в комментариях после инструкции.
"Загружаем инструкцию", означает, что нужно подождать пока файл загрузится и можно будет его читать онлайн. Некоторые инструкции очень большие и время их появления зависит от вашей скорости интернета.


20
English
○
The nylon head must be securely mounted to the
threaded fastener of the motor case.
○
For outstanding performance and reliability, always
use Hitachi nylon cutting line. Never use wire or other
materials that could become a dangerous projectile.
○
If the nylon head does not feed cutting line properly,
check that the nylon line and all components are
properly installed. Contact your Hitachi dealer if you
need assistance.
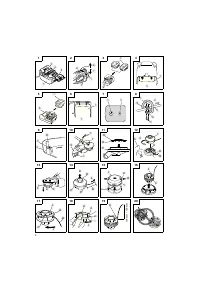
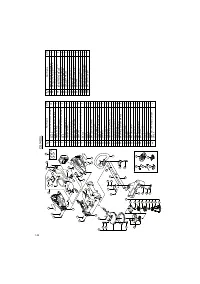
2.
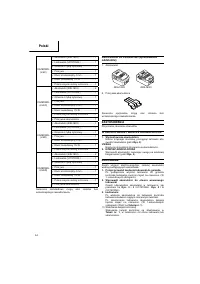
Installation
(Fig.
11
and
12)
(1) Insert the
fl
ange assy into the motor case. At this time,
the wing of the
fl
ange assy should face the motor case
side. Next, align the holes of the
fl
ange assy and the
motor case, insert the hex. bar wrench 4 mm, and then
turn to tighten the
fl
ange assy.
(2) Screw the nylon head directly to the threaded fastener
of the motor case.
The mounting nut of nylon head is left-hand-threaded.
Turn clockwise to loosen/ counterclockwise to tighten.
CAUTION
Install the nylon head properly and securely as
instructed in the handling instructions.
If not attached properly or securely, it may come o
ff
and
cause injur y.
3.
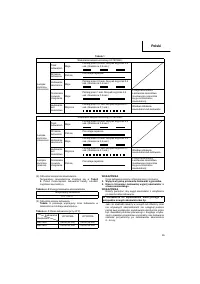
Adjustment
of
line
length
Rotate and tap the nylon head on the ground. Nylon line
is drawn out abt, 30 mm by one tapping. (
Fig.
13
)
Also, you can extend nylon line with hands. This time
the motor must be completely stopped.
Con
fi
rm the line extends in 30 mm increments by
"tapping" and "releasing" the bottom button while
pulling the line ends of the nylon head. (
Fig.
14
)
○
Appropriate Length of Nylon Line
The appropriate length of the line when the tool is in
use is 90 – 110 mm. Extend the line to the appropriate
length.
4.
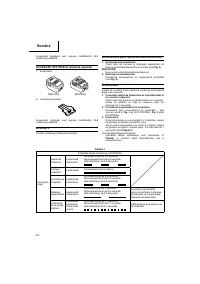
Nylon
line
replacement
(1) Prepare 1.4 mm × 6 m of genuine nylon line (Code
No.333923).
(2) Press the opposing tabs, and then remove the cover
from the case. (
Fig.
15
)
(3) Remove the reel from the case. (
Fig.
16
)
○
If there is nylon line remaining, hook the line in the
groves, and then remove the reel.
○
If the nylon line does not extend when there is enough
nylon line remaining, or when replacing the nylon
line (Code No.333923), wind the nylon line using the
following procedure.
(4) As shown in
Fig.
17
and
18
, draw the nylon line through
the hole of the reel and hook it in the groove of the reel,
and then wind the line in the direction of the arrow so
that the nylon line does not cross.
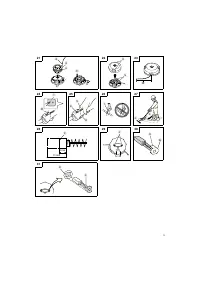
(5) Leave about 100 mm – 150 mm nylon cord unwound,
hook and secure the line in the stopper. (
Fig.
19
)
NOTE
Do not cross the nylon line when securing the line in the
stopper. (
Fig.
20
)
(6) Align the position of the stopper and eyelet line guide,
and then insert the button through the case.
Release the line from the stopper while holding the reel
lightly, and then string the line through the eyelet line
guide. (
Fig.
21
)
(7) Press and snap the tabs of the case in the locking holes
of the cover. (
Fig.
22
)
WARNING
Check to make sure the tabs are
fi
rmly snapped into the
locking holes.
Operating the tool while the parts are not
fi
rmly snapped
together may results in accidents or injur y from
fl
ying
part.
(8) Pull the line taught so there is no slack, and then cut
the line to an extended length of 90 mm – 110 mm with
scissors. (
Fig.
23
)
OPERATION
Trimming
grass
WARNING
○
Do not operate the tool at night or under bad weather
conditions when visibility is poor.
○
Do not operate the tool when it is raining or right after it
has been raining.
○
Wear proper footwear to prevent slipping that could
cause you to lose your balance and fall.
○
Do not use the tool on steep slopes.
When trimming grass on slopes that are not so steep,
trim by moving towards the ridge.
○
Place the right hand on the handle and the left hand on
the loop handle and hold it
fi
rmly.
○
Take care not to move the nylon head too close to your
feet.
○
Do not raise the nylon head above your knee during
cutting.
○
Do not use the tool where the nylon head may come into
contact with stones, tree and other obstacles.
○
A nylon head can injure while it continues to spin after
the motor is stopped. When the unit is turned o
ff
, make
sure the nylon head has stopped before the unit is set
down.
○
Do not use the tool within 15 m of another person. When
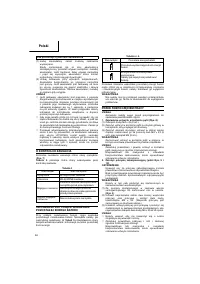
you work with someone else, maintain a distance of
more than 15 m.
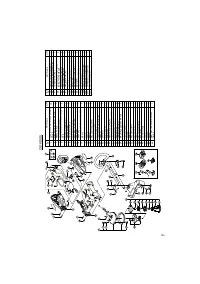
1.
Insert
the
battery
while
observing
its
polarities.
2.
Turn
on
the
tool.
(Fig.
24)
○
Press the power button on the housing, the power goes
on and the power lamp on the handle lights red.
○
Pressing the power button a second time turns the
power o
ff
and the red lamp on the handle goes o
ff
.
[Auto
power
o
ff
]
When the power is turned on but the lever is not used for
one minute, the tool is automatically turned o
ff
. To turn
the tool on again, press the power button a second time.
WARNING
Never leave the tool with the power on. This could result
in an accident.
3.
Trimming
grass
○
Grip the handle from above, press the lock lever and
pull the lever to start nylon head rotation. (
Fig.
25
)
○
Release the lever when you
fi
nish trimming and stop the
motor.
○
Place your thumb on the loop handle and grip the
handle with your other
fi
ngers. (
Fig.
26
)
○
Take a posture that makes it easy to move.
[Grass
trimming
techniques]
Do not swing the pipe, but use the hips to move the
nylon head horizontally from right to left in an arc while
going forward and use the left side of the nylon head for
cutting grass. (
Fig.
27
)
000Book̲CG14DSDL̲EE.indb 20
000Book̲CG14DSDL̲EE.indb 20
2011/06/17 14:23:03
2011/06/17 14:23:03


