Пилы торцовочные Ryobi RMS18190-0 - инструкция пользователя по применению, эксплуатации и установке на русском языке. Мы надеемся, она поможет вам решить возникшие у вас вопросы при эксплуатации техники.
Если остались вопросы, задайте их в комментариях после инструкции.
"Загружаем инструкцию", означает, что нужно подождать пока файл загрузится и можно будет его читать онлайн. Некоторые инструкции очень большие и время их появления зависит от вашей скорости интернета.


respiratory system. Dust from wood such as oak, beech,
MDF and others are carcinogenic. Material containing
asbestos should only ever be worked or processed by
TXDOL¿HGVSHFLDOLVWRSHUDWRUV
WARNING!
Injuries may be caused, or aggravated, by
prolonged use of a tool. When using any tool for prolonged
periods, ensure you take regular breaks.
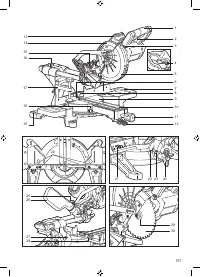
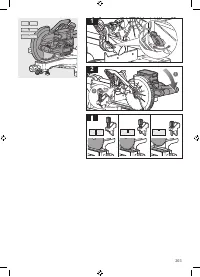
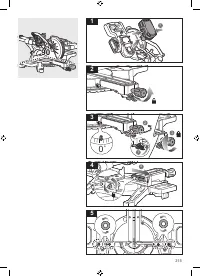
KNOW YOUR PRODUCT
See page 197.
1. Handle, insulated gripping surface
Power switch
3. Spindle lock button
4. Switch lock-off lever
5. Lower guard
6. Main fence
7. Carrying handle
8. Sliding fence
9. Turntable
10. Table insert
11. Mitre lock knob
Mitre detent release lever
13. Battery pack
14. Upper guard
15. Cutting depth adjustment screw
16. Linear rod stop knob
17. Clamp
18. Mitre angle pointer
19. Mounting hole
Screws for locking main fence
+H[NH\
Bevel angle pointer
Screws for adjusting 45º bevel angle limit stop
Bevel angle lock knob
Saw head lock pin
Dust bag
Screws for adjusting 0º bevel angle limit stop
Screw for locking the sliding fence
Outer flange
30. Saw blade
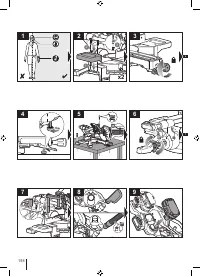
OPERATION
The product features a moving saw blade that can be set
at various angles by the operator when cutting a workpiece
ZKLFK LV VHFXUHO\ ¿[HG WR WKH EDVH RI WKH SURGXFW ,W PXVW
be operated by only one person to prevent unintentional
contact with the moving saw blade.
The principles for safe operation of the product are as
follows:
Ŷ
Maintain saw, blades and work area in good condition.
Ŷ
Secure the mitre saw base to a sturdy work bench. The
product may move and tip if it is not adequately secured.
Ŷ
Set up and lock the cutting angles and depth before
making the cut.
Ŷ
Secure the workpiece to the mitre saw base. Use the
clamp provided and, where necessary, use additional
clamps or holding mechanisms to prevent unintentional
movement of the workpiece while cutting.
Ɣ
Check that the operation of the blade guards are not
restricted by the position of the workpiece.
Ɣ
Ensure that the fence and other parts of the product
will not be cut as the blade lowers to the cutting
position.
Ŷ
Start the motor and allow the blade to reach full speed
before slowly lowering it to cut the workpiece.
Ŷ
Allow the blade assembly to rise to its upper position
where the blade guards are fully closed. Switch off the
motor and allow the blade to come to a complete stop
before removing the workpiece or off-cuts, or before
reaching into the area of the blade.
%HIRUH¿UVWXVHHQVXUHWKDWWKHDQJOHRIWKHEHYHORUPLWUH
set on the product matches the angle to be produced on
the workpiece. Check this on a discarded piece of wood by
using a carpenter’s set or mitre square.
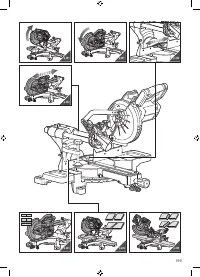
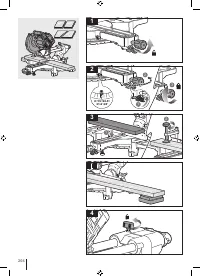
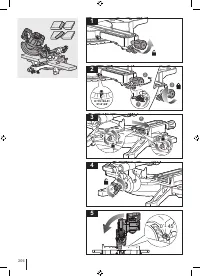
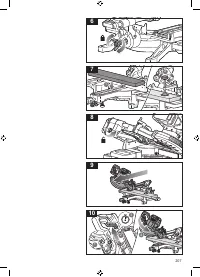
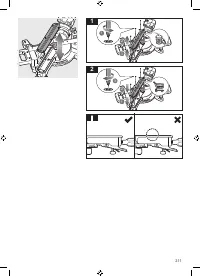
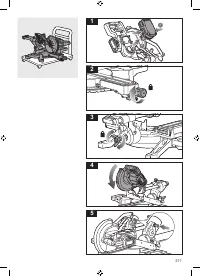
Removing saw blade:
1. Wear gloves when handling saw blade.
Turn off the power and remove the battery pack.
3. Swing back the self-closing guard and hold it.
4. Press spindle lock button and unscrew the blade bolt
ZLWK SURYLGHG KH[ NH\ DW WKH VDPH WLPH 5HPRYH WKH
outer flange.
5. Remove the saw blade.
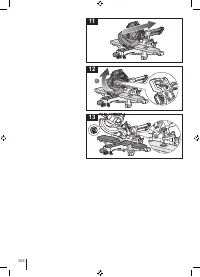
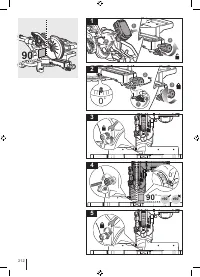
Mounting saw blade:
If necessary, clean all parts to be mounted prior to assembly.
After following the procedure of “Removing Saw Blade”.
1. Wear gloves when handling the saw blade.
Ensure the power is off and the battery pack is removed.
3. Swing back the self-closing guard, and hold it.
4. Place the new saw blade. Ensure the rotation direction
on the blade is consistent with the arrow direction on the
blade guard.
5. Place on the flange and blade bolt.
6. Press spindle lock button until it engages, tighten the
blade bolt.
7. Put the self-closing guard down.
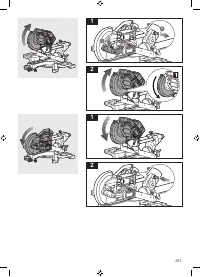
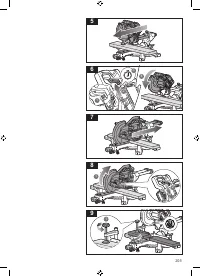
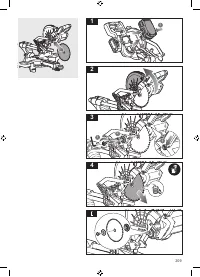
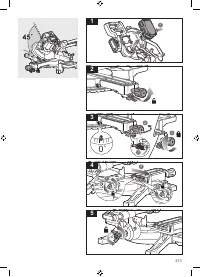
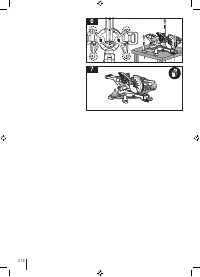
Adjusting mitre angle:
The mitre angle can be set in the range from 45 degree (left
side) to 45 degree (right side).
1. Loosen the mitre lock knob.
Press mitre detent release lever. Turn the saw table to
the desired mitre angle by the mitre lock knob.
3. Tighten the mitre lock knob again.
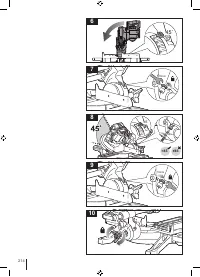
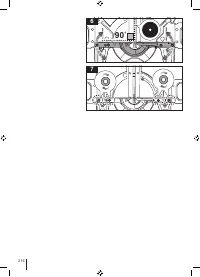
Adjusting bevel angle:
The bevel angle can be set in the range from 0 degree to
45 degrees.
1. Loosen the bevel lock knob.
Tilt the tool arm to desired bevel angle by the handle.
3. Hold the tool arm in this position and retighten the bevel
lock knob.
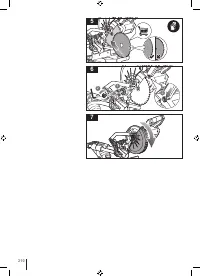
WARNING!
The manufacturer strongly recommends
that the product is always securely mounted to a bench top.
:KHQ WKH EDVH RI WKH SURGXFW LV ¿UPO\ VHFXUHG WR D EHQFK
top by four nuts, bolts and washers as instructed, the
SURGXFW FDQ EH XVHG DW PD[LPXP EHYHO DQG PLWUH VHWWLQJ
without the possibility of it tipping over. If the product is not
secured properly, the product may over balance when large
bevel angles are selected.
MAINTENANCE
Ŷ
Do not modify the product in any way or use accessories
not approved by the manufacturer. Your safety and that
of others may be compromised.
Ŷ
Do not use the product if any switches, guards or
other functions does not work as intended. Return to
an authorised service centre for professional repair or
adjustment.
ENGLISH
EN
FR
DE
ES
IT
NL
PT
DA
SV
FI
NO
RU
PL
CS
HU
RO
LV
LT
ET
HR
SL
SK
BG
UK
TR
EL
7
Original Instructions
Характеристики

Остались вопросы?Не нашли свой ответ в руководстве или возникли другие проблемы? Задайте свой вопрос в форме ниже с подробным описанием вашей ситуации, чтобы другие люди и специалисты смогли дать на него ответ. Если вы знаете как решить проблему другого человека, пожалуйста, подскажите ему :)

