Водонагреватели Gorenje TGR65SB6 - инструкция пользователя по применению, эксплуатации и установке на русском языке. Мы надеемся, она поможет вам решить возникшие у вас вопросы при эксплуатации техники.
Если остались вопросы, задайте их в комментариях после инструкции.
"Загружаем инструкцию", означает, что нужно подождать пока файл загрузится и можно будет его читать онлайн. Некоторые инструкции очень большие и время их появления зависит от вашей скорости интернета.


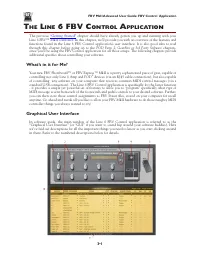


FBV MkII Advanced User Guide: FBV Control Application
3•2
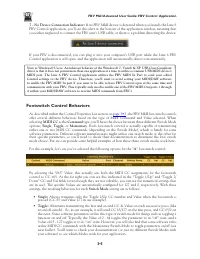
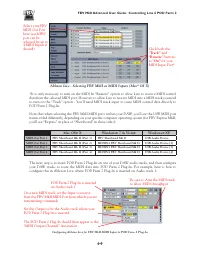
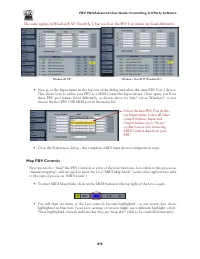
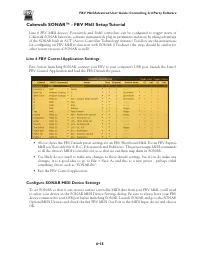
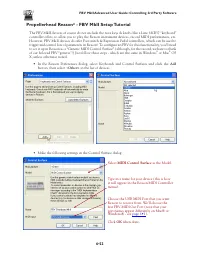
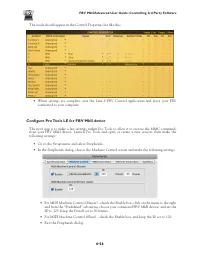
Device Controls
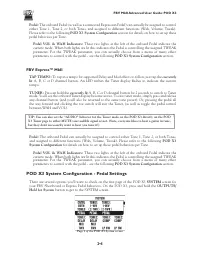
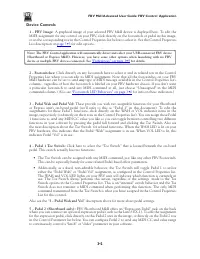
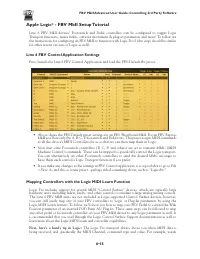
1 - FBV Image:
A graphical image of your selected FBV MkII device is displayed here. To edit the
MIDI assignment for any control on your FBV, click directly on the footswitch or pedal in this image,
or
on the corresponding row in the Control Properties list below to select it. See the Control Properties
List description on
Note: The FBV Control application will automatically detect and select your USB-connected FBV device
(Shortboard or Express MkII). However, you have some other options when launching with no FBV
device or multiple FBV devices connected. See
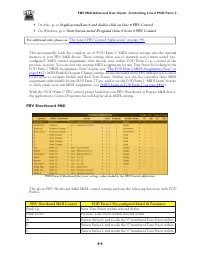
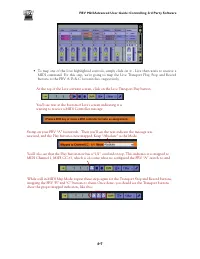
2 - Footswitches:
Click directly on any footswitch here to select it and its related row in the Control
Properties List where you can edit its MIDI assignment. Note that all the footswitches on your FBV
MkII hardware can be set to send
any
type of MIDI message available in the Control Properties list’s
columns - regardless of how the footswitch is labeled on your FBV hardware chassis. If you don’t want
a particular footswitch to send any MIDI command at all, just choose “Unassigned” in the MIDI
command column. (Also see
“Footswitch LED Behaviors” on page 3•6
for info on these indicators.)
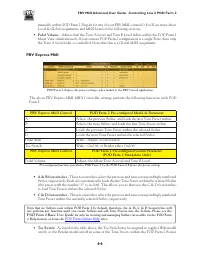
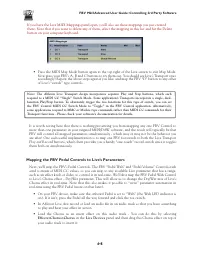
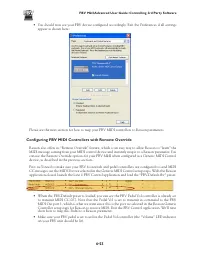
3 - Pedal Wah and Pedal Vol:
These provide you with two assignable functions for your Shortboard
or Express unit’s on-board pedal (we’ll refer to this as “Pedal 1” in this document). To edit the
assignments for these Pedal 1 functions, click directly on the WAH or VOL indicator items in the
image, respectively (or directly on their rows in the Control Properties list). You can assign these Pedal
1 functions to send any MIDI CC value you like so you can toggle between controlling two different
functions in your software by pressing the pedal full forward and clicking the Toe Switch Also see
the next description about the Toe Switch for related functions. When the WAH LED is lit on your
FBV hardware, this indicates that the Pedal “Wah” assignment is in use. When VOL LED is lit, this
indicates Pedal “Vol” is in use.
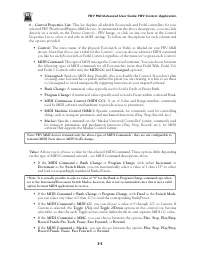
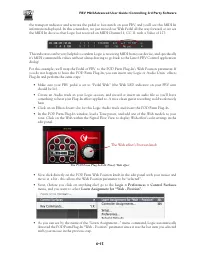
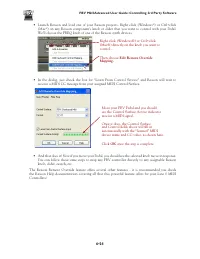
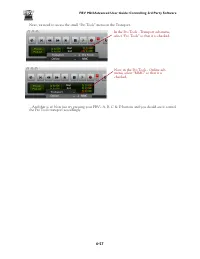
4 - Pedal 1 Toe Switch:
Click here to select the “Toe Switch” that is located beneath the on-board
pedal. This switch actually has two functions:
• The Toe Switch can be assigned with any MIDI command, just like any other FBV Footswitch.
This can be especially handy for some related Pedal-based effect parameters.
• Additionally, as a fixed, non-editable behavior, the Toe Switch will toggle Pedal 1 to utilize
either the “Pedal Wah” or “Pedal Vol” assignment, as configured in the Control Properties list.
The WAH and VOL LED lights on your FBV unit will indicate which function is currently in
use. The Toe Switch always performs this action, regardless of the settings made to the Toe
Switch options in the Control Properties list. This is an “internal” switch behavior and the Toe
Switch does not transmit a MIDI command when performing this function. The only MIDI
command transmitted from the Toe Switch is what you have assigned in the Control Properties
List for this control.
Also see the “
3 - Pedal Wah and Vol
” description above for more about pedal settings.
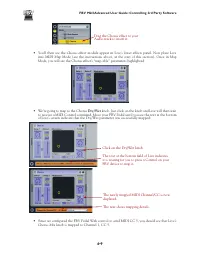
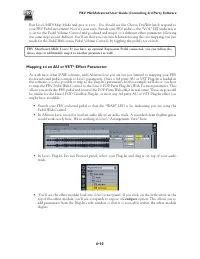
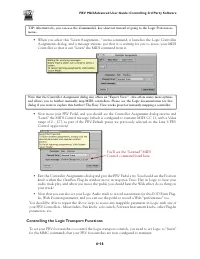
5 - Pedal 2 (Shortboard only):
FBV Shortboard MkII offers an “Expression Pedal” jack on the back
where you can connect an optional expression pedal (such as the Line 6 EX-1). To edit the assignment
for the expression pedal, click directly on this Pedal 2 area in the image, or directly on the Pedal 2 row
in the Control Parameter list below. You can configure Pedal 2 to send any MIDI CC and value range
to continuously control a “knob” or “slider” parameter in your software.
Характеристики

Остались вопросы?Не нашли свой ответ в руководстве или возникли другие проблемы? Задайте свой вопрос в форме ниже с подробным описанием вашей ситуации, чтобы другие люди и специалисты смогли дать на него ответ. Если вы знаете как решить проблему другого человека, пожалуйста, подскажите ему :)


