Водонагреватели Gorenje TGR65SB6 - инструкция пользователя по применению, эксплуатации и установке на русском языке. Мы надеемся, она поможет вам решить возникшие у вас вопросы при эксплуатации техники.
Если остались вопросы, задайте их в комментариях после инструкции.
"Загружаем инструкцию", означает, что нужно подождать пока файл загрузится и можно будет его читать онлайн. Некоторые инструкции очень большие и время их появления зависит от вашей скорости интернета.


FBV MkII Advanced User Guide: POD X3
2•9
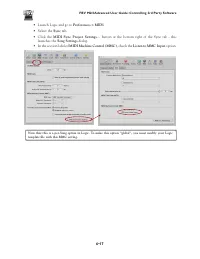
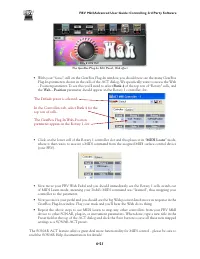
effect results in less gain - placing the volume after a distortion effect reduces the overall volume level
without affecting the gain. With the Volume in the Pre position, and using the Delay effect, you can
swell in your guitar volume and then roll the pedal back and still hear the delay repeats - but placing
the Volume pedal Post conversely turns down the original signal AND the delay repeats... Get it?
Note that this VOL effect block is the same volume that is accessed by the POD X3 Tone Volume
knob and, therefore, each Tone has its own independent VOL effect. So, if your preset has two Tones,
then you can press the TONE 2 button to independently configure these three settings for Tone 1 and
Tone 2. These VOL settings are also configurable for each preset, so you can set and save these settings
differently for each User preset.
Controlling Dual Tone Presets
One of the coolest features of your POD X3 is that it offers two completely independent Tone Paths.
It is possible for you to configure a “Tone Pair”, using Tone 1 for a guitar or bass that plugs into the
POD X3 Input 1 jack and Tone 2 for a Mic plugged into Input 2. Alternatively, you can create a “Tone
Blend”, where you utilize both Tone 1 and Tone 2 on a single input, such as to process a guitar with
two amps, with each Tone having its own set of effects, speaker cabinet and mic! You’ll see that your
POD X3 already comes loaded with Single Tone presets, as well as Tone Pairs and Tone Blends, so you
can take a look at how these are constructed - as well as modify them to your heart’s content, and save
your own creations as presets within the User folder.
For a thorough understanding of all this business of creating Dual Tones, please check out the
“Dual
Tone Concept”
section of your
POD X3 Pilot’s Handbook
.
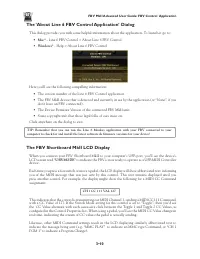
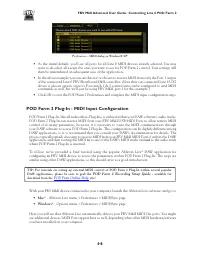
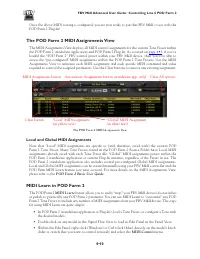
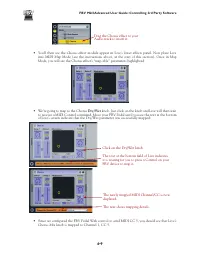
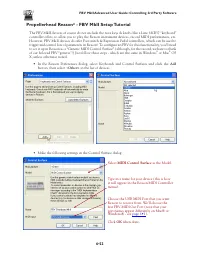
Your FBV MkII allows you to navigate through the 128 memory locations within the User folder. As
mentioned above, some User presets might be composed with only a Tone 1, while others both a Tone
1 and Tone 2. This makes no difference as far as your FBV Channel (A, B, C, D) or Bank buttons are
concerned, since the FBV unit will simply call up a channel location regardless if it holds a preset with
one or two Tones active. However, it is important to take a look at what the other buttons on the FBV
Shortboard MkII control when a Dual Tone preset is loaded.
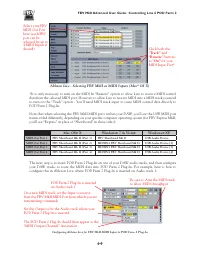
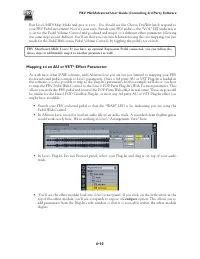
FBV Shortboard MkII units include effect buttons (STOMP, MOD, DELAY, etc.) which allow you to
modify the
selected
Tone of the currently loaded preset - stepping on one of these effect buttons will
toggle on/off ONLY the function for the currently selected Tone. You can optionally configure your
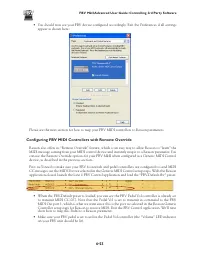
FBV MkII Shortboard
FUNCTION 1
switch to perform the same functions as the TONE 2 button
on the POD X3 unit. This allows you to toggle between Tone 1/Tone 2 as the “selected” Tone, as
well as allows you to hold down the button to toggle the Dual Tone feature on/off. To configure the
FUNCTION 1 button’s assignment, go to the SYSTEM screen on your POD X3 and access the LP SW
options for Tone 1 and Tone 2 (see the LP SW descriptions starting on
).
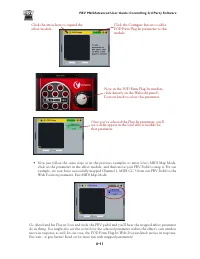
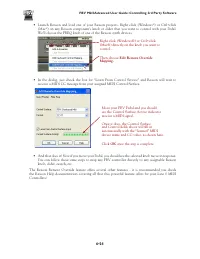
TIP: When calling up one of the factory-created “Tone Pair” type of Dual Tone User presets, you’ll see
we added an “L” and an “R” at the ends of many titles for Tone 1 and Tone 2 respectively. (Call up preset
12A as an example.) Adding a unique identifying character to each Tone’s title like this is handy when
using an FBV Shortboard since this provides you with an easy reference on your FBV LCD screen for
which of the two Tones is the one currently being controlled.
That about covers it! Armed with the above knowledge, you should now have vast control over the
power embedded in your POD X3 or POD X3 Pro, all without your hands leaving your guitar. For more
helpful information, please visit the
Характеристики

Остались вопросы?Не нашли свой ответ в руководстве или возникли другие проблемы? Задайте свой вопрос в форме ниже с подробным описанием вашей ситуации, чтобы другие люди и специалисты смогли дать на него ответ. Если вы знаете как решить проблему другого человека, пожалуйста, подскажите ему :)


