Сварочное оборудование Telwin TELMIG 161 1 TURBO - инструкция пользователя по применению, эксплуатации и установке на русском языке. Мы надеемся, она поможет вам решить возникшие у вас вопросы при эксплуатации техники.
Если остались вопросы, задайте их в комментариях после инструкции.
"Загружаем инструкцию", означает, что нужно подождать пока файл загрузится и можно будет его читать онлайн. Некоторые инструкции очень большие и время их появления зависит от вашей скорости интернета.


- 7 -
automatic circuit-breaker; the special earth terminal should be
WARNINGS
connected to the ear th conductor (yellow-green) of the power supply
-
Turn the welding cable connectors right down into the quick
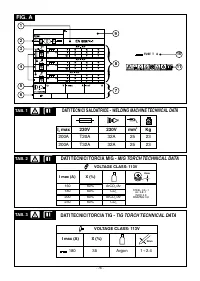
line. Table 1
(TAB.1)
shows the recommended delayed fuse sizes in
connections , to ensure a perfect electrical contact; otherwise the
amps, chosen according to the max. nominal current supplied by the
connectors themselves will overheat, resulting in their rapid
welding machine, and the nominal voltage of the main power supply.
deterioration and loss of efficiency.
-
The welding cables should be as short as possible.
______________________________________________________
-
Do not use metal structures which are not part of the workpiece to
substitute the return cable of the welding current: this could
jeopardise safety and result in poor welding.
WARNING!
Failure to observe the above rules will make the (Class 1) safety
LOADING THE WIRE REEL (Fig. G)
system installed by the manufacturer ineffective with consequent
______________________________________________________
serious risks to persons (e.g. electric shock) and objects (e.g.
fire).
WARNING! BEFORE STARTING THE OPERATIONS TO LOAD
______________________________________________________
THE WIRE MAKE SURE THE WELDING MACHINE IS SWITCHED
CONNECTION OF THE WELDING CABLES
OFF AND DISCONNECTED FROM THE MAIN POWER SUPPLY
______________________________________________________
OUTLET.
______________________________________________________
WARNING! BEFORE MAKING THE FOLLOWING
MAKE SURE THAT THE WIRE FEEDER ROLLERS, THE WIRE
CONNECTIONS MAKE SURE THE WELDING MACHINE IS
GUIDE HOSE AND THE CONTACT TIP OF THE TORCH MATCH THE
SWITCHED OFF AND DISCONNECTED FROM THE POWER
DIAMETER AND TYPE OF WIRE TO BE USED AND MAKE SURE
SUPPLY OUTLET.
THAT THESE ARE FITTED CORRECTLY. WHEN INSERTING AND
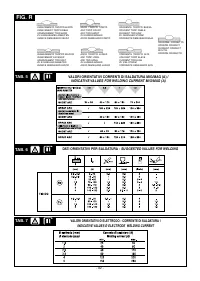
Table 1
(TAB. 1)
gives the recommended values for the welding cables
2
THREADING THE WIRE DO NOT WEAR PROTECTIVE GLOVES.
(in mm ) depending on the maximum current supplied by the welding
- Open the reel compartment door.
machine.
- Position the wire reel on the spindle, holding the end of the wire
______________________________________________________
upwards; make sure the tab for pulling the spindle is correctly
seated in its hole
(1a)
.
MIG/MAG WELDING
- Release the pressure counter-roller(s) and move them away from
Connection to the gas bottle
the lower roller(s)
(2a)
;
The gas bottle can be loaded onto the supporting platform of the trolley
- Make sure that the towing roller(s) is suited to the wire used
(2b)
.
max. 60 kg.
- Free the end of the wire and remove the distorted end with a clean
- Screw the pressure reducing valve onto the gas bottle valve,
cut and no burr; turn the reel anti-clockwise and thread the end of
inserting the appropriate adapter supplied as an accessory, for
the wire into the wire-guide infeed, pushing it 50-100mm into the
when the gas used is Argon or an
wire guide of the torch fitting
(2c)
.
Argon /CO mixture.
2
- Re-position the counter-roller(s), adjusting the pressure to an
- Connect the gas inlet pipe to the pressure-reducing valve and
intermediate value, and make sure that the wire is correctly
tighten the band supplied.
positioned in the groove of the lower roller(s)
(3)
- Loosen the adjustment ring nut on the pressure-reducing valve
- Use the adjustment screw located at the centre of the spindle to
before opening the bottle valve.
apply a slight braking pressure on the spindle itself
(1b)
.
- Remove the nozzle and contact tip
(4a)
.
Connecting the welding current return cable
Connect the welding current return cable to the piece to be welded or to
- Insert the welding machine plug in the power supply outlet, switch
the metal bench on which it rests, as close as possible to the join being
on the welding machine, press the torch button and wait for the end
made.
of the wire to pass through the whole of the wire guide hose and
protrude by 10-15 cm from the front part of the torch, release the
Connecting the torch
button.
Engage the torch
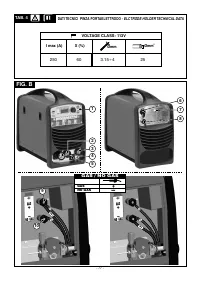
(Fig. B (4))
with its dedicated connector MIG by
tightening the locking ring manually as far down as it will go. Prepare
______________________________________________________
the wire for loading the first time by dismantling the nozzle and the
contact tube to ease its exit.
WARNING! During these operations the wire is live and
subject to mechanical stress; therefore if adequate precautions
FLUX WELDING
are not taken the wire could cause hazardous electric shock,
The connections for the earth return cable and the torch are the
injury and striking of electric arcs:
same as those for MIG/MAG welding, it is necessary to change the
______________________________________________________
voltage polarity
(FIG.B (9)-(10))
in the reel compartment, as shown
on the label.
- Do not direct the mouthpiece of the torch towards parts of the body.
- Keep the torch away from the gas bottle.
Connecting the spool gun (Fig. B)
- Re-fit the contact tip and the nozzle onto the torch
(4b)
.
Connect the spool gun to the centralised torch connection
(4)
screwing
- Check that wire feed is regular; set the roller and spindle braking
the ring nut right down to fasten it. Then insert the control cable
pressure to the minimum possible values making sure that the wire
connector in the special socket
(5)
. The welding machine will recognise
does not slide in the groove and when feed is halted the loops of
the spool gun automatically.
wire are not loosened by excessive reel inertia.
- Cut the end of the wire so that 10-15 mm protrude from the nozzle.
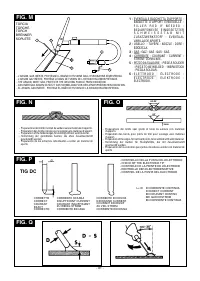
TIG WELDING
- Close the reel compartment door.
Connection to the gas bottle
The gas bottle can be loaded onto the supporting platform of the trolley
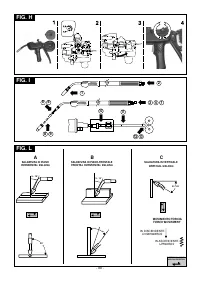
LOADING THE WIRE REEL ONTO THE SPOOL GUN (Fig. H)
max. 60 kg.
______________________________________________________
- Screw the pressure reducing valve onto the gas bottle valve,
inserting the appropriate adapter supplied as an accessory, for
WARNING! BEFORE STARTING THE OPERATIONS TO LOAD
when the gas used is Argon.
- Connect the gas input pipe to the reduction valve and tighten the clip
THE WIRE MAKE SURE THE WELDING MACHINE IS SWITCHED
supplied; then connect the other end of the pipe to the cock
OFF AND DISCONNECTED FROM THE MAIN POWER SUPPLY OR
connector provided on the TIG torch.
THAT THE SPOOL GUN IS DISCONNECTED FROM THE WELDING
- Loosen the adjustment ring nut on the pressure-reducing valve
MACHINE.
before opening the bottle valve.
______________________________________________________
Connecting the welding current return cable
MAKE SURE THE WIRE PULLER ROLLERS, THE WIRE GUIDE
- This is connected to the piece being welded or to the metal bench
HOSE AND THE SPOOL GUN CONTACT TUBE HAVE SUITABLE
supporting it, as close as possible to the join being made.
DIAMETERS CORRESPONDING TO THAT OF THE WIRE TO BE
- This cable is connected to the terminal with the symbol (+).
USED AND MAKE SURE THEY ARE ASSEMBLED CORRECTLY. DO
NOT WEAR PROTECTIVE GLOVES WHEN THREADING IN THE
Connecting the torch (Fig.M)
WIRE.
- Connect the TIG torch to the quick connection (-) on the front panel of
-
Remove the cover by undoing the appropriate screw
(1)
.
the welding machine;
-
Position the wire reel on the reel holder.
-
Free the pressure counter-roller and move it away from the lower
MMA welding
roller
(2)
.
Practically all coated electrodes are connected to the positive terminal
-
Free the end of the wire, cut off the distorted end with a clean cut
(+) of the power source, with the exception of acid-coated electrodes
leaving no burrs; turn the reel anti-clockwise and thread the end of
which are connected to the negative terminal (-).
the wire into the wire-guide infeed, pushing it 50-100mm inside the
lance
(2)
.
Connecting the electrode-holder clamp welding cable
-
Reposition the counter-roller, adjusting the pressure to an
Put a special clamp on the terminal which serves to close the
intermediate value and make sure the wire is correctly positioned
uncovered part of the electrode.
in the lower roller recess
(3)
.
This cable should be connected to the terminal with the symbol (+).
-
Brake the reel holder slightly by adjusting the appropriate screw.
-
Switch on the welding machine, putting the switch to ( I ), press the
Connecting the welding current return cable
spool gun button and wait until the end of the wire runs through the
This is connected to the piece to be welded or to the metal bench on
complete wire guide hose and 10-15 cm comes out of the front of
which it rests, as close as possible to the joint being made.
the torch then release the torch button.
This cable should be connected to the terminal with the symbol (-).
-
With the Spool gun connected, switch on the machine, press the


