
Бензопилы GRAPHITE 58G952 - инструкция пользователя по применению, эксплуатации и установке на русском языке. Мы надеемся, она поможет вам решить возникшие у вас вопросы при эксплуатации техники.
Если остались вопросы, задайте их в комментариях после инструкции.
"Загружаем инструкцию", означает, что нужно подождать пока файл загрузится и можно будет его читать онлайн. Некоторые инструкции очень большие и время их появления зависит от вашей скорости интернета.


17
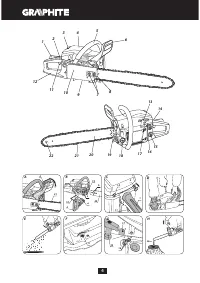
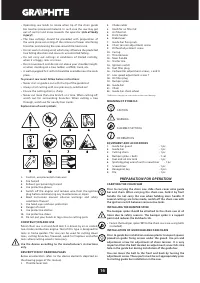
Guide bar and chain are supplied separately.
•
Brake lever (
6
) must be in the upper (ver tical) position (
fig. A
).
•
Unscrew the guide bar fixing nuts (
7
) and remove the casing
(
10
).
•
Put the chain (
21
) onto driving chain wheel located behind
the clutch.
•
I
nstall the guide bar (
20
) (slide it behind the clutch) onto
guiding screws (
c
) and push towards driving chain wheel (
fig.
B
).
•
Put the chain (
21
) onto guide bar chain wheel (
22
) from below.
•
M
ove the guide bar (
20
) away from the driving chain wheel, so
chain guiding links are placed in the guide bar groove.
•
Ensure the pin (
a
) of the chain tension adjustment screw (
8
) is
in the middle of the lower hole (
b
) of the guide bar (
20
), adjust
when necessar y (
fig. B
).
•
Place the casing (
10
) in its place and fix by slightly tightening
guide bar fixing nuts (
7
).
•
Strain the chain appropriately using the chain tension
adjustment screw (
8
). Chain tension is appropriate when the
chain can be lifted by 3 to 4 mm in the middle of the guide bar
in horizontal position.
•
Firmly tighten guide bar fixing screws (
7
) while holding the
guide bar tip.
Prior to guide bar and chain installation ensure that position
of chain cutting blades is appropriate (correct position of the
chain on the guide bar is shown on the tip of the guide bar).
Always wear protective gloves during checks and installation
of the chain to prevent cuts from sharp edges of the chain.
New chain requires star t-up period, which lasts approximately
5 minutes. Chain lubrication is ver y impor tant in this phase.
Check chain tension after star t-up period and readjust if
necessar y.
Check and adjust the chain tension frequently. Too loose chain
can easily slide off the guide bar, quickly wear out or quickly
wear out the guide bar.
F I L L I N G S AW TA N K W I T H O I L
Oil tank in new chain saw is empty. Fill the tank with oil prior
to first use.
•
Unscrew oil filler plug (
18
).
•
Pour in maximally 260 ml of oil (be careful to avoid
contamination of oil during filling of the tank).
•
Screw oil filler plug (
18
).
Do not use oil that has been already used or regenerated, as
this may damage the oil pump.
Use SAE 10W/30 oil for the
whole year, or SAE 30W/40 in summer and SAE 20W/30 in
winter.
F I L L I N G T H E F U E L TA N K
When filling the fuel, follow these rules:
• Engine must not work,
• You must not spill the fuel.
A
ccordingly to the below table, mix petrol (lead-free with octane
number 95) with good quality engine oil for two stroke engines.
R E CO M M E N D E D F U E L B L E N D R AT I O
Working conditions
Petrol : oil
First 20 hours of operation
20 : 1
A
fter 20 hours of operation
25 : 1
•
Unscrew fuel filler plug (
15
).
•
Pour in previously prepared fuel blend (max. 550 ml).
•
Screw fuel filler plug (
15
).
Most problems with combustion engines result directly or
indirectly from fuel used. You must not use oil designed for
four-stroke engines to prepare fuel blend.
OPERATION / SETTINGS
S TA R T I N G T H E E N G I N E
Hold the chain saw with both hands during operation.
•
Check level in the fuel tank and the oil tank.
•
Ensure the brake lever (
6
) is in the switched on position
(moved to the front).
•
When engine is cold, pull out choke cable (
2
).
•
Set the ignition switch (
14
) to switched on position (
fig. C
).
•
Place the saw on stable ground.
•
While holding the saw pressed against ground, pull the star ter
line (
13
). First slowly so to hear the clutch gears, then pull it
strongly (
fig. D
).
•
A
fter star ting the saw, press the throttle lever lock (
1
) and
throttle level (
11
) slightly (choke cable will move automatically
to switched off position).
•
A
llow the engine to heat up with throttle lever (
11
) slightly
pressed.
•
M
ove the brake lever (
6
) to switched off position (to the back).
•
M
ake a cut.
I
n case the engine does not star t at the first tr y, pull out the
choke cable (
2
) halfway and pull the star ter line again.
Do not star t the engine while holding the saw in hands. During
star t up the chain saw must rest on ground and be held firmly.
Ensure the chain is free to move without touching any object.
Do not cut any material with choke cable pulled out.
S TO P P I N G T H E E N G I N E
•
Release the throttle lever (
11
) and allow the engine to run idle
for a few minutes.
•
Set the ignition switch (
14
) to STOP position.
C H E C K I N G C H A I N LU B R I C AT I O N
Check lubrication of the chain and oil level in the tank before
star ting to work. Switch on the saw and hold it above ground.
I
f
you see enlarging oil marks, the chain lubrication works well (
fig.
E
).
I
f there are no oil marks or they are ver y small, use oil feed
adjustment screw (
9
) to make appropriate adjustments.
I
n case
the adjustment brings no effects, clean oil outlet, upper hole of
chain tension and oilway, or contact ser vice.
Make adjustments when the saw is switched off, obser ve
precaution measures and do not allow the guide bar to touch
ground. Operate the tool safely and maintain at least 20 cm
distance from ground.
Use oil feed adjustment screw (
9
) to set amount of supplied oil
accordingly to respective operating conditions.
•
MIN
position – oil flow decreases.
•
MAX
position – oil flow increases (
fig. F
).
When cutting hard and dr y wood and using whole length of the
guide bar when making a cut, set the oil feed adjustment screw
(
9
) to the
MAX
position.
You can reduce amount of oil supplied by turning oil feed
adjustment screw (
9
) to
MIN
position, when cutting soft and
damp wood, or when only par t of the working length of the
guide bar is used.
Oil tank should be almost empty when the fuel tank is emptied.
When filling the fuel remember about filling oil tank as well.
C H A I N LU B R I C A N TS
Durability of chain and guide bar depends heavily on quality of
lubricant. Use only lubricants, which are designed for chain saws.
Never use regenerated or previously used oil for chain
lubrication.
CHAIN GUIDE BAR
Guide bar (
20
) is exposed to heavy wear especially in tip
and bottom par t. To prevent side wear due to friction, it is
recommended to turn over the guide bar ever y time the chain
Содержание
- 31 ПОДГОТОВКА К РАБОТЕ; Использовать мас ло SAE
- 32 Проверьте свободное вращение цепи, цепь не
- 34 Запрещается валить деревья в с лучае:; ТЕХНИЧЕСКОЕ ОБСЛУЖИВАНИЕ
- 35 ТЕХНИЧЕСКИЕ ПАРАМЕТРЫ; Пила цепная бензиновая
- 36 ЗАЩИТА ОКРУЖАЮЩЕЙ СРЕДЫ; ИНФОРМАЦИЯ О ДАТЕ ИЗГОТОВЛЕНИЯ; Порядок расшифровки информации с ледующий:; ХХХ – год изготовления,


