Автомобили Fiat LINEA 2007 - инструкция пользователя по применению, эксплуатации и установке на русском языке. Мы надеемся, она поможет вам решить возникшие у вас вопросы при эксплуатации техники.
Если остались вопросы, задайте их в комментариях после инструкции.
"Загружаем инструкцию", означает, что нужно подождать пока файл загрузится и можно будет его читать онлайн. Некоторые инструкции очень большие и время их появления зависит от вашей скорости интернета.


68
ПР
ИБ
ОР
Ы
И О
РГ
АН
Ы
УП
РА
ВЛ
ЕН
ИЯ
КО
НТ
РО
ЛЬ
НЫ
Е
ЛА
МП
Ы
И
СО
ОБ
ЩЕ
НИ
Я
СИ
СТ
ЕМ
А Б
ЕЗ
О
-
ПА
СН
ОС
ТИ
СО
ВЕ
ТЫ
ВО
ДИ
ТЕ
ЛЮ
АВ
ТО
МО
БИ
ЛЯ
УС
ТРА
НЕ
НИ
Е
НЕ
ИС
ПР
АВ
-НО
СТ
ЕЙ
ТЕ
ХН
ИЧ
ЕС
КО
Е
ОБ
СЛ
УЖ
ИВ
АН
ИЕ
ТЕ
ХН
ИЧ
ЕС
КИ
Е
ХА
РА
КТ
ЕР
ИС
ТИ
КИ
ПР
ЕД
МЕ
ТН
ЫЙ
УК
АЗ
АТ
ЕЛ
Ь
СИ
СТ
ЕМ
А
БЕ
ЗО
ПА
СН
ОС
ТИ
СО
ВЕ
ТЫ
ВО
ДИ
ТЕ
ЛЮ
АВ
ТО
МО
БИ
ЛЯ
УС
ТР
АН
ЕН
ИЕ
НЕ
ИС
ПР
АВ
НО
СТ
ЕЙ
ТЕ
ХН
ИЧ
ЕС
КО
Е
ОБ
СЛ
УЖ
ИВ
АН
ИЕ
ТЕ
ХН
ИЧ
ЕС
КИ
Е
ХА
РА
КТ
ЕР
ИС
ТИ
КИ
ПР
ЕД
МЕ
ТН
ЫЙ
УК
АЗ
АТ
ЕЛ
Ь
КО
НТ
РО
ЛЬ
НЫ
Е
ЛА
МП
Ы
И
СО
ОБ
ЩЕ
НИ
Я
ПР
ИБ
ОР
Ы
И О
РГ
АН
Ы
УП
РА
ВЛ
ЕН
ИЯ
ПР
ИБ
ОР
Ы
И О
РГ
АН
Ы
УП
РА
ВЛ
ЕН
ИЯ
КО
НТ
РО
ЛЬ
НЫ
Е
ЛА
МП
Ы
И
СО
ОБ
ЩЕ
НИ
Я
СИ
СТ
ЕМ
А Б
ЕЗ
О
-
ПА
СН
ОС
ТИ
СО
ВЕ
ТЫ
ВО
ДИ
ТЕ
ЛЮ
АВ
ТО
МО
БИ
ЛЯ
УС
ТРА
НЕ
НИ
Е
НЕ
ИС
ПР
АВ
-НО
СТ
ЕЙ
ТЕ
ХН
ИЧ
ЕС
КО
Е
ОБ
СЛ
УЖ
ИВ
АН
ИЕ
ТЕ
ХН
ИЧ
ЕС
КИ
Е
ХА
РА
КТ
ЕР
ИС
ТИ
КИ
ПР
ЕД
МЕ
ТН
ЫЙ
УК
АЗ
АТ
ЕЛ
Ь
СИ
СТ
ЕМ
А
БЕ
ЗО
ПА
СН
ОС
ТИ
СО
ВЕ
ТЫ
ВО
ДИ
ТЕ
ЛЮ
АВ
ТО
МО
БИ
ЛЯ
УС
ТР
АН
ЕН
ИЕ
НЕ
ИС
ПР
АВ
НО
СТ
ЕЙ
ТЕ
ХН
ИЧ
ЕС
КО
Е
ОБ
СЛ
УЖ
ИВ
АН
ИЕ
ТЕ
ХН
ИЧ
ЕС
КИ
Е
ХА
РА
КТ
ЕР
ИС
ТИ
КИ
ПР
ЕД
МЕ
ТН
ЫЙ
УК
АЗ
АТ
ЕЛ
Ь
КО
НТ
РО
ЛЬ
НЫ
Е
ЛА
МП
Ы
И
СО
ОБ
ЩЕ
НИ
Я
ПР
ИБ
ОР
Ы
И О
РГ
АН
Ы
УП
РА
ВЛ
ЕН
ИЯ
66
SAFETY DEVICES
CORRECT USE OF THE
CA
R
W
ARNING
LIGHTS AND MESSAGES
IN AN
EMERGENCY
CA
R
MA
IN
TE
NA
NC
E
TECHNICAL
SPECIFICA
TIONS
INDEX
DASHBOARD AND CONTROLS
EXTERNAL LIGHTS
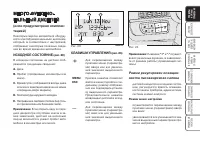
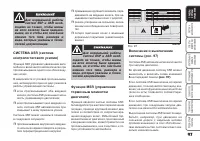
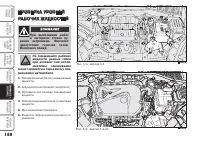
The left-hand stalk
fig. 44/a
operates
most of the external lights.
The external lights can only be switched
on when the ignition key is at
MAR
.
The instrument panel and the various
dashboard controls will come on with the
external lights.
LIGHTS OFF
Knurled ring turned to symbol
O
.
SIDELIGHTS - TAILLIGHTS
Turn the knurled ring to
6
.
The warning light
3
on the instrument
cluster will come on at the same time.
DIPPED BEAM HEADLIGHTS
Turn the knurled ring to
2
.
The warning light
3
on the instrument
cluster will come on at the same time.
MAIN BEAM HEADLIGHTS
When the knurled ring is at
2
, pull the
lever towards the steering wheel (2
nd
un-
stable position).
The warning light
1
1on the instrument
cluster will come on at the same time.
To turn the main beams off, pull again the
lever towards the steering wheel (dipped
beams will turn on again).
FLASHING THE HEADLIGHTS
Pull the stalk towards the steering wheel
(1
st
unstable position) regardless of the po-
sition of the knurled ring. The warning
light
1
on the instrument cluster will
come on at the same time.
AUTOMATIC HEADLIGHT
SENSOR (day light sensor)
fig. 44/b (where provided)
This sensor detects changes of external
lights according to the sensitivity of the
setting: higher the sensitivity, lower the
amount of external light needed to switch
the lights on. The sensitivity of the day light
sensor may be adjusted by means of the
“Setup menu” on the instrument panel.
Activation
Turn the knurled ring to
2
A
. the side/tail-
lights and dipped beam headlights are
switched on automatically according to
the external light.
The headlights can only be flashed with the
sensor on.
fig. 44/a
F0R0037m
fig. 44/b
F0R0238m
66
SAFETY DEVICES
CORRECT USE OF THE
CA
R
W
ARNING
LIGHTS AND MESSAGES
IN AN
EMERGENCY
CA
R
MA
IN
TE
NA
NC
E
TECHNICAL
SPECIFICA
TIONS
INDEX
DASHBOARD AND CONTROLS
EXTERNAL LIGHTS
The left-hand stalk
fig. 44/a
operates
most of the external lights.
The external lights can only be switched
on when the ignition key is at
MAR
.
The instrument panel and the various
dashboard controls will come on with the
external lights.
LIGHTS OFF
Knurled ring turned to symbol
O
.
SIDELIGHTS - TAILLIGHTS
Turn the knurled ring to
6
.
The warning light
3
on the instrument
cluster will come on at the same time.
DIPPED BEAM HEADLIGHTS
Turn the knurled ring to
2
.
The warning light
3
on the instrument
cluster will come on at the same time.
MAIN BEAM HEADLIGHTS
When the knurled ring is at
2
, pull the
lever towards the steering wheel (2
nd
un-
stable position).
The warning light
1
1on the instrument
cluster will come on at the same time.
To turn the main beams off, pull again the
lever towards the steering wheel (dipped
beams will turn on again).
FLASHING THE HEADLIGHTS
Pull the stalk towards the steering wheel
(1
st
unstable position) regardless of the po-
sition of the knurled ring. The warning
light
1
on the instrument cluster will
come on at the same time.
AUTOMATIC HEADLIGHT
SENSOR (day light sensor)
fig. 44/b (where provided)
This sensor detects changes of external
lights according to the sensitivity of the
setting: higher the sensitivity, lower the
amount of external light needed to switch
the lights on. The sensitivity of the day light
sensor may be adjusted by means of the
“Setup menu” on the instrument panel.
Activation
Turn the knurled ring to
2
A
. the side/tail-
lights and dipped beam headlights are
switched on automatically according to
the external light.
The headlights can only be flashed with the
sensor on.
fig. 44/a
F0R0037m
fig. 44/b
F0R0238m
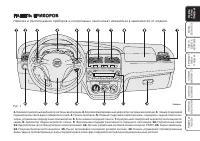
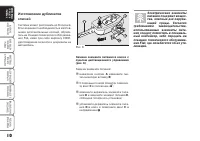
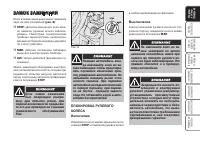
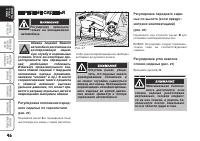
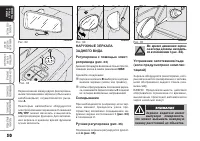
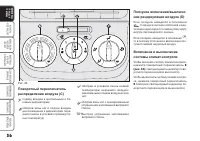
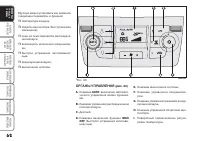
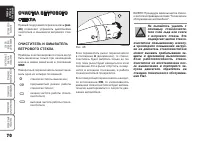
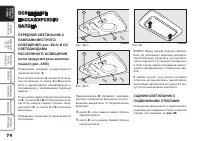
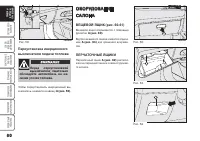
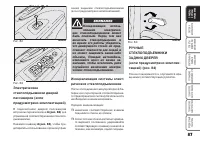
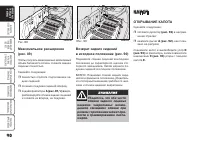
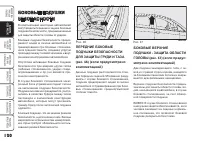
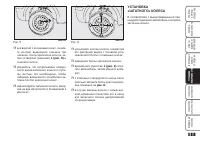
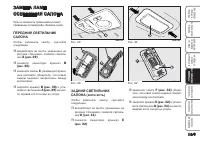
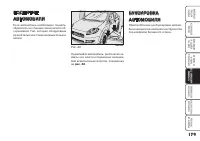
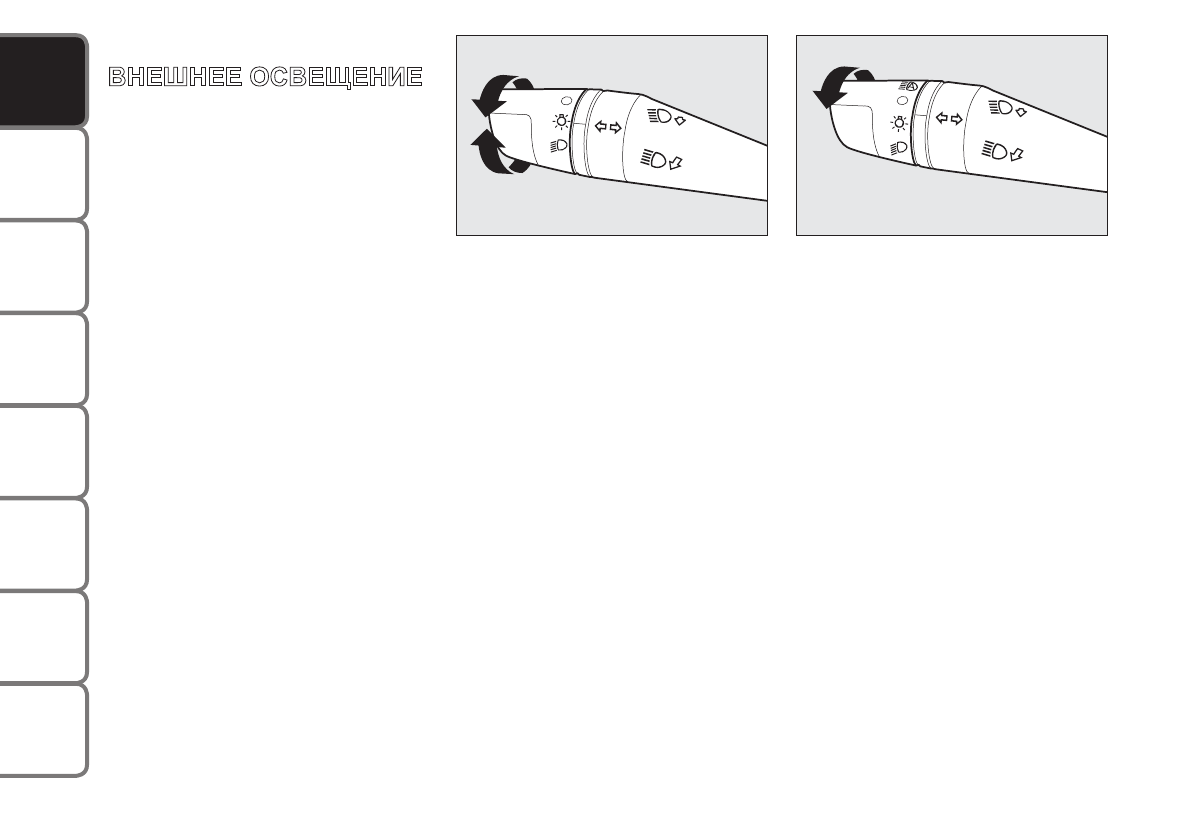
ВНЕШНЕЕ ОСВЕЩЕНИЕ
Управление большинством приборов вне
-
шнего освещения осуществляется левым
подрулевым переключателем
(рис. 44/a)
.
Включение приборов внешнего освеще
-
ния возможно только при положении клю
-
ча в замке зажигания
MAR
.
Одновременно с включением внешнего
освещения включается подсветка прибо
-
ров и различных органов управления на
передней панели.
ВЫКЛЮЧЕНИЕ ВНЕШНЕГО
ОСВЕЩЕНИЯ
Поверните поворотный переключатель в
сторону символа
66
SAFETY DEVICES
CORRECT USE OF THE
CA
R
W
ARNING
LIGHTS AND MESSAGES
IN AN
EMERGENCY
CA
R
MA
IN
TE
NA
NC
E
TECHNICAL
SPECIFICA
TIONS
INDEX
DASHBOARD AND CONTROLS
EXTERNAL LIGHTS
The left-hand stalk
fig. 44/a
operates
most of the external lights.
The external lights can only be switched
on when the ignition key is at
MAR
.
The instrument panel and the various
dashboard controls will come on with the
external lights.
LIGHTS OFF
Knurled ring turned to symbol
O
.
SIDELIGHTS - TAILLIGHTS
Turn the knurled ring to
6
.
The warning light
3
on the instrument
cluster will come on at the same time.
DIPPED BEAM HEADLIGHTS
Turn the knurled ring to
2
.
The warning light
3
on the instrument
cluster will come on at the same time.
MAIN BEAM HEADLIGHTS
When the knurled ring is at
2
, pull the
lever towards the steering wheel (2
nd
un-
stable position).
The warning light
1
1on the instrument
cluster will come on at the same time.
To turn the main beams off, pull again the
lever towards the steering wheel (dipped
beams will turn on again).
FLASHING THE HEADLIGHTS
Pull the stalk towards the steering wheel
(1
st
unstable position) regardless of the po-
sition of the knurled ring. The warning
light
1
on the instrument cluster will
come on at the same time.
AUTOMATIC HEADLIGHT
SENSOR (day light sensor)
fig. 44/b (where provided)
This sensor detects changes of external
lights according to the sensitivity of the
setting: higher the sensitivity, lower the
amount of external light needed to switch
the lights on. The sensitivity of the day light
sensor may be adjusted by means of the
“Setup menu” on the instrument panel.
Activation
Turn the knurled ring to
2
A
. the side/tail-
lights and dipped beam headlights are
switched on automatically according to
the external light.
The headlights can only be flashed with the
sensor on.
fig. 44/a
F0R0037m
fig. 44/b
F0R0238m
.
ВКЛЮЧЕНИЕ ГАБАРИТНЫХ
ОГНЕЙ
Поверните поворотный переключатель в
сторону символа
66
SAFETY DEVICES
CORRECT USE OF THE
CA
R
W
ARNING
LIGHTS AND MESSAGES
IN AN
EMERGENCY
CA
R
MA
IN
TE
NA
NC
E
TECHNICAL
SPECIFICA
TIONS
INDEX
DASHBOARD AND CONTROLS
EXTERNAL LIGHTS
The left-hand stalk
fig. 44/a
operates
most of the external lights.
The external lights can only be switched
on when the ignition key is at
MAR
.
The instrument panel and the various
dashboard controls will come on with the
external lights.
LIGHTS OFF
Knurled ring turned to symbol
O
.
SIDELIGHTS - TAILLIGHTS
Turn the knurled ring to
6
.
The warning light
3
on the instrument
cluster will come on at the same time.
DIPPED BEAM HEADLIGHTS
Turn the knurled ring to
2
.
The warning light
3
on the instrument
cluster will come on at the same time.
MAIN BEAM HEADLIGHTS
When the knurled ring is at
2
, pull the
lever towards the steering wheel (2
nd
un-
stable position).
The warning light
1
1on the instrument
cluster will come on at the same time.
To turn the main beams off, pull again the
lever towards the steering wheel (dipped
beams will turn on again).
FLASHING THE HEADLIGHTS
Pull the stalk towards the steering wheel
(1
st
unstable position) regardless of the po-
sition of the knurled ring. The warning
light
1
on the instrument cluster will
come on at the same time.
AUTOMATIC HEADLIGHT
SENSOR (day light sensor)
fig. 44/b (where provided)
This sensor detects changes of external
lights according to the sensitivity of the
setting: higher the sensitivity, lower the
amount of external light needed to switch
the lights on. The sensitivity of the day light
sensor may be adjusted by means of the
“Setup menu” on the instrument panel.
Activation
Turn the knurled ring to
2
A
. the side/tail-
lights and dipped beam headlights are
switched on automatically according to
the external light.
The headlights can only be flashed with the
sensor on.
fig. 44/a
F0R0037m
fig. 44/b
F0R0238m
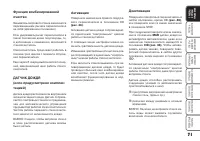
При этом включается контрольная лампа
66
SAFETY DEVICES
CORRECT USE OF THE
CA
R
W
ARNING
LIGHTS AND MESSAGES
IN AN
EMERGENCY
CA
R
MA
IN
TE
NA
NC
E
TECHNICAL
SPECIFICA
TIONS
INDEX
DASHBOARD AND CONTROLS
EXTERNAL LIGHTS
The left-hand stalk
fig. 44/a
operates
most of the external lights.
The external lights can only be switched
on when the ignition key is at
MAR
.
The instrument panel and the various
dashboard controls will come on with the
external lights.
LIGHTS OFF
Knurled ring turned to symbol
O
.
SIDELIGHTS - TAILLIGHTS
Turn the knurled ring to
6
.
The warning light
3
on the instrument
cluster will come on at the same time.
DIPPED BEAM HEADLIGHTS
Turn the knurled ring to
2
.
The warning light
3
on the instrument
cluster will come on at the same time.
MAIN BEAM HEADLIGHTS
When the knurled ring is at
2
, pull the
lever towards the steering wheel (2
nd
un-
stable position).
The warning light
1
1on the instrument
cluster will come on at the same time.
To turn the main beams off, pull again the
lever towards the steering wheel (dipped
beams will turn on again).
FLASHING THE HEADLIGHTS
Pull the stalk towards the steering wheel
(1
st
unstable position) regardless of the po-
sition of the knurled ring. The warning
light
1
on the instrument cluster will
come on at the same time.
AUTOMATIC HEADLIGHT
SENSOR (day light sensor)
fig. 44/b (where provided)
This sensor detects changes of external
lights according to the sensitivity of the
setting: higher the sensitivity, lower the
amount of external light needed to switch
the lights on. The sensitivity of the day light
sensor may be adjusted by means of the
“Setup menu” on the instrument panel.
Activation
Turn the knurled ring to
2
A
. the side/tail-
lights and dipped beam headlights are
switched on automatically according to
the external light.
The headlights can only be flashed with the
sensor on.
fig. 44/a
F0R0037m
fig. 44/b
F0R0238m
на панели приборов.
ВКЛЮЧЕНИЕ БЛИЖНЕГО
СВЕТА ФАР
Поверните поворотный переключатель в
сторону символа
66
SAFETY DEVICES
CORRECT USE OF THE
CA
R
W
ARNING
LIGHTS AND MESSAGES
IN AN
EMERGENCY
CA
R
MA
IN
TE
NA
NC
E
TECHNICAL
SPECIFICA
TIONS
INDEX
DASHBOARD AND CONTROLS
EXTERNAL LIGHTS
The left-hand stalk
fig. 44/a
operates
most of the external lights.
The external lights can only be switched
on when the ignition key is at
MAR
.
The instrument panel and the various
dashboard controls will come on with the
external lights.
LIGHTS OFF
Knurled ring turned to symbol
O
.
SIDELIGHTS - TAILLIGHTS
Turn the knurled ring to
6
.
The warning light
3
on the instrument
cluster will come on at the same time.
DIPPED BEAM HEADLIGHTS
Turn the knurled ring to
2
.
The warning light
3
on the instrument
cluster will come on at the same time.
MAIN BEAM HEADLIGHTS
When the knurled ring is at
2
, pull the
lever towards the steering wheel (2
nd
un-
stable position).
The warning light
1
1on the instrument
cluster will come on at the same time.
To turn the main beams off, pull again the
lever towards the steering wheel (dipped
beams will turn on again).
FLASHING THE HEADLIGHTS
Pull the stalk towards the steering wheel
(1
st
unstable position) regardless of the po-
sition of the knurled ring. The warning
light
1
on the instrument cluster will
come on at the same time.
AUTOMATIC HEADLIGHT
SENSOR (day light sensor)
fig. 44/b (where provided)
This sensor detects changes of external
lights according to the sensitivity of the
setting: higher the sensitivity, lower the
amount of external light needed to switch
the lights on. The sensitivity of the day light
sensor may be adjusted by means of the
“Setup menu” on the instrument panel.
Activation
Turn the knurled ring to
2
A
. the side/tail-
lights and dipped beam headlights are
switched on automatically according to
the external light.
The headlights can only be flashed with the
sensor on.
fig. 44/a
F0R0037m
fig. 44/b
F0R0238m
.
При этом включается контрольная лампа
66
SAFETY DEVICES
CORRECT USE OF THE
CA
R
W
ARNING
LIGHTS AND MESSAGES
IN AN
EMERGENCY
CA
R
MA
IN
TE
NA
NC
E
TECHNICAL
SPECIFICA
TIONS
INDEX
DASHBOARD AND CONTROLS
EXTERNAL LIGHTS
The left-hand stalk
fig. 44/a
operates
most of the external lights.
The external lights can only be switched
on when the ignition key is at
MAR
.
The instrument panel and the various
dashboard controls will come on with the
external lights.
LIGHTS OFF
Knurled ring turned to symbol
O
.
SIDELIGHTS - TAILLIGHTS
Turn the knurled ring to
6
.
The warning light
3
on the instrument
cluster will come on at the same time.
DIPPED BEAM HEADLIGHTS
Turn the knurled ring to
2
.
The warning light
3
on the instrument
cluster will come on at the same time.
MAIN BEAM HEADLIGHTS
When the knurled ring is at
2
, pull the
lever towards the steering wheel (2
nd
un-
stable position).
The warning light
1
1on the instrument
cluster will come on at the same time.
To turn the main beams off, pull again the
lever towards the steering wheel (dipped
beams will turn on again).
FLASHING THE HEADLIGHTS
Pull the stalk towards the steering wheel
(1
st
unstable position) regardless of the po-
sition of the knurled ring. The warning
light
1
on the instrument cluster will
come on at the same time.
AUTOMATIC HEADLIGHT
SENSOR (day light sensor)
fig. 44/b (where provided)
This sensor detects changes of external
lights according to the sensitivity of the
setting: higher the sensitivity, lower the
amount of external light needed to switch
the lights on. The sensitivity of the day light
sensor may be adjusted by means of the
“Setup menu” on the instrument panel.
Activation
Turn the knurled ring to
2
A
. the side/tail-
lights and dipped beam headlights are
switched on automatically according to
the external light.
The headlights can only be flashed with the
sensor on.
fig. 44/a
F0R0037m
fig. 44/b
F0R0238m
на панели приборов.
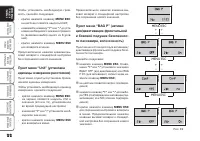
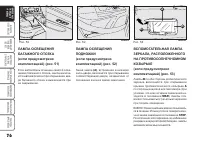
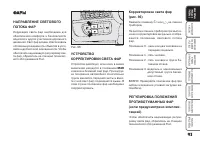
ВКЛЮЧЕНИЕ ДАЛЬНЕГО
СВЕТА ФАР
При нахождении наконечника переклю
-
чателя в положении
66
SAFETY DEVICES
CORRECT USE OF THE
CA
R
W
ARNING
LIGHTS AND MESSAGES
IN AN
EMERGENCY
CA
R
MA
IN
TE
NA
NC
E
TECHNICAL
SPECIFICA
TIONS
INDEX
DASHBOARD AND CONTROLS
EXTERNAL LIGHTS
The left-hand stalk
fig. 44/a
operates
most of the external lights.
The external lights can only be switched
on when the ignition key is at
MAR
.
The instrument panel and the various
dashboard controls will come on with the
external lights.
LIGHTS OFF
Knurled ring turned to symbol
O
.
SIDELIGHTS - TAILLIGHTS
Turn the knurled ring to
6
.
The warning light
3
on the instrument
cluster will come on at the same time.
DIPPED BEAM HEADLIGHTS
Turn the knurled ring to
2
.
The warning light
3
on the instrument
cluster will come on at the same time.
MAIN BEAM HEADLIGHTS
When the knurled ring is at
2
, pull the
lever towards the steering wheel (2
nd
un-
stable position).
The warning light
1
1on the instrument
cluster will come on at the same time.
To turn the main beams off, pull again the
lever towards the steering wheel (dipped
beams will turn on again).
FLASHING THE HEADLIGHTS
Pull the stalk towards the steering wheel
(1
st
unstable position) regardless of the po-
sition of the knurled ring. The warning
light
1
on the instrument cluster will
come on at the same time.
AUTOMATIC HEADLIGHT
SENSOR (day light sensor)
fig. 44/b (where provided)
This sensor detects changes of external
lights according to the sensitivity of the
setting: higher the sensitivity, lower the
amount of external light needed to switch
the lights on. The sensitivity of the day light
sensor may be adjusted by means of the
“Setup menu” on the instrument panel.
Activation
Turn the knurled ring to
2
A
. the side/tail-
lights and dipped beam headlights are
switched on automatically according to
the external light.
The headlights can only be flashed with the
sensor on.
fig. 44/a
F0R0037m
fig. 44/b
F0R0238m
, нажмите рычаг
переключателя от себя (2-е постоянное
положение).
При этом включается контрольная лампа
66
SAFETY DEVICES
CORRECT USE OF THE
CA
R
W
ARNING
LIGHTS AND MESSAGES
IN AN
EMERGENCY
CA
R
MA
IN
TE
NA
NC
E
TECHNICAL
SPECIFICA
TIONS
INDEX
DASHBOARD AND CONTROLS
EXTERNAL LIGHTS
The left-hand stalk
fig. 44/a
operates
most of the external lights.
The external lights can only be switched
on when the ignition key is at
MAR
.
The instrument panel and the various
dashboard controls will come on with the
external lights.
LIGHTS OFF
Knurled ring turned to symbol
O
.
SIDELIGHTS - TAILLIGHTS
Turn the knurled ring to
6
.
The warning light
3
on the instrument
cluster will come on at the same time.
DIPPED BEAM HEADLIGHTS
Turn the knurled ring to
2
.
The warning light
3
on the instrument
cluster will come on at the same time.
MAIN BEAM HEADLIGHTS
When the knurled ring is at
2
, pull the
lever towards the steering wheel (2
nd
un-
stable position).
The warning light
1
1on the instrument
cluster will come on at the same time.
To turn the main beams off, pull again the
lever towards the steering wheel (dipped
beams will turn on again).
FLASHING THE HEADLIGHTS
Pull the stalk towards the steering wheel
(1
st
unstable position) regardless of the po-
sition of the knurled ring. The warning
light
1
on the instrument cluster will
come on at the same time.
AUTOMATIC HEADLIGHT
SENSOR (day light sensor)
fig. 44/b (where provided)
This sensor detects changes of external
lights according to the sensitivity of the
setting: higher the sensitivity, lower the
amount of external light needed to switch
the lights on. The sensitivity of the day light
sensor may be adjusted by means of the
“Setup menu” on the instrument panel.
Activation
Turn the knurled ring to
2
A
. the side/tail-
lights and dipped beam headlights are
switched on automatically according to
the external light.
The headlights can only be flashed with the
sensor on.
fig. 44/a
F0R0037m
fig. 44/b
F0R0238m
на панели приборов.
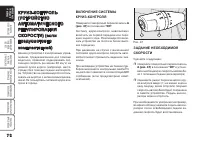
Для выключения дальнего света фар сно
-
ва потяните рычаг на себя (включится
ближний свет фар).
КРАТКОВРЕМЕННОЕ
ВКЛЮЧЕНИЕ ДАЛЬНЕГО
СВЕТА
Потяните рычаг на себя (нефиксирован
-
ное положение) при любом положении
наконечника переключателя. При этом
включится контрольная лампа
66
SAFETY DEVICES
CORRECT USE OF THE
CA
R
W
ARNING
LIGHTS AND MESSAGES
IN AN
EMERGENCY
CA
R
MA
IN
TE
NA
NC
E
TECHNICAL
SPECIFICA
TIONS
INDEX
DASHBOARD AND CONTROLS
EXTERNAL LIGHTS
The left-hand stalk
fig. 44/a
operates
most of the external lights.
The external lights can only be switched
on when the ignition key is at
MAR
.
The instrument panel and the various
dashboard controls will come on with the
external lights.
LIGHTS OFF
Knurled ring turned to symbol
O
.
SIDELIGHTS - TAILLIGHTS
Turn the knurled ring to
6
.
The warning light
3
on the instrument
cluster will come on at the same time.
DIPPED BEAM HEADLIGHTS
Turn the knurled ring to
2
.
The warning light
3
on the instrument
cluster will come on at the same time.
MAIN BEAM HEADLIGHTS
When the knurled ring is at
2
, pull the
lever towards the steering wheel (2
nd
un-
stable position).
The warning light
1
1on the instrument
cluster will come on at the same time.
To turn the main beams off, pull again the
lever towards the steering wheel (dipped
beams will turn on again).
FLASHING THE HEADLIGHTS
Pull the stalk towards the steering wheel
(1
st
unstable position) regardless of the po-
sition of the knurled ring. The warning
light
1
on the instrument cluster will
come on at the same time.
AUTOMATIC HEADLIGHT
SENSOR (day light sensor)
fig. 44/b (where provided)
This sensor detects changes of external
lights according to the sensitivity of the
setting: higher the sensitivity, lower the
amount of external light needed to switch
the lights on. The sensitivity of the day light
sensor may be adjusted by means of the
“Setup menu” on the instrument panel.
Activation
Turn the knurled ring to
2
A
. the side/tail-
lights and dipped beam headlights are
switched on automatically according to
the external light.
The headlights can only be flashed with the
sensor on.
fig. 44/a
F0R0037m
fig. 44/b
F0R0238m
на
панели приборов.
ДАТЧИК АВТОМАТИЧЕСКОГО
ВКЛЮЧЕНИЯ СВЕТА ФАР (ДАТ
-
ЧИК СУМРАКА) (рис. 44/b)
(если есть)
Датчик реагирует на изменения условий
освещенности в соответствии с установлен
-
ным уровнем чувствительности: чем выше
чувствительность, тем раньше происходит
автоматическое включение света фар при
наступлении сумерек. Чувствительность
датчика сумрака устанавливается с помо
-
щью меню настройки.
Активация
Поверните поворотный переключатель в
сторону символа
66
SAFETY DEVICES
CORRECT USE OF THE
CA
R
W
ARNING
LIGHTS AND MESSAGES
IN AN
EMERGENCY
CA
R
MA
IN
TE
NA
NC
E
TECHNICAL
SPECIFICA
TIONS
INDEX
DASHBOARD AND CONTROLS
EXTERNAL LIGHTS
The left-hand stalk
fig. 44/a
operates
most of the external lights.
The external lights can only be switched
on when the ignition key is at
MAR
.
The instrument panel and the various
dashboard controls will come on with the
external lights.
LIGHTS OFF
Knurled ring turned to symbol
O
.
SIDELIGHTS - TAILLIGHTS
Turn the knurled ring to
6
.
The warning light
3
on the instrument
cluster will come on at the same time.
DIPPED BEAM HEADLIGHTS
Turn the knurled ring to
2
.
The warning light
3
on the instrument
cluster will come on at the same time.
MAIN BEAM HEADLIGHTS
When the knurled ring is at
2
, pull the
lever towards the steering wheel (2
nd
un-
stable position).
The warning light
1
1on the instrument
cluster will come on at the same time.
To turn the main beams off, pull again the
lever towards the steering wheel (dipped
beams will turn on again).
FLASHING THE HEADLIGHTS
Pull the stalk towards the steering wheel
(1
st
unstable position) regardless of the po-
sition of the knurled ring. The warning
light
1
on the instrument cluster will
come on at the same time.
AUTOMATIC HEADLIGHT
SENSOR (day light sensor)
fig. 44/b (where provided)
This sensor detects changes of external
lights according to the sensitivity of the
setting: higher the sensitivity, lower the
amount of external light needed to switch
the lights on. The sensitivity of the day light
sensor may be adjusted by means of the
“Setup menu” on the instrument panel.
Activation
Turn the knurled ring to
2
A
. the side/tail-
lights and dipped beam headlights are
switched on automatically according to
the external light.
The headlights can only be flashed with the
sensor on.
fig. 44/a
F0R0037m
fig. 44/b
F0R0238m
. При этом габаритные
огни и ближний свет фар будут включаться
автоматически при наступлении сумерек.
Если свет фар включен автоматически (по
сигналу датчика сумрака), то возможно
только переключение света фар с ближне
-
го на дальний, выключение невозможно.
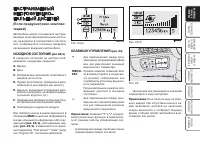
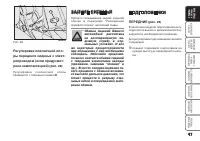
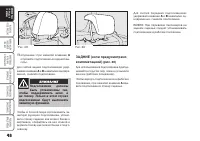
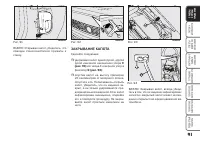
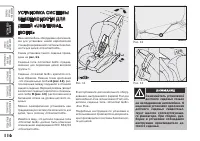
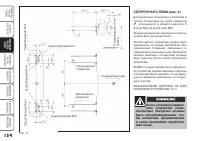
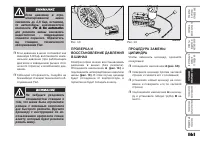
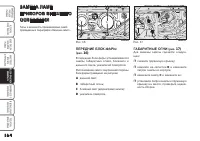
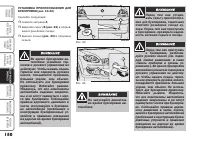
Рис. 44/a
Рис. 44/b
Содержание
- 3 REFUELLING; ages as a consequence.; ENGINE STARTING; dles or any other inflammable materials: risk of fire.; RESPECTING THE ENVIRONMENT; sure better respect for the environment.; ПУСК ДВИГАТЕЛЯ; Вашему Вниманию
- 4 ЭЛЕКТРИЧЕСКИЕ ПРИБОРЫ; КАРТОЧКА CODE; ТЕХНИЧЕСКОЕ ОБСЛУЖИВАНИЕ; port the required load.
- 6 DASHBOARD
- 7 SYMBOLS
- 8 ЭКСПЛуаТаЦиЯ; Предупредительный сигнал; во время движения; Электронные компонен
- 9 THE KEYS; KEY WITH REMOTE CONTROL; KEY WITH REMOTE CONTROL; THE KEYS; КаРТОЧКа CODE; KEY WITH REMOTE CONTROL; THE KEYS; All the keys and the CODE
- 10 LED indications on the driver’s; LED indications on the driver’s; Replacing the battery of the key; Only press button B with the; LED indications on the driver’s
- 12 HEADLIGHT WASHER; The metal insert of the key; ALARM; The car alarm system is available at Lin-; СиГнаЛиЗаЦиЯ
- 14 IGNITION; ЗамОК ЗаЖиГаниЯ; Выключение
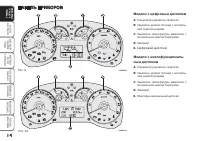
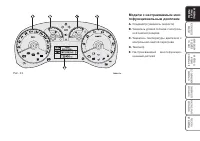
- 15 INSTRUMENT PANEL; модели с цифровым дисплеем; модели с многофункциональ
- 16 Versions with reconfigurable
- 17 INSTRUMENTS; СПиДОмеТР; ПРиБОРЫ
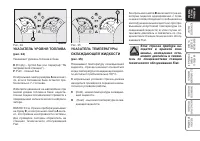
- 18 If the needle reaches the red; If the needle reaches the red; уКаЗаТеЛЬ уРОВнЯ ТОПЛиВа; FUEL LEVEL GAUGE fig. 14; If the needle reaches the red
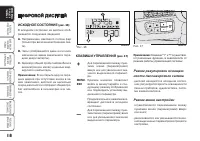
- 19 STANDARD SCREEN fig. 16; Note; STANDARD SCREEN fig. 16; Note; ЦиФРОВОЙ ДиСПЛеЙ; иСХОДнОе СОСТОЯние; КЛаВиши уПРаВЛениЯ; Режим регулировки освещен
- 20 меню наСТРОЙКи
- 23 Пункт меню “BAG P” (актива
- 24 MULTIFUNCTION; To adjust light inside the passenger; MULTIFUNCTION; To adjust light inside the passenger; (если предусмотрено комплек
- 27 Пункт меню “Headl. sensor”
- 34 наСТРаиВаемЫЙ; наЛЬнЫЙ ДиСПЛеЙ
- 40 Пункт меню “First screen”
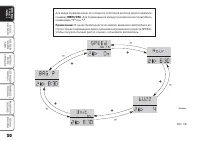
- 45 назначение; Отображаемые значения
- 46 Кнопка; Задание нового маршрута.
- 47 FRONT SEATS; Back rest angle adjustment fig. 27; Seat height adjustment; Backwards/Forwards adjustment; Back rest angle adjustment fig. 27
- 48 HEAD RESTRAINTS; HEAD RESTRAINTS
- 49 The head restraints must be; рис
- 50 REARVIEW MIRRORS; DRIVING MIRROR fig. 32; STEERING WHEEL; РУЛЕВОЕ КОЛЕСО
- 52 HEATING AND VENTILATION; Adjustable central vents -; СИСТЕМА ОТОПЛЕНИЯ И ВЕНТИЛЯЦИИ
- 53 Air temperature knob A
- 55 СТЕКЛАХ; Устранение запотевания стекол
- 56 ОРГАНЫ УПРАВЛЕНИЯ; MANUAL CLIMATE; MANUAL CLIMATE; MANUAL CLIMATE
- 58 VENTILATION; VENTILATION
- 59 WARMING THE PASSENGER
- 60 Window demisting; HEATED REAR WINDOW AND
- 61 РЕЦИРКУЛЯЦИЯ ВОЗДУХА; LOOKING AFTER THE SYSTEM
- 62 ОБЩИЕ СВЕДЕНИЯ
- 63 D MAX DEF
- 65 LO; LO; LO; LO
- 70 Деактивация; ДЕАКТИВАЦИЯ
- 71 WIPER; WIPER; WINDOW WASHING; WIPER; WINDOW WASHING; WIPER; WINDOW WASHING; WIPER; WINDOW WASHING; WIPER
- 73 SWITCHING THE DEVICE ON; SWITCHING THE DEVICE ON
- 75 CEILING LIGHTS; CEILING LIGHTS; FRONT CEILING WITH SPOT
- 77 COURTESY LIGHTS
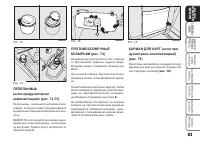
- 78 HAZARD LIGHTS fig. 54; CONTROLS; ПРОТИВОТУМАННЫЕ ФАРЫ; CONTROLS; REAR FOG LIGHTS fig. 56; CONTROLS; REAR FOG LIGHTS fig. 56; CONTROLS; HAZARD LIGHTS fig. 54; REAR FOG LIGHTS fig. 56; CONTROLS; HAZARD LIGHTS fig. 54; REAR FOG LIGHTS fig. 56
- 79 ГАБАРИТНЫЕ ОГНИ; если предусмотрено комплек
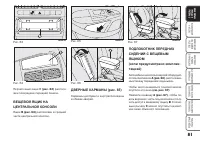
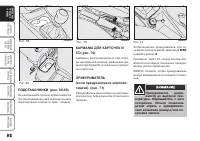
- 81 To open the drawer operate handle; Oddment compartment; To open the drawer operate handle; Oddment compartment; ПЕРЧАТОЧНЫЕ ЯЩИКИ; Перед переустановкой
- 82 FRONT ARMREST WITH
- 83 The cigar lighter becomes; CIGAR LIGHTER; GLASS HOLDER - CAN HOLDER
- 84 КАРМАН ДЛЯ КАРТ (если пре
- 86 WINDOW WINDERS; Always use this device when; POWER WINDOWS; СТЕКЛОПОДЪЕМНИКИ
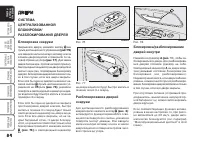
- 87 The system conforms to; DOORS; Система
- 88 Front and rear passenger door; Front and rear passenger door
- 89 OPENING THE BOOT; OPENING THE BOOT; БАГАЖНЫЙ ОТСЕК; BOOT; OPENING THE BOOT; BOOT; OPENING THE BOOT
- 90 EXTENDING THE BOOT
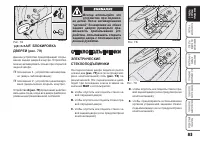
- 91 To return the rear seat back to its; Make sure the backrest is; BONNET; OPENING THE BONNET; КАПОТ; ОТКРЫВАНИЕ КАПОТА
- 92 CLOSING THE BONNET
- 93 СЪЕМНЫЙ БАГАЖНИК
- 94 BEAM DIRECTION; ФАРЫ; HEADLIGHTS; HEADLIGHTS
- 95 СИСТЕМА abS; Неисправность системы abS; ABS SYSTEM; ABS SYSTEM INTERVENTION; FAILURE INDICATIONS
- 96 Неисправность функции EbD; ESP SYSTEM; BRAKE ASSIST; EBD failure; тивности торможения в экс; BRAKE ASSIST; ESP SYSTEM; EBD failure; Electronic
- 97 АКТИВАЦИЯ СИСТЕМЫ ESP; ESP SYSTEM ACTIVATION; HILL HOLDER SYSTEM
- 98 MSR system; For correct operation of the
- 99 СИСТЕМА EObD; предусмотрено комплек; EOBD SYSTEM; EOBD SYSTEM
- 100 PARKING SENSORS; ACTIVATION
- 101 ПРИ БУКСИРОВКЕ ПРИЦЕПА; GENERAL WARNINGS; OPERATION WITH TRAILER
- 102 SOUND SYSTEM; SOUND SYSTEM PRESETTING; For connection to existing car; АУДИОСИСТЕМА; мотрено комплектацией)
- 103 TRANSCEIVERS; ACCESSORIES; ELECTRICAL/ELECTRONIC
- 104 AT THE FILLING; PETROL ENGINES
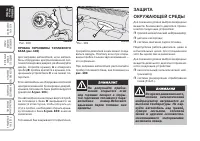
- 105 PROTECTING THE; PROTECTING THE
- 106 С И С Т Е М А Б Е З О П АС Н О С Т И
- 107 SEAT BELTS; ADJUSTING THE FRONT SEAT; SEAT BELTS; ADJUSTING THE FRONT SEAT; SEAT BELTS; USING THE SEAT BELTS fig. 1; ADJUSTING THE FRONT SEAT; Нельзя нажимать клави
- 109 PRETENSIONERS; LOAD LIMITERS; ОГРАНИЧИТЕЛИ УСИЛИЯ
- 110 GENERAL INSTRUCTIONS FOR; The belt must not be twist-
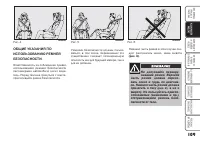
- 112 БЕЗОПАСНАЯ ПЕРЕВОЗКА ДЕТЕЙ
- 114 structions supplied with the child restraint.; GROUP 2; The figure is indicative for; ГРУППА 1
- 115 ГРУППА 3; УСЛОВНЫЕ ОБОЗНАЧЕНИЯ:
- 117 Fit the child seat when the; “UNIVERSAL ISOFIX”
- 119 PASSENGER’S FRONT AIR BAG
- 120 MANUAL DEACTIVATION OF
- 121 SIDE AIRBAGS; (если предусмотрено
- 122 ОБЩИЕ УКАЗАНИЯ
- 126 С О В Е Т Ы В О Д И Т Е л Ю А В ТО М О Б И л я
- 127 ЗАПУСК ДВИГАТЕЛЯ
- 129 ОСТАНОВКА ДВИГАТЕЛЯ; STOPPING THE ENGINE
- 130 Never leave children unat-; PARKING THE CAR; Never leave children unat-; PARKING THE CAR; Never leave children unat-
- 131 USING THE MANUAL; USING THE MANUAL
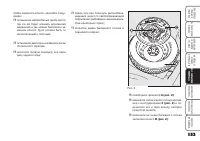
- 135 After fitting, screw holes; Assembly diagram fig. 3; After fitting, screw holes
- 136 ЗИМНИЕ ШИНЫ
- 137 CAR INACTIVITY
- 138 С О О Б Щ Е Н И я; кО Н Т Р О л Ь Н Ы Е л А М П Ы И И Н Ф О Р М А Ц И О Н Н Ы Е
- 139 WARNING LIGHTS; УРОВЕНЬ ТОРМОЗНОЙ ЖИД; WARNING LIGHTS; If the warning light
- 141 If the warning light; LOW ENGINE OIL; In the case of demanding use
- 143 сии с двигателем; СИСТЕМА УПРАВЛЕНИЯ ДВИ; steady light
- 145 Предпусковой подогрев; Неисправность системы пред
- 146 жел
- 148 Сопровождение домой
- 149 леная лампа; циональным дисплеем
- 150 У С Т РА Н Е Н И Е Н Е И С П РА В Н О С Т Е Й
- 151 ЗАПУСК ДВИГАТЕЛЯ В; STARTING THE
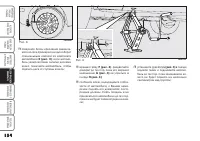
- 152 ЗАМЕНА КОЛЕСА
- 153 Существенные примечания:
- 154 To change a wheel proceed as
- 156 REFITTING THE
- 158 QUICK TYRE REPAIR KIT; Hand over the instruction
- 159 IMPORTANT INFORMATION:; The sealing fluid of the quick tyre repair
- 160 Apply the handbrake; INFLATION PROCEDURE; Apply the handbrake
- 161 pull
- 162 ПРОВЕРКА И
- 163 ЗАМЕНА ЛАМП; GENERAL INSTRUCTIONS; WHEN NEEDING TO; GENERAL INSTRUCTIONS
- 165 IF AN EXTERIOR LIGHT; FRONT LIGHT CLUSTERS
- 166 DIPPED BEAM HEADLIGHTS
- 167 FRONT FOG LIGHTS; ПРОТИВОТУМАНЫЕ ФАРЫ
- 169 THIRD BRAKE LIGHTS
- 170 IF AN INTERIOR LIGHT; FRONT CEILING LIGHT
- 171 COURTESY LIGHT fig. 33
- 172 GENERAL; GENERAL
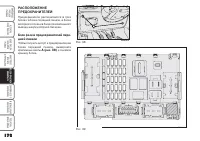
- 173 Блок реле и предохранителей пере; FUSE LOCATION
- 174 To gain access to the fuses in the fuse box; To gain access to the fuses in the fuse box
- 175 ЗАЩИЩАЕМЫЕ цЕПИ
- 177 Блок реле и предохранителей моторного отсека
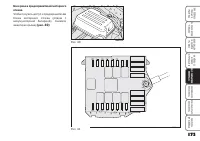
- 180 LIFTING THE CAR
- 181 release the cap; release the cap
- 182 Т Е Х Н И Ч Е С КО Е О Б С Л У Ж И ВА Н И Е А В ТО М О Б И Л Я
- 185 Top up fluids; Thousands of kilometres; Thousands of kilometres; Top up fluids; Thousands of kilometres; Top up fluids
- 188 ОБЩАЯ ПРОВЕРКА
- 189 CHECKING FLUID; CHECKING FLUID
- 190 Engine oil
- 192 PARAFLU UP
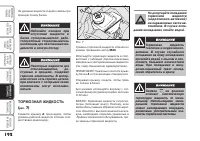
- 193 ТОРМОЗНАЯ ЖИДКОСТЬ
- 194 ТИТЕЛЬ
- 197 WHEELS AND TYRES; IMPORTANT NOTES; Remember that the road; КОЛЕСА И ШИНЫ; Помните, что устойчи
- 198 РЕЗИНОВЫЕ ШЛАНГИ; ЩЕТКИ
- 200 КУЗОВ
- 201 CHANGING THE BATTERY
- 202 CLEANING SEATS AND FABRIC; INTERIORS
- 204 Т Е Х Н И Ч Е С К И Е Х А РА К Т Е Р И С Т И К И
- 205 IDENTIFICATION DATA
- 208 ДВИГАТЕЛЬ
- 211 READING TYRE; WHEELS; RIMS AND TYRES; КОЛЕСА
- 213 Диск
- 215 DIMENSIONS; Dimensions are expressed in mm and re-; Boot volume; Unladen boot volume; Versions; РАЗМЕРЫ КУЗОВА
- 216 РАБОЧИЕ ХАРАКТЕРИСТИКИ
- 217 МАССА
- 218 ЗАПРАВОЧНЫЕ ОБЪЕМЫ
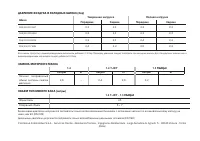
- 219 РАБОЧИЕ ЖИДКОСТИ И СМАЗОЧНЫЕ МАТЕРИАЛЫ
- 221 РАСХОД ТОПЛИВА
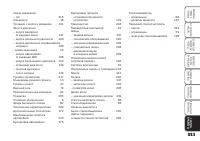
- 223 П Р Е Д М Е Т Н Ы Й У К А З АТ Е Л Ь
- 227 УТИЛИЗАЦИЯ АВТОМОБИЛЯ ПО ОКОНЧАНИИ СРОКА СЛУЖБЫ
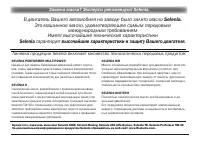
- 232 Замена масла? Эксперты рекомендуют Selenia.; В двигатель Вашего автомобиля на заводе было залито масло; SELENIa WR
- 235 Русский

