Автомобили Fiat LINEA 2007 - инструкция пользователя по применению, эксплуатации и установке на русском языке. Мы надеемся, она поможет вам решить возникшие у вас вопросы при эксплуатации техники.
Если остались вопросы, задайте их в комментариях после инструкции.
"Загружаем инструкцию", означает, что нужно подождать пока файл загрузится и можно будет его читать онлайн. Некоторые инструкции очень большие и время их появления зависит от вашей скорости интернета.


ПР
ИБ
ОР
Ы
И О
РГ
АН
Ы
УП
РА
ВЛ
ЕН
ИЯ
КО
НТ
РО
ЛЬ
НЫ
Е
ЛА
МП
Ы
И
СО
ОБ
ЩЕ
НИ
Я
СИ
СТ
ЕМ
А Б
ЕЗ
О
-
ПА
СН
ОС
ТИ
СО
ВЕ
ТЫ
ВО
ДИ
ТЕ
ЛЮ
АВ
ТО
МО
БИ
ЛЯ
УС
ТРА
НЕ
НИ
Е
НЕ
ИС
ПР
АВ
-НО
СТ
ЕЙ
ТЕ
ХН
ИЧ
ЕС
КО
Е
ОБ
СЛ
УЖ
ИВ
АН
ИЕ
ТЕ
ХН
ИЧ
ЕС
КИ
Е
ХА
РА
КТ
ЕР
ИС
ТИ
КИ
ПР
ЕД
МЕ
ТН
ЫЙ
УК
АЗ
АТ
ЕЛ
Ь
СИ
СТ
ЕМ
А
БЕ
ЗО
ПА
СН
ОС
ТИ
СО
ВЕ
ТЫ
ВО
ДИ
ТЕ
ЛЮ
АВ
ТО
МО
БИ
ЛЯ
УС
ТР
АН
ЕН
ИЕ
НЕ
ИС
ПР
АВ
НО
СТ
ЕЙ
ТЕ
ХН
ИЧ
ЕС
КО
Е
ОБ
СЛ
УЖ
ИВ
АН
ИЕ
ТЕ
ХН
ИЧ
ЕС
КИ
Е
ХА
РА
КТ
ЕР
ИС
ТИ
КИ
ПР
ЕД
МЕ
ТН
ЫЙ
УК
АЗ
АТ
ЕЛ
Ь
КО
НТ
РО
ЛЬ
НЫ
Е
ЛА
МП
Ы
И
СО
ОБ
ЩЕ
НИ
Я
ПР
ИБ
ОР
Ы
И О
РГ
АН
Ы
УП
РА
ВЛ
ЕН
ИЯ
65
ПР
ИБ
ОР
Ы
И О
РГ
АН
Ы
УП
РА
ВЛ
ЕН
ИЯ
КО
НТ
РО
ЛЬ
НЫ
Е
ЛА
МП
Ы
И
СО
ОБ
ЩЕ
НИ
Я
СИ
СТ
ЕМ
А Б
ЕЗ
О
-
ПА
СН
ОС
ТИ
СО
ВЕ
ТЫ
ВО
ДИ
ТЕ
ЛЮ
АВ
ТО
МО
БИ
ЛЯ
УС
ТРА
НЕ
НИ
Е
НЕ
ИС
ПР
АВ
-НО
СТ
ЕЙ
ТЕ
ХН
ИЧ
ЕС
КО
Е
ОБ
СЛ
УЖ
ИВ
АН
ИЕ
ТЕ
ХН
ИЧ
ЕС
КИ
Е
ХА
РА
КТ
ЕР
ИС
ТИ
КИ
ПР
ЕД
МЕ
ТН
ЫЙ
УК
АЗ
АТ
ЕЛ
Ь
СИ
СТ
ЕМ
А
БЕ
ЗО
ПА
СН
ОС
ТИ
СО
ВЕ
ТЫ
ВО
ДИ
ТЕ
ЛЮ
АВ
ТО
МО
БИ
ЛЯ
УС
ТР
АН
ЕН
ИЕ
НЕ
ИС
ПР
АВ
НО
СТ
ЕЙ
ТЕ
ХН
ИЧ
ЕС
КО
Е
ОБ
СЛ
УЖ
ИВ
АН
ИЕ
ТЕ
ХН
ИЧ
ЕС
КИ
Е
ХА
РА
КТ
ЕР
ИС
ТИ
КИ
ПР
ЕД
МЕ
ТН
ЫЙ
УК
АЗ
АТ
ЕЛ
Ь
КО
НТ
РО
ЛЬ
НЫ
Е
ЛА
МП
Ы
И
СО
ОБ
ЩЕ
НИ
Я
ПР
ИБ
ОР
Ы
И О
РГ
АН
Ы
УП
РА
ВЛ
ЕН
ИЯ
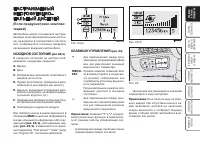
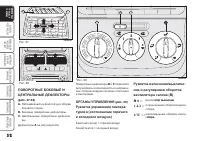
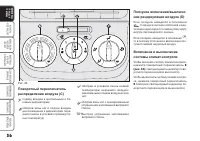
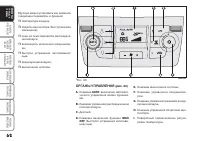
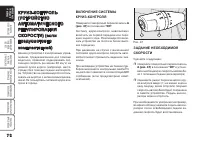
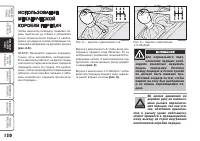
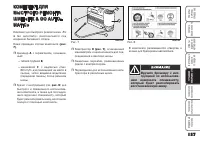
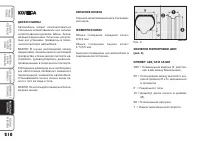
Клавиша управления
оборотами вентилятора (H)
Клавиша
H
позволяет увеличивать или
уменьшать скорость вращения вентиля
-
тора салона, изменяя количество воздуха,
поступающего в пассажирский салон
(при сохранении заданной температу
-
ры).
Скорость вращения вентилятора отобра
-
жается светящимися штрихами на дисп
-
лее:
максимальные обороты вентилятора
= все штрихи светятся;
минимальные обороты вентилятора =
светится только один штрих.
Вентилятор салона может быть выключен
только в случае принудительного выклю
-
чения кондиционера клавишей
F
(рис. 40)
.
Чтобы восстановить автоматическое уп
-
равление скоростью вращения вентиля
-
тора, нажмите клавишу
AUTO
.
ВАЖНО: При высокой скорости автомобиля
динамический эффект может увеличить
количество воздуха, поступающего в пас
-
сажирский салон, поэтому обозначения на
дисплее могут не соответствовать реальной
интенсивности воздушного потока.
Клавиша
AUTO
(A)
(Автоматическое управление)
Нажмите клавишу
AUTO
, чтобы система
автоматически поддерживала количество
и режим распределения воздуха, посту
-
пающего в пассажирский салон. Все
предварительные ручные настройки бу
-
дут отменены.
В этом случае на дисплее появится над
-
пись
FULL
AUTO
.
Если вручную изменить хотя бы один па
-
раметр, контролируемый системой (со
-
стояние режима рециркуляции, обороты
вентилятора или состояние кондиционе
-
ра), слово
FULL
исчезнет с дисплея, в
знак того, что система больше не управ
-
ляет всеми функциями автоматически
(автоматическое управление температу
-
рой при этом не прекращается).
ВАЖНО: Если система (в результате чело
-
веческого вмешательства) не может под
-
держивать заданную температуру в пас
-
сажирском салоне, установленное значе
-
ние температуры на дисплее начнет ми
-
гать через минуту после того, как слово
AUTO
исчезнет с дисплея.
Чтобы восстановить автоматический кли
-
мат-контроль после ручной настройки, в
любое время нажмите клавишу
AUTO
.
Клавиша включения/выключе
-
ния режима рециркуляции (G)
Алгоритм действия клавиши:
принудительное включение (режим
рециркуляции включен постоянно) со
-
провождается включением светодиод-
ного индикатора клавиши
G
и появле
-
нием символа
63
SAFETY DEVICES
CORRECT USE OF THE
CA
R
W
ARNING
LIGHTS AND MESSAGES
IN AN
EMERGENCY
CA
R
MA
IN
TE
NA
NC
E
TECHNICAL
SPECIFICA
TIONS
INDEX
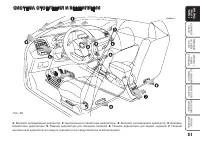
DASHBOARD AND CONTROLS
Fan speed adjusting buttons (H)
Press button
H
to increase or to decrease
the fan speed and therefore the amount
of air admitted into the passenger com-
partment, although keeping the required
temperature set.
The fan speed is shown by the lit bars on
the display:
❒
max fan speed = all bars lit;
❒
min fan speed = one bar lit.
The fan can be cut off only if the climate
control compressor has been switched
off pressing button
F-fig. 40
.
IMPORTANT To restore automatic fan
speed control after a manual adjustment,
press button
AUTO
.
IMPORTANT At high speeds, the dynamic
effect may increase the flow of air into the
passenger compartment which in this case
will not directly correspond to the fan
speed bar display.
AUTO (A) (automatic operation)
Press
AUTO
to make the system auto-
matically adjust the quantity and distribu-
tion of the air introduced into the pas-
senger compartment. All previous manu-
al settings will be cancelled.
The message
FULL AUTO
will appear
on the front display in this condition.
By manually intervening on at least of the
functions automatically managed by the
system (air recirculation, fan speed or
compressor on/off), the word
FULL
will
disappear from the display indicating that
the system is no longer automatically con-
trolling all the functions (the temperature
will still be controlled automatically by the
system).
IMPORTANT Should the system (after
manual settings) be no longer able to
guarantee the required temperature set
in the passenger compartment, the set
temperature value will start flashing to in-
dicate this condition, after one minute the
AUTO
message will turn off.
To restore system automatic control at
any time, after one or more manual ad-
justments, press button
AUTO
.
Air recirculation on/off button (G)
Air recirculation works according to the
following operating logics:
❒
override on (inside air recirculation
always on), indicated by the the LED
on button
G
and symbol
T
on
the display;
❒
override off (air recirculation always
off and introduction of external air),
indicated by the fact that the LED on
the button is off
ê
is on the display.
These operating conditions are obtained
by pressing
G
in sequence.
IMPORTANT The inside air recircula-
tion system makes it possible to reach
the required heating or cooling condi-
tions faster.
It is however inadvisable to use it on
rainy/cold days as it would considerably
increase the possibility of the windows
misting inside, especially if the climate
control compressor is off.
Recirculation is forced off (i.e. air is
introduced from the outside) when the
the outside temperature is cold to pre-
vent misting up.
It is advisable not to use the air recircu-
lation function when the outside tem-
perature is low to prevent the windows
from rapidly misting up.
на дисплее;
принудительное выключение (постоян
-
ное поступление наружного воздуха)
сопровождается выключением свето
-
диодного индикатора клавиши и появ
-
лением символа
63
SAFETY DEVICES
CORRECT USE OF THE
CA
R
W
ARNING
LIGHTS AND MESSAGES
IN AN
EMERGENCY
CA
R
MA
IN
TE
NA
NC
E
TECHNICAL
SPECIFICA
TIONS
INDEX
DASHBOARD AND CONTROLS
Fan speed adjusting buttons (H)
Press button
H
to increase or to decrease
the fan speed and therefore the amount
of air admitted into the passenger com-
partment, although keeping the required
temperature set.
The fan speed is shown by the lit bars on
the display:
❒
max fan speed = all bars lit;
❒
min fan speed = one bar lit.
The fan can be cut off only if the climate
control compressor has been switched
off pressing button
F-fig. 40
.
IMPORTANT To restore automatic fan
speed control after a manual adjustment,
press button
AUTO
.
IMPORTANT At high speeds, the dynamic
effect may increase the flow of air into the
passenger compartment which in this case
will not directly correspond to the fan
speed bar display.
AUTO (A) (automatic operation)
Press
AUTO
to make the system auto-
matically adjust the quantity and distribu-
tion of the air introduced into the pas-
senger compartment. All previous manu-
al settings will be cancelled.
The message
FULL AUTO
will appear
on the front display in this condition.
By manually intervening on at least of the
functions automatically managed by the
system (air recirculation, fan speed or
compressor on/off), the word
FULL
will
disappear from the display indicating that
the system is no longer automatically con-
trolling all the functions (the temperature
will still be controlled automatically by the
system).
IMPORTANT Should the system (after
manual settings) be no longer able to
guarantee the required temperature set
in the passenger compartment, the set
temperature value will start flashing to in-
dicate this condition, after one minute the
AUTO
message will turn off.
To restore system automatic control at
any time, after one or more manual ad-
justments, press button
AUTO
.
Air recirculation on/off button (G)
Air recirculation works according to the
following operating logics:
❒
override on (inside air recirculation
always on), indicated by the the LED
on button
G
and symbol
T
on
the display;
❒
override off (air recirculation always
off and introduction of external air),
indicated by the fact that the LED on
the button is off
ê
is on the display.
These operating conditions are obtained
by pressing
G
in sequence.
IMPORTANT The inside air recircula-
tion system makes it possible to reach
the required heating or cooling condi-
tions faster.
It is however inadvisable to use it on
rainy/cold days as it would considerably
increase the possibility of the windows
misting inside, especially if the climate
control compressor is off.
Recirculation is forced off (i.e. air is
introduced from the outside) when the
the outside temperature is cold to pre-
vent misting up.
It is advisable not to use the air recircu-
lation function when the outside tem-
perature is low to prevent the windows
from rapidly misting up.
на дисплее.
Необходимый режим включается после
-
довательным нажатием клавиши
G
.
ВАЖНО: В режиме рециркуляции воздуха
в салоне цели обогрева или охлаждения
достигаются быстрее, чем при поступле
-
нии наружного воздуха.
Не рекомендуется использовать режим
рециркуляции в дождливую погоду, так как
при этом возможно запотевание стекол
(особенно если выключен кондиционер).
Режим рециркуляции принудительно вы
-
ключается (то есть в салон поступает на
-
ружный воздух) при низкой температуре
наружного воздуха для предупреждения
запотевания стекол.
Не рекомендуется использовать режим
рециркуляции в холодную погоду, так как
в этом случае возможно быстрое запоте
-
вание стекол.
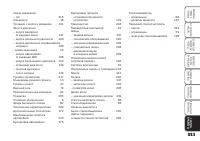
Содержание
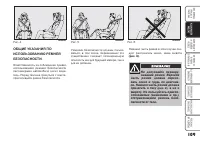
- 3 REFUELLING; ages as a consequence.; ENGINE STARTING; dles or any other inflammable materials: risk of fire.; RESPECTING THE ENVIRONMENT; sure better respect for the environment.; ПУСК ДВИГАТЕЛЯ; Вашему Вниманию
- 4 ЭЛЕКТРИЧЕСКИЕ ПРИБОРЫ; КАРТОЧКА CODE; ТЕХНИЧЕСКОЕ ОБСЛУЖИВАНИЕ; port the required load.
- 6 DASHBOARD
- 7 SYMBOLS
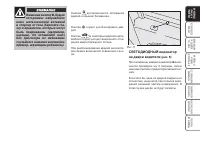
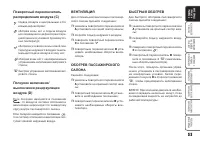
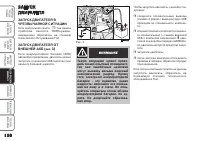
- 8 ЭКСПЛуаТаЦиЯ; Предупредительный сигнал; во время движения; Электронные компонен
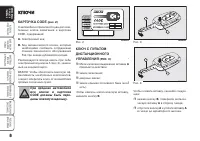
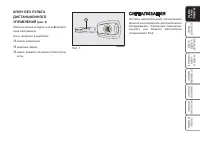
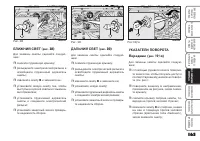
- 9 THE KEYS; KEY WITH REMOTE CONTROL; KEY WITH REMOTE CONTROL; THE KEYS; КаРТОЧКа CODE; KEY WITH REMOTE CONTROL; THE KEYS; All the keys and the CODE
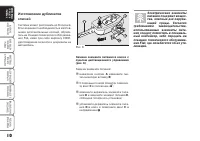
- 10 LED indications on the driver’s; LED indications on the driver’s; Replacing the battery of the key; Only press button B with the; LED indications on the driver’s
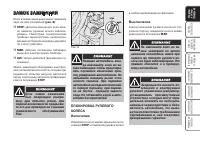
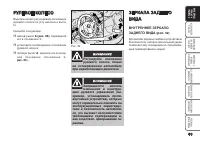
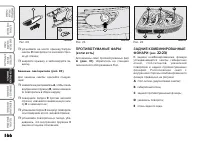
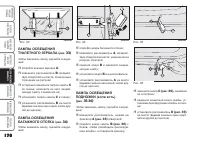
- 12 HEADLIGHT WASHER; The metal insert of the key; ALARM; The car alarm system is available at Lin-; СиГнаЛиЗаЦиЯ
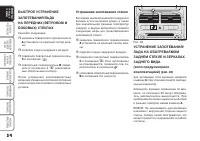
- 14 IGNITION; ЗамОК ЗаЖиГаниЯ; Выключение
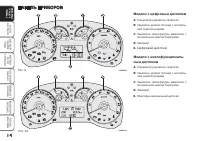
- 15 INSTRUMENT PANEL; модели с цифровым дисплеем; модели с многофункциональ
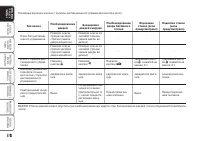
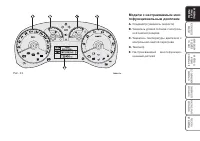
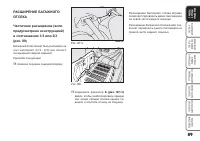
- 16 Versions with reconfigurable
- 17 INSTRUMENTS; СПиДОмеТР; ПРиБОРЫ
- 18 If the needle reaches the red; If the needle reaches the red; уКаЗаТеЛЬ уРОВнЯ ТОПЛиВа; FUEL LEVEL GAUGE fig. 14; If the needle reaches the red
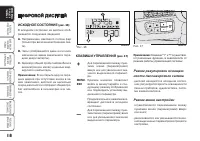
- 19 STANDARD SCREEN fig. 16; Note; STANDARD SCREEN fig. 16; Note; ЦиФРОВОЙ ДиСПЛеЙ; иСХОДнОе СОСТОЯние; КЛаВиши уПРаВЛениЯ; Режим регулировки освещен
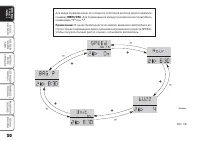
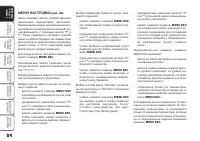
- 20 меню наСТРОЙКи
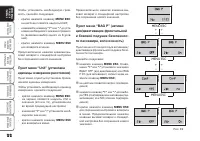
- 23 Пункт меню “BAG P” (актива
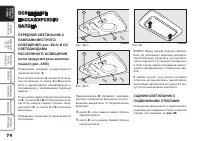
- 24 MULTIFUNCTION; To adjust light inside the passenger; MULTIFUNCTION; To adjust light inside the passenger; (если предусмотрено комплек
- 27 Пункт меню “Headl. sensor”
- 34 наСТРаиВаемЫЙ; наЛЬнЫЙ ДиСПЛеЙ
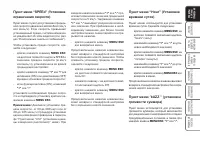
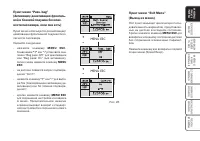
- 40 Пункт меню “First screen”
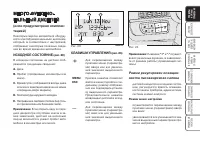
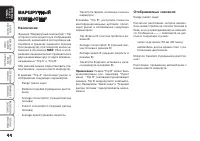
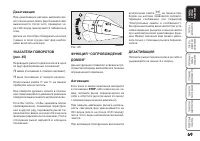
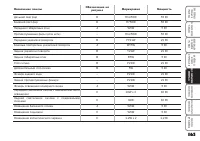
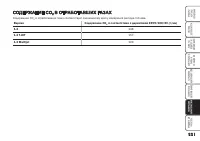
- 45 назначение; Отображаемые значения
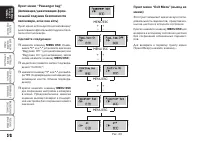
- 46 Кнопка; Задание нового маршрута.
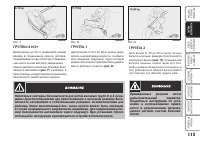
- 47 FRONT SEATS; Back rest angle adjustment fig. 27; Seat height adjustment; Backwards/Forwards adjustment; Back rest angle adjustment fig. 27
- 48 HEAD RESTRAINTS; HEAD RESTRAINTS
- 49 The head restraints must be; рис
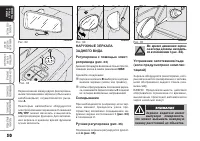
- 50 REARVIEW MIRRORS; DRIVING MIRROR fig. 32; STEERING WHEEL; РУЛЕВОЕ КОЛЕСО
- 52 HEATING AND VENTILATION; Adjustable central vents -; СИСТЕМА ОТОПЛЕНИЯ И ВЕНТИЛЯЦИИ
- 53 Air temperature knob A
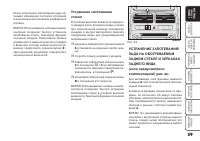
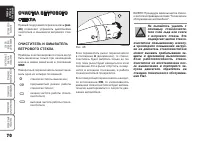
- 55 СТЕКЛАХ; Устранение запотевания стекол
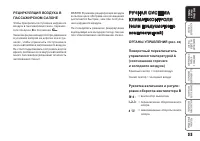
- 56 ОРГАНЫ УПРАВЛЕНИЯ; MANUAL CLIMATE; MANUAL CLIMATE; MANUAL CLIMATE
- 58 VENTILATION; VENTILATION
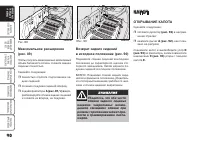
- 59 WARMING THE PASSENGER
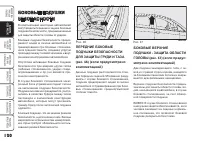
- 60 Window demisting; HEATED REAR WINDOW AND
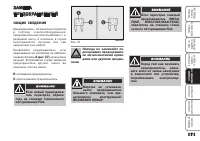
- 61 РЕЦИРКУЛЯЦИЯ ВОЗДУХА; LOOKING AFTER THE SYSTEM
- 62 ОБЩИЕ СВЕДЕНИЯ
- 63 D MAX DEF
- 65 LO; LO; LO; LO
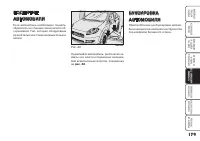
- 70 Деактивация; ДЕАКТИВАЦИЯ
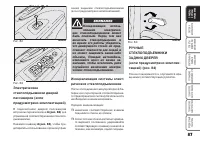
- 71 WIPER; WIPER; WINDOW WASHING; WIPER; WINDOW WASHING; WIPER; WINDOW WASHING; WIPER; WINDOW WASHING; WIPER
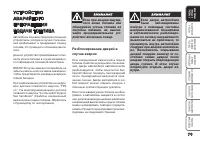
- 73 SWITCHING THE DEVICE ON; SWITCHING THE DEVICE ON
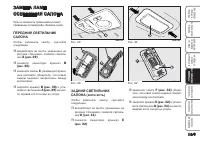
- 75 CEILING LIGHTS; CEILING LIGHTS; FRONT CEILING WITH SPOT
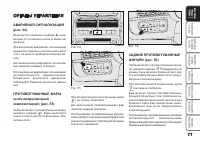
- 77 COURTESY LIGHTS
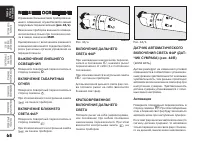
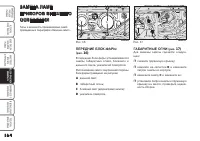
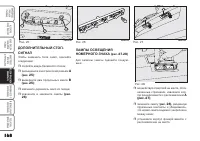
- 78 HAZARD LIGHTS fig. 54; CONTROLS; ПРОТИВОТУМАННЫЕ ФАРЫ; CONTROLS; REAR FOG LIGHTS fig. 56; CONTROLS; REAR FOG LIGHTS fig. 56; CONTROLS; HAZARD LIGHTS fig. 54; REAR FOG LIGHTS fig. 56; CONTROLS; HAZARD LIGHTS fig. 54; REAR FOG LIGHTS fig. 56
- 79 ГАБАРИТНЫЕ ОГНИ; если предусмотрено комплек
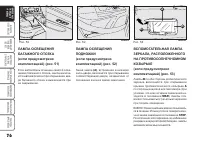
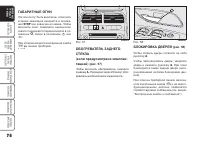
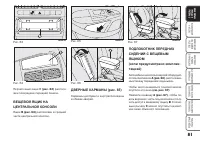
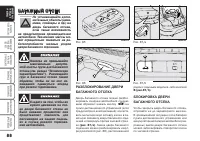
- 81 To open the drawer operate handle; Oddment compartment; To open the drawer operate handle; Oddment compartment; ПЕРЧАТОЧНЫЕ ЯЩИКИ; Перед переустановкой
- 82 FRONT ARMREST WITH
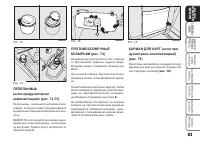
- 83 The cigar lighter becomes; CIGAR LIGHTER; GLASS HOLDER - CAN HOLDER
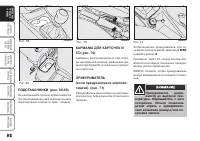
- 84 КАРМАН ДЛЯ КАРТ (если пре
- 86 WINDOW WINDERS; Always use this device when; POWER WINDOWS; СТЕКЛОПОДЪЕМНИКИ
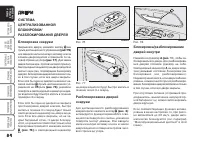
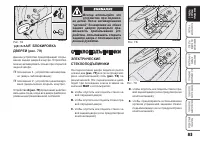
- 87 The system conforms to; DOORS; Система
- 88 Front and rear passenger door; Front and rear passenger door
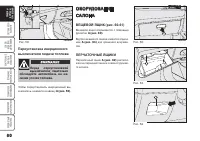
- 89 OPENING THE BOOT; OPENING THE BOOT; БАГАЖНЫЙ ОТСЕК; BOOT; OPENING THE BOOT; BOOT; OPENING THE BOOT
- 90 EXTENDING THE BOOT
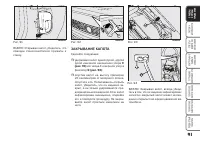
- 91 To return the rear seat back to its; Make sure the backrest is; BONNET; OPENING THE BONNET; КАПОТ; ОТКРЫВАНИЕ КАПОТА
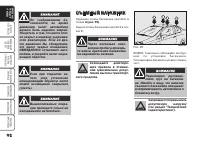
- 92 CLOSING THE BONNET
- 93 СЪЕМНЫЙ БАГАЖНИК
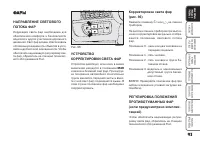
- 94 BEAM DIRECTION; ФАРЫ; HEADLIGHTS; HEADLIGHTS
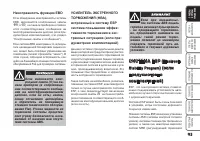
- 95 СИСТЕМА abS; Неисправность системы abS; ABS SYSTEM; ABS SYSTEM INTERVENTION; FAILURE INDICATIONS
- 96 Неисправность функции EbD; ESP SYSTEM; BRAKE ASSIST; EBD failure; тивности торможения в экс; BRAKE ASSIST; ESP SYSTEM; EBD failure; Electronic
- 97 АКТИВАЦИЯ СИСТЕМЫ ESP; ESP SYSTEM ACTIVATION; HILL HOLDER SYSTEM
- 98 MSR system; For correct operation of the
- 99 СИСТЕМА EObD; предусмотрено комплек; EOBD SYSTEM; EOBD SYSTEM
- 100 PARKING SENSORS; ACTIVATION
- 101 ПРИ БУКСИРОВКЕ ПРИЦЕПА; GENERAL WARNINGS; OPERATION WITH TRAILER
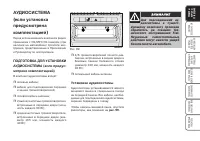
- 102 SOUND SYSTEM; SOUND SYSTEM PRESETTING; For connection to existing car; АУДИОСИСТЕМА; мотрено комплектацией)
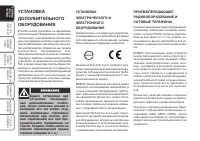
- 103 TRANSCEIVERS; ACCESSORIES; ELECTRICAL/ELECTRONIC
- 104 AT THE FILLING; PETROL ENGINES
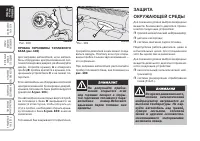
- 105 PROTECTING THE; PROTECTING THE
- 106 С И С Т Е М А Б Е З О П АС Н О С Т И
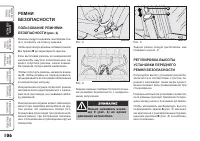
- 107 SEAT BELTS; ADJUSTING THE FRONT SEAT; SEAT BELTS; ADJUSTING THE FRONT SEAT; SEAT BELTS; USING THE SEAT BELTS fig. 1; ADJUSTING THE FRONT SEAT; Нельзя нажимать клави
- 109 PRETENSIONERS; LOAD LIMITERS; ОГРАНИЧИТЕЛИ УСИЛИЯ
- 110 GENERAL INSTRUCTIONS FOR; The belt must not be twist-
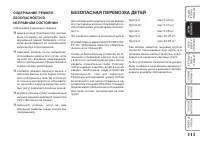
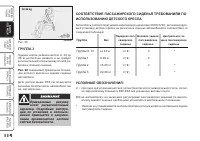
- 112 БЕЗОПАСНАЯ ПЕРЕВОЗКА ДЕТЕЙ
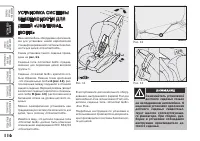
- 114 structions supplied with the child restraint.; GROUP 2; The figure is indicative for; ГРУППА 1
- 115 ГРУППА 3; УСЛОВНЫЕ ОБОЗНАЧЕНИЯ:
- 117 Fit the child seat when the; “UNIVERSAL ISOFIX”
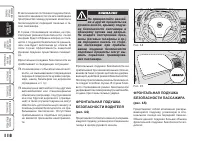
- 119 PASSENGER’S FRONT AIR BAG
- 120 MANUAL DEACTIVATION OF
- 121 SIDE AIRBAGS; (если предусмотрено
- 122 ОБЩИЕ УКАЗАНИЯ
- 126 С О В Е Т Ы В О Д И Т Е л Ю А В ТО М О Б И л я
- 127 ЗАПУСК ДВИГАТЕЛЯ
- 129 ОСТАНОВКА ДВИГАТЕЛЯ; STOPPING THE ENGINE
- 130 Never leave children unat-; PARKING THE CAR; Never leave children unat-; PARKING THE CAR; Never leave children unat-
- 131 USING THE MANUAL; USING THE MANUAL
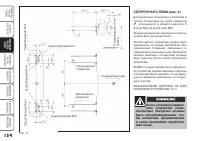
- 135 After fitting, screw holes; Assembly diagram fig. 3; After fitting, screw holes
- 136 ЗИМНИЕ ШИНЫ
- 137 CAR INACTIVITY
- 138 С О О Б Щ Е Н И я; кО Н Т Р О л Ь Н Ы Е л А М П Ы И И Н Ф О Р М А Ц И О Н Н Ы Е
- 139 WARNING LIGHTS; УРОВЕНЬ ТОРМОЗНОЙ ЖИД; WARNING LIGHTS; If the warning light
- 141 If the warning light; LOW ENGINE OIL; In the case of demanding use
- 143 сии с двигателем; СИСТЕМА УПРАВЛЕНИЯ ДВИ; steady light
- 145 Предпусковой подогрев; Неисправность системы пред
- 146 жел
- 148 Сопровождение домой
- 149 леная лампа; циональным дисплеем
- 150 У С Т РА Н Е Н И Е Н Е И С П РА В Н О С Т Е Й
- 151 ЗАПУСК ДВИГАТЕЛЯ В; STARTING THE
- 152 ЗАМЕНА КОЛЕСА
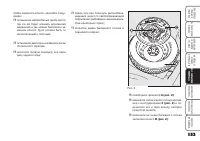
- 153 Существенные примечания:
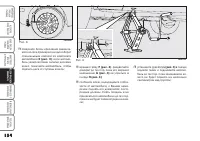
- 154 To change a wheel proceed as
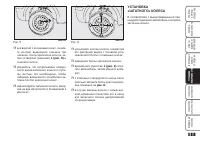
- 156 REFITTING THE
- 158 QUICK TYRE REPAIR KIT; Hand over the instruction
- 159 IMPORTANT INFORMATION:; The sealing fluid of the quick tyre repair
- 160 Apply the handbrake; INFLATION PROCEDURE; Apply the handbrake
- 161 pull
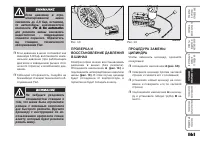
- 162 ПРОВЕРКА И
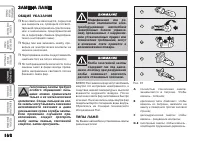
- 163 ЗАМЕНА ЛАМП; GENERAL INSTRUCTIONS; WHEN NEEDING TO; GENERAL INSTRUCTIONS
- 165 IF AN EXTERIOR LIGHT; FRONT LIGHT CLUSTERS
- 166 DIPPED BEAM HEADLIGHTS
- 167 FRONT FOG LIGHTS; ПРОТИВОТУМАНЫЕ ФАРЫ
- 169 THIRD BRAKE LIGHTS
- 170 IF AN INTERIOR LIGHT; FRONT CEILING LIGHT
- 171 COURTESY LIGHT fig. 33
- 172 GENERAL; GENERAL
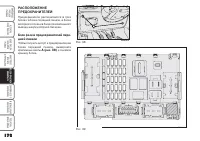
- 173 Блок реле и предохранителей пере; FUSE LOCATION
- 174 To gain access to the fuses in the fuse box; To gain access to the fuses in the fuse box
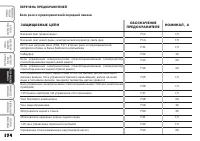
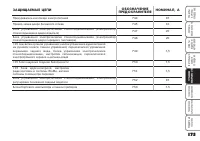
- 175 ЗАЩИЩАЕМЫЕ цЕПИ
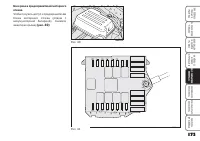
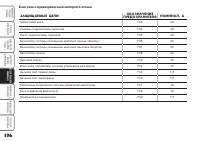
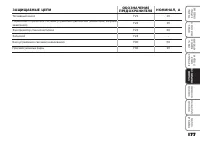
- 177 Блок реле и предохранителей моторного отсека
- 180 LIFTING THE CAR
- 181 release the cap; release the cap
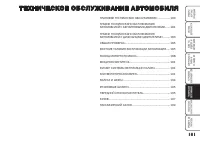
- 182 Т Е Х Н И Ч Е С КО Е О Б С Л У Ж И ВА Н И Е А В ТО М О Б И Л Я
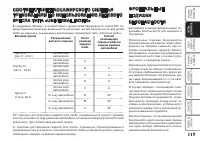
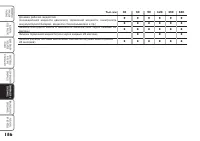
- 185 Top up fluids; Thousands of kilometres; Thousands of kilometres; Top up fluids; Thousands of kilometres; Top up fluids
- 188 ОБЩАЯ ПРОВЕРКА
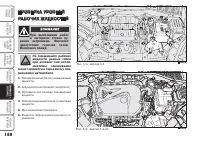
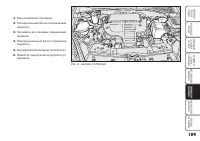
- 189 CHECKING FLUID; CHECKING FLUID
- 190 Engine oil
- 192 PARAFLU UP
- 193 ТОРМОЗНАЯ ЖИДКОСТЬ
- 194 ТИТЕЛЬ
- 197 WHEELS AND TYRES; IMPORTANT NOTES; Remember that the road; КОЛЕСА И ШИНЫ; Помните, что устойчи
- 198 РЕЗИНОВЫЕ ШЛАНГИ; ЩЕТКИ
- 200 КУЗОВ
- 201 CHANGING THE BATTERY
- 202 CLEANING SEATS AND FABRIC; INTERIORS
- 204 Т Е Х Н И Ч Е С К И Е Х А РА К Т Е Р И С Т И К И
- 205 IDENTIFICATION DATA
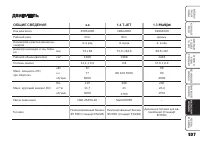
- 208 ДВИГАТЕЛЬ
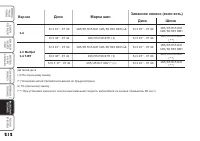
- 211 READING TYRE; WHEELS; RIMS AND TYRES; КОЛЕСА
- 213 Диск
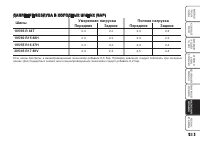
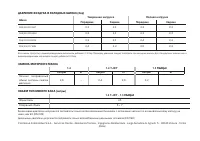
- 215 DIMENSIONS; Dimensions are expressed in mm and re-; Boot volume; Unladen boot volume; Versions; РАЗМЕРЫ КУЗОВА
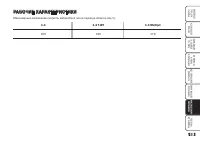
- 216 РАБОЧИЕ ХАРАКТЕРИСТИКИ
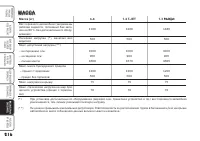
- 217 МАССА
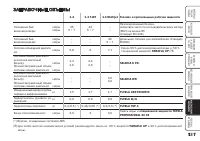
- 218 ЗАПРАВОЧНЫЕ ОБЪЕМЫ
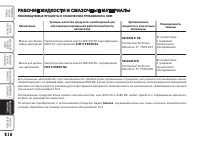
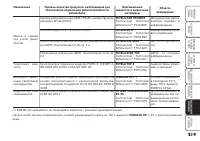
- 219 РАБОЧИЕ ЖИДКОСТИ И СМАЗОЧНЫЕ МАТЕРИАЛЫ
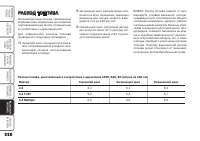
- 221 РАСХОД ТОПЛИВА
- 223 П Р Е Д М Е Т Н Ы Й У К А З АТ Е Л Ь
- 227 УТИЛИЗАЦИЯ АВТОМОБИЛЯ ПО ОКОНЧАНИИ СРОКА СЛУЖБЫ
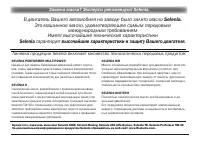
- 232 Замена масла? Эксперты рекомендуют Selenia.; В двигатель Вашего автомобиля на заводе было залито масло; SELENIa WR
- 235 Русский

