Швейная машина Janome Clio 320 - инструкция пользователя по применению, эксплуатации и установке на русском языке. Мы надеемся, она поможет вам решить возникшие у вас вопросы при эксплуатации техники.
Если остались вопросы, задайте их в комментариях после инструкции.
"Загружаем инструкцию", означает, что нужно подождать пока файл загрузится и можно будет его читать онлайн. Некоторые инструкции очень большие и время их появления зависит от вашей скорости интернета.


6
5
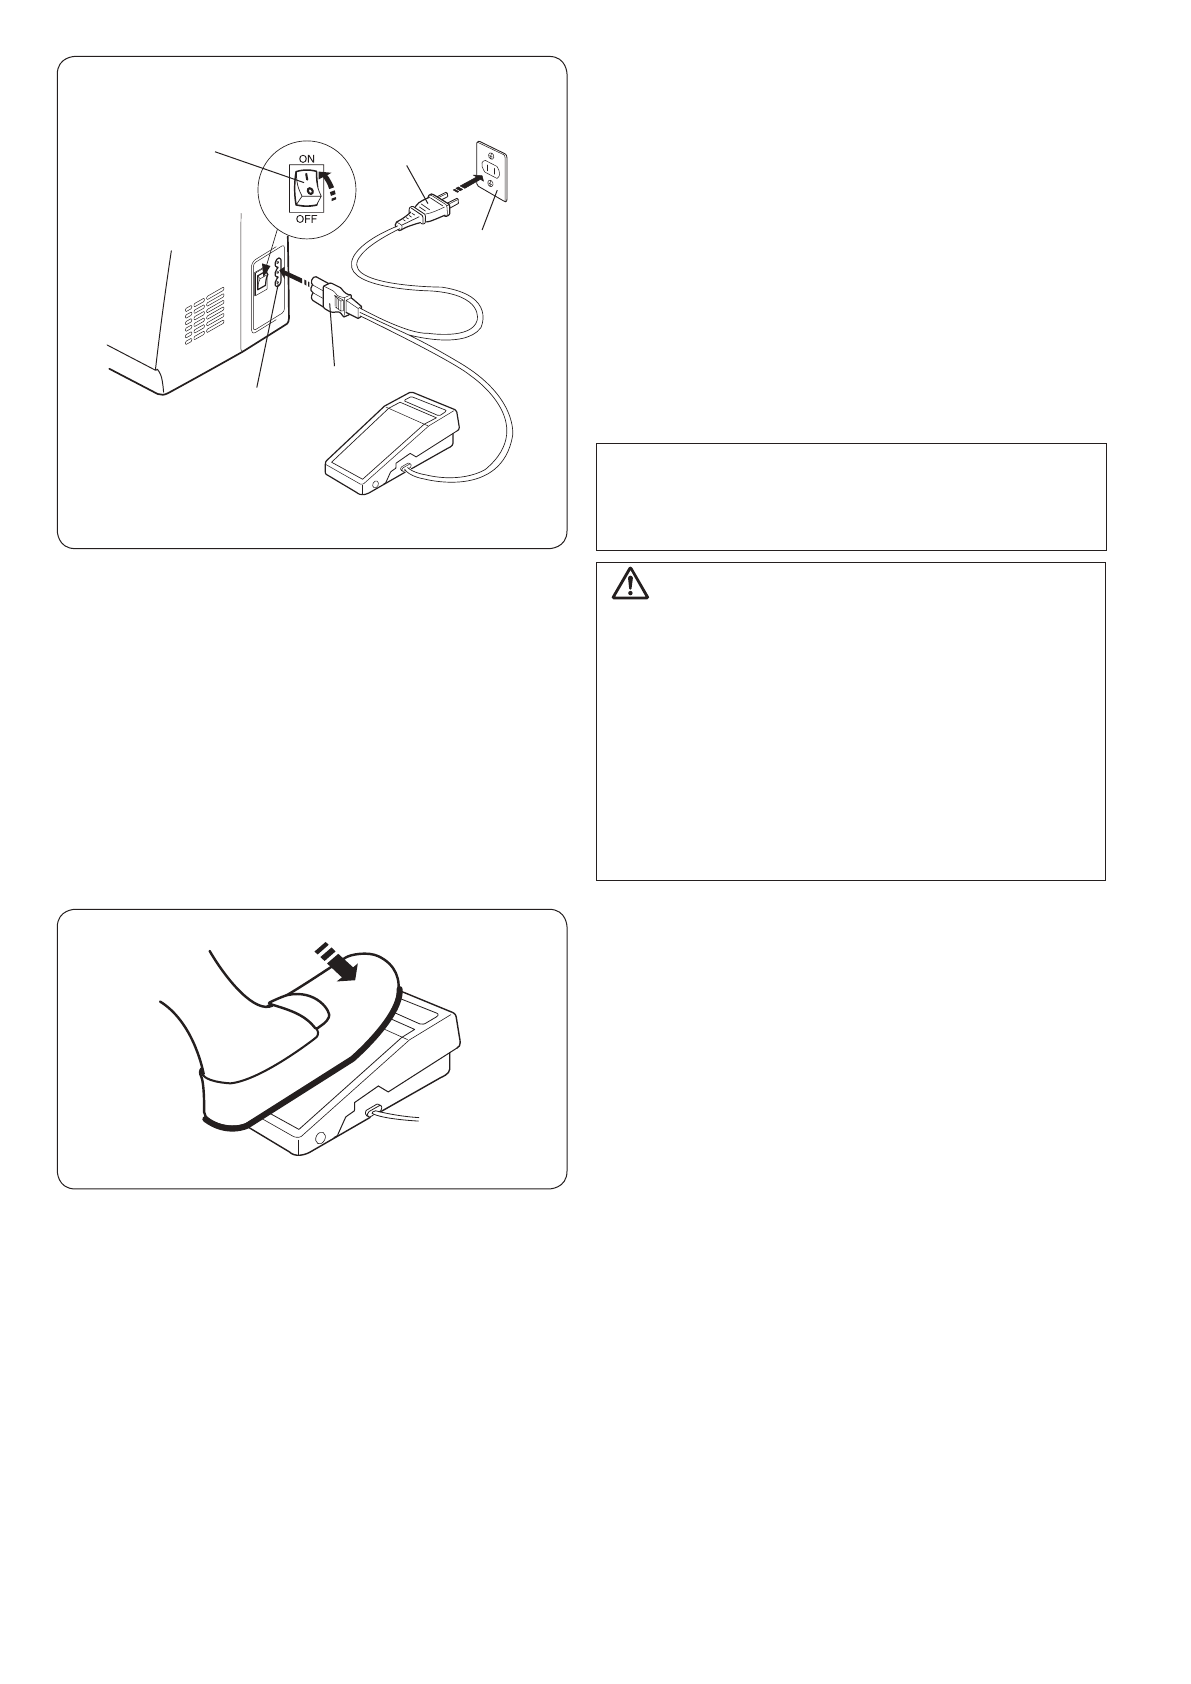
Connecting the Power Supply
z
Turn the power switch off.
x
Insert the machine plug into the machine
socket.
c
Insert the power supply plug into the wall
outlet.
v
Turn the power switch on.
q
Power switch
w
Machine plug
e
Machine socket
r
Power supply plug
t
Wall outlet
NOTE:
Before connecting to the power supply, make
sure the voltage shown on the machine
conforms to your electrical power.
WARNING:
While in operation, always keep your eyes
on the sewing area, and do not touch any
moving parts such as the thread take-up
lever, handwheel or needle.
Always turn off the power switch and unplug
from the power supply:
- when leaving the machine unattended.
- when attaching or removing parts.
- when cleaning the machine.
Do not place anything on the foot control,
otherwise the machine will run intermittently.
Operating Instructions:
The symbol “O” of a switch indicates the “off” position of a switch.
For the U.S.A. and Canada only:
For an appliance with a polarized plug (one blade wider than the other):
To reduce the risk of electrical shock, this plug is intended to fit in a polarized outlet only one way.
If it does not fit fully in the outlet, reverse the plug. If it still does not fit, contact a qualified electrician
to install the proper outlet. Do not modify the plug in any way.
The foot controller Model YC-482J or
YC-168S is used with this sewing machine.
GETTING READY TO SEW
Controlling the Sewing Speed
Foot control
Sewing speed can be varied by the foot control.
The harder you depress the foot control, the
faster the machine runs.
q
w
e
r
t
5
Connecting the Power Supply
z
Turn the power switch off.
x
Insert the machine plug into the machine
socket.
c
Insert the power supply plug into the wall
outlet.
v
Turn the power switch on.
q
Power switch
w
Machine plug
e
Machine socket
r
Power supply plug
t
Wall outlet
NOTE:
Before connecting to the power supply, make
sure the voltage shown on the machine
conforms to your electrical power.
WARNING:
While in operation, always keep your eyes
on the sewing area, and do not touch any
moving parts such as the thread take-up
lever, handwheel or needle.
Always turn off the power switch and unplug
from the power supply:
- when leaving the machine unattended.
- when attaching or removing parts.
- when cleaning the machine.
Do not place anything on the foot control,
otherwise the machine will run intermittently.
Operating Instructions:
The symbol “O” of a switch indicates the “off” position of a switch.
For the U.S.A. and Canada only:
For an appliance with a polarized plug (one blade wider than the other):
To reduce the risk of electrical shock, this plug is intended to fit in a polarized outlet only one way.
If it does not fit fully in the outlet, reverse the plug. If it still does not fit, contact a qualified electrician
to install the proper outlet. Do not modify the plug in any way.
The foot controller Model YC-482J or
YC-168S is used with this sewing machine.
GETTING READY TO SEW
Controlling the Sewing Speed
Foot control
Sewing speed can be varied by the foot control.
The harder you depress the foot control, the
faster the machine runs.
q
w
e
r
t
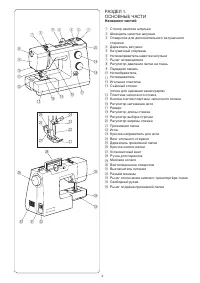
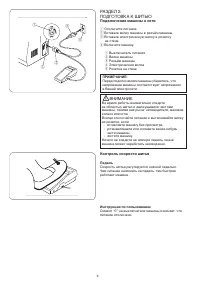
РАЗДЕЛ 2.
ПОДГОТОВКА К ШИТЬЮ
Подключение машины к сети
z
Отключите питание.
x
Вставьте вилку машины в разъём машины.
c
Вставьте электрическую вилку в розетку
на стене.
v
Включите машину.
q
Выключатель питания
w
Вилка машины
e
Разъём машины
r
Электрическая вилка
t
Розетка на стене
ВНИМАНИЕ:
Во время работы внимательно следите
за областью шитья и движущимися частями
машины, такими как рычаг нитеводителя, маховое
колесо или игла.
Всегда отключайте питание и вытаскивайте вилку
из розетки, если:
- оставляете машину без присмотра,
- устанавливаете или снимаете какие-нибудь
части машины,
- чистите машину.
Ничего не кладите на ножную педаль, иначе
машина может заработать неожиданно.
ПРИМЕЧАНИЕ:
Перед подключением машины убедитесь, что
напряжение машины соответствует напряжению
в Вашей электросети.
Контроль скорости шитья
Педаль
Скорость шитья регулируется ножной педалью.
Чем сильнее нажимать на педаль, тем быстрее
работает машина.
Инструкции по пользованию:
Символ “0” на выключателе машины означает, что
питание отключено.
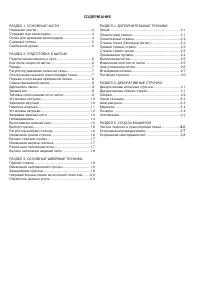
Содержание
- 5 ОСНОВНЫЕ ЧАСТИ; Названия частей; ESSENTIAL PARTS; Names of Parts
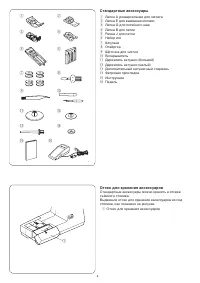
- 6 Отсек для хранения аксессуаров; Standard Accessories
- 7 Съёмный столик; Чтобы установить столик:; Сопоставьте выступы с отверстиями на машине; Свободный рукав; Extension Table; q w
- 8 Operating Instructions:; Controlling the Sewing Speed; Connecting the Power Supply; GETTING READY TO SEW; Foot control; ПОДГОТОВКА К ШИТЬЮ; Подключение машины к сети; Педаль
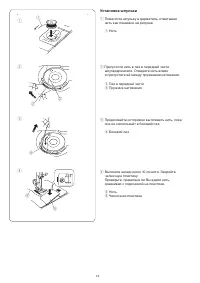
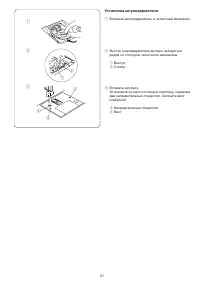
- 9 Установочная отметка; Отключение нижнего транспортёра ткани; Рычаг нижнего транспортёра ткани
- 10 Как отстегнуть лапку:; Raising and Lowering the Presser Foot
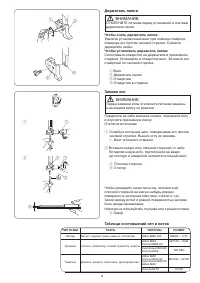
- 11 Держатель лапки; Чтобы снять держатель лапки:; Замена игл
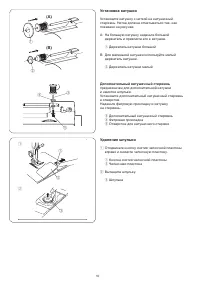
- 12 Установка катушки; Дополнительный катушечный стержень; Удаление шпульки; Extra spool pin; Extra spool pin
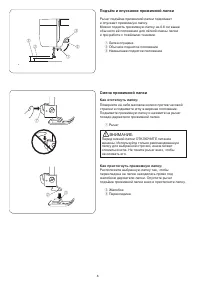
- 13 Намотка шпульки; Winding the bobbin
- 14 the thread to the left, sliding it between the
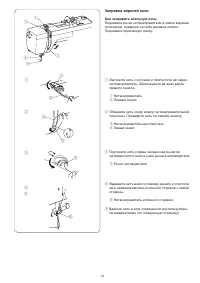
- 15 Заправка верхней нити; Как заправить игольную нить:; Threading the Machine
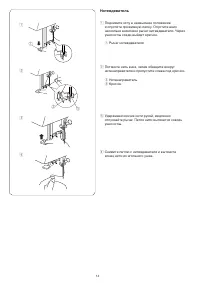
- 16 Нитевдеватель; Needle threader
- 17 Pull 4 ̋ (10 cm) of both threads back and
- 18 Stitch pattern selector dial
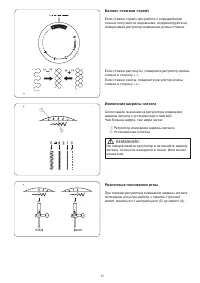
- 19 Регулятор изменения ширины зигзага; Различные положения иглы
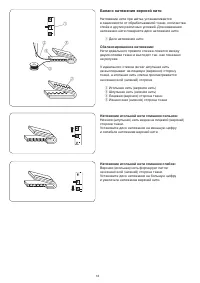
- 20 Баланс натяжения верхней нити; Диск натяжения нити; Сбалансированное натяжение:; Balancing Needle Thread Tension
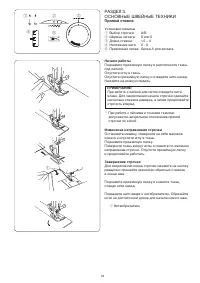
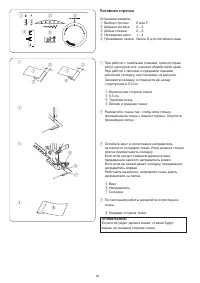
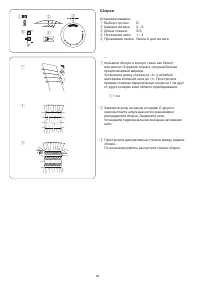
- 21 ОСНОВНЫЕ ШВЕЙНЫЕ ТЕХНИКИ; Прямой стежок; Начало работы; Starting to sew; BASIC SEWING; To fasten the beginning of the seam, first sew; Прямой стежок стрейч
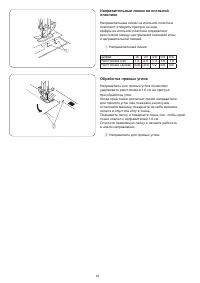
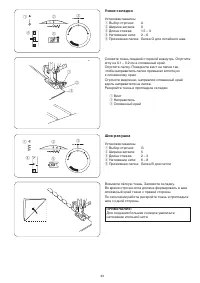
- 22 Направительные линии; Обработка прямых углов; Направитель для прямых углов; The cornering guide helps you maintain a 5/8 ̋; The cornering guide helps you maintain a 5/8 ̋
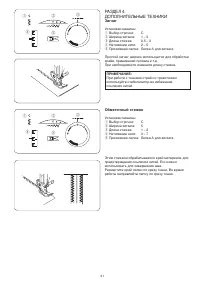
- 23 ДОПОЛНИТЕЛЬНЫЕ ТЕХНИКИ; Зигзаг; Обметочный стежок; Установки машины; UTILITY STITCHES
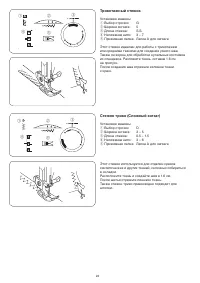
- 24 Трикотажный стежок; This stitch is used to finish a raw edge on; This stitch is used to finish a raw edge on; Knit Stitch; This stitch is used to finish a raw edge on; Knit Stitch; This stitch is used to finish a raw edge on
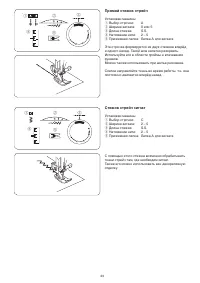
- 25 Стежок стрейч зигзаг
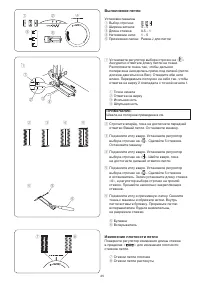
- 27 To adjust buttonhole stitch density:
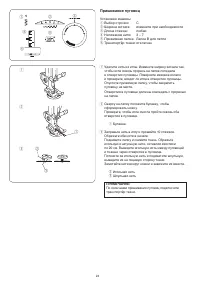
- 28 Зажгутованная петля; Corded Buttonhole
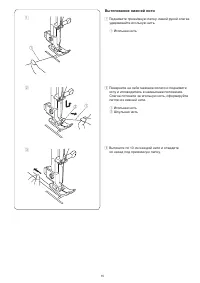
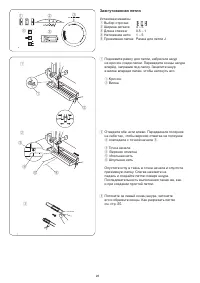
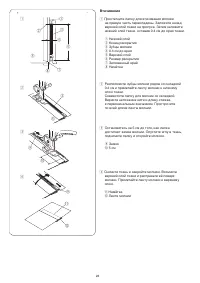
- 29 Втачивание молнии; Установка лапки для молнии; e r; Zipper Application; Fabric preparation; Zipper Application; e r; Fabric preparation
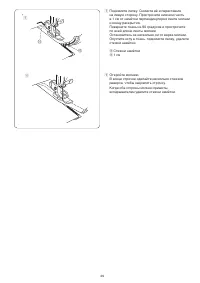
- 30 Stop the machine 2 ̋ (5 cm) before reaching
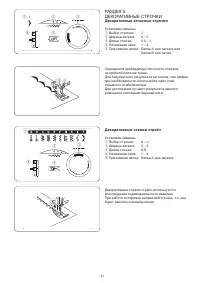
- 33 ДЕКОРАТИВНЫЕ СТРОЧКИ; Декоративные атласные строчки; Decorative Satin Stitches; Decorative Stretch Stitches
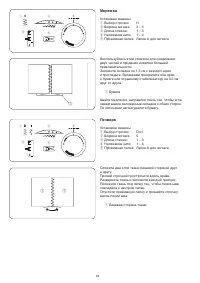
- 34 DECORATIVE STITCHES; DECORATIVE STITCHES; Smocking; DECORATIVE STITCHES; Smocking; DECORATIVE STITCHES; Smocking; DECORATIVE STITCHES; Smocking; DECORATIVE STITCHES; Smocking; DECORATIVE STITCHES; Smocking; DECORATIVE STITCHES
- 35 Узкие складки
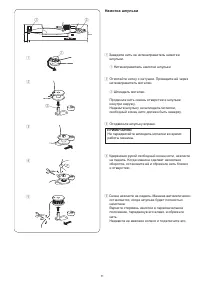
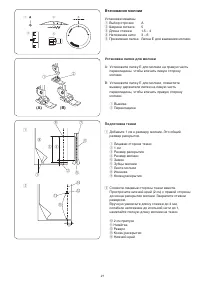
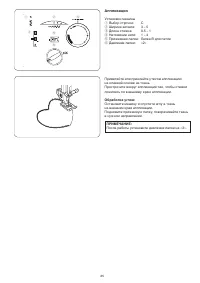
- 37 После работы установите давление лапки на «3».; Аппликация
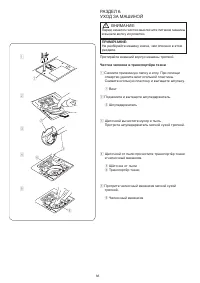
- 38 УХОД ЗА МАШИНОЙ; Чистка челнока и транспортёра ткани; Wipe the hook race with a soft, dry cloth.; CARE AND MAINTENANCE; Cleaning the Hook Race and Feed Dog
- 39 Make sure the knob of the bobbin holder fits
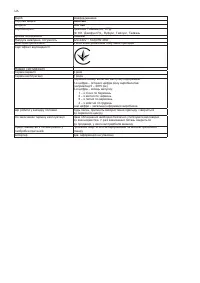
- 41 Куәлік нөмірі


