Швейная машина Janome Clio 320 - инструкция пользователя по применению, эксплуатации и установке на русском языке. Мы надеемся, она поможет вам решить возникшие у вас вопросы при эксплуатации техники.
Если остались вопросы, задайте их в комментариях после инструкции.
"Загружаем инструкцию", означает, что нужно подождать пока файл загрузится и можно будет его читать онлайн. Некоторые инструкции очень большие и время их появления зависит от вашей скорости интернета.


27
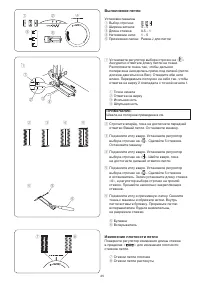
Втачивание молнии
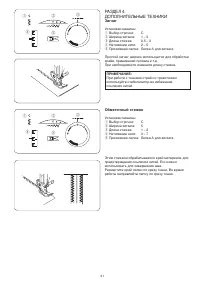
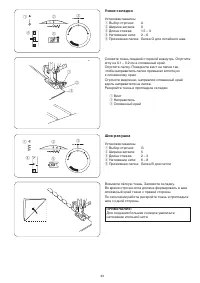
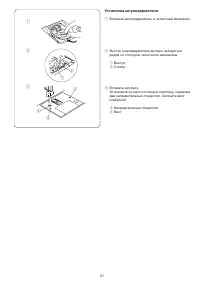
Установки машины
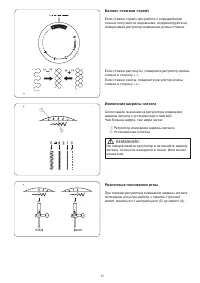
q
Выбор строчки:
А
w
Ширина зигзага:
5
e
Длина стежка:
1.5 – 4
r
Натяжение нити:
3 – 6
t
Прижимная лапка: Лапка Е для вшивания молнии
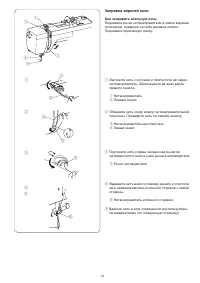
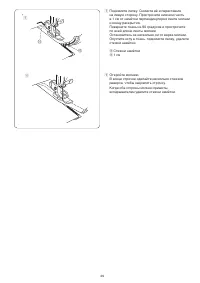
Установка лапки для молнии
А: Установите лапку Е для молнии на правую часть
перекладины, чтобы втачать левую сторону
молнии.
В: Установите лапку Е для молнии, поместите
выемку держателя лапки на левую часть
перекладины, чтобы втачать правую сторону
молнии.
q
Выемка
w
Перекладина
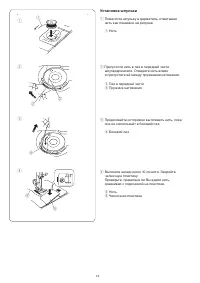
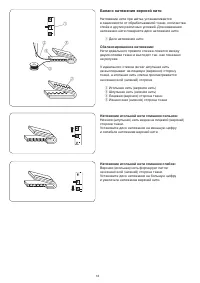
Подготовка ткани
z
Добавьте 1 см к размеру молнии. Это общий
размер раскрытия.
q
Лицевая сторона ткани
w
1 см
e
Размер раскрытия
r
Размер молнии
t
Замок
y
Зубцы молнии
u
Лента молнии
i
Изнанка
o
Конец раскрытия
x
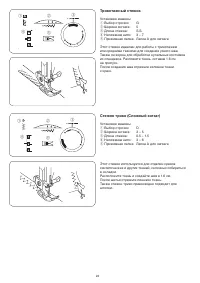
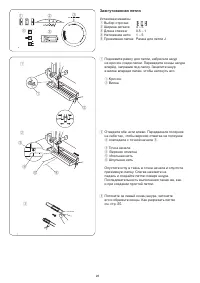
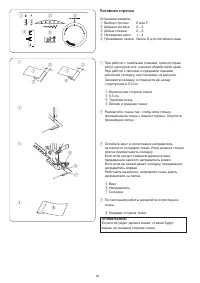
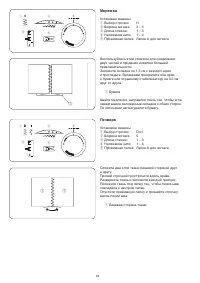
Сложите лицевые стороны ткани вместе.
Прострочите нижний край (2 см) с правой стороны
до конца раскрытия молнии. Закрепите стежки
реверсом.
Вручную увеличьте длину стежка до 4 мм,
ослабьте натяжение до игольной нити до 1,
наметайте полную длину молнии на ткани.
!0
2 см припуск
!1
Намётка
!2
Реверс
!3
Конец раскрытия
!4
Нижний край
28
Zipper Application
q
Stitch pattern:
A
w
Stitch width:
5
e
Stitch length:
1.5 – 4
r
Thread tension:
3 – 6
t
Presser foot:
Zipper foot E
q
w
e r
t
y
u
i
o
!0
!1
!2
!3
!4
q
w
z
x
(A)
(B)
q
w
e
r
t
Attaching the zipper foot
A:
To sew the left side of the zipper, attach
zipper foot with the right side pin.
B:
To sew the right side of zipper, attach the
zipper foot with the left side pin.
q
Groove
w
Pin
Fabric preparation
z
Add 3/8˝ (1 cm) to the zipper size.
This is the overall opening size.
q
Right side of the fabric
w
3/8˝ (1 cm)
e
Opening size
r
Zipper size
t
Slider
y
Zipper teeth
u
Zipper tape
i
Wrong side of the fabric
o
End of the opening
x
Place the right (top) sides of the fabric
together. Sew a bottom seam 5/8˝ (2 cm)
from the right edge to the zipper bottom stop
position. Sew a few stitches in reverse to
lock.
Increase the stitch length to “4”, set needle
thread tension to “1”, and baste the entire
length of the fabric.
!0
5/8˝ (2 cm)
!1
Basting
!2
Reverse stitch
!3
End of the opening
!4
Bottom seam
u
o
Содержание
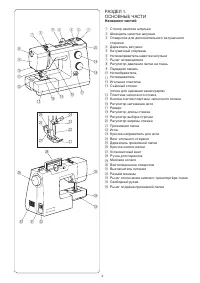
- 5 ОСНОВНЫЕ ЧАСТИ; Названия частей; ESSENTIAL PARTS; Names of Parts
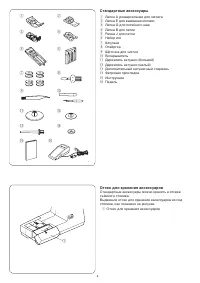
- 6 Отсек для хранения аксессуаров; Standard Accessories
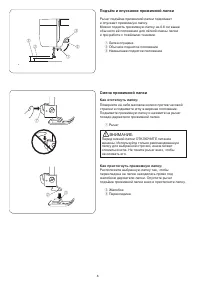
- 7 Съёмный столик; Чтобы установить столик:; Сопоставьте выступы с отверстиями на машине; Свободный рукав; Extension Table; q w
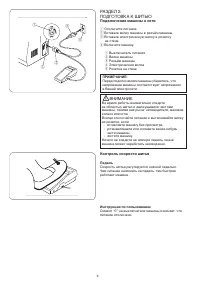
- 8 Operating Instructions:; Controlling the Sewing Speed; Connecting the Power Supply; GETTING READY TO SEW; Foot control; ПОДГОТОВКА К ШИТЬЮ; Подключение машины к сети; Педаль
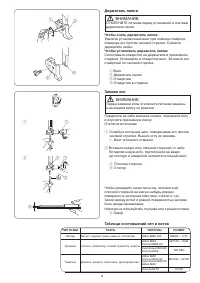
- 9 Установочная отметка; Отключение нижнего транспортёра ткани; Рычаг нижнего транспортёра ткани
- 10 Как отстегнуть лапку:; Raising and Lowering the Presser Foot
- 11 Держатель лапки; Чтобы снять держатель лапки:; Замена игл
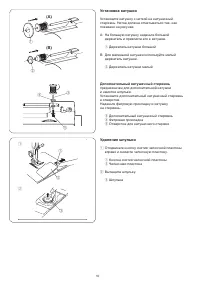
- 12 Установка катушки; Дополнительный катушечный стержень; Удаление шпульки; Extra spool pin; Extra spool pin
- 13 Намотка шпульки; Winding the bobbin
- 14 the thread to the left, sliding it between the
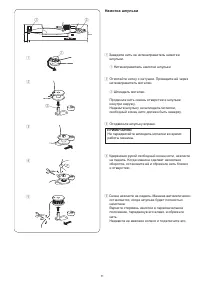
- 15 Заправка верхней нити; Как заправить игольную нить:; Threading the Machine
- 16 Нитевдеватель; Needle threader
- 17 Pull 4 ̋ (10 cm) of both threads back and
- 18 Stitch pattern selector dial
- 19 Регулятор изменения ширины зигзага; Различные положения иглы
- 20 Баланс натяжения верхней нити; Диск натяжения нити; Сбалансированное натяжение:; Balancing Needle Thread Tension
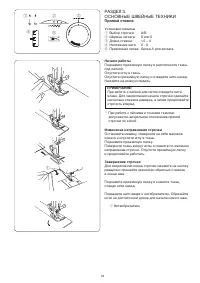
- 21 ОСНОВНЫЕ ШВЕЙНЫЕ ТЕХНИКИ; Прямой стежок; Начало работы; Starting to sew; BASIC SEWING; To fasten the beginning of the seam, first sew; Прямой стежок стрейч
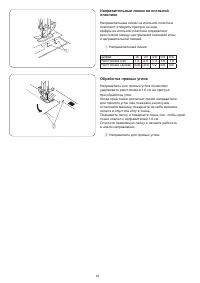
- 22 Направительные линии; Обработка прямых углов; Направитель для прямых углов; The cornering guide helps you maintain a 5/8 ̋; The cornering guide helps you maintain a 5/8 ̋
- 23 ДОПОЛНИТЕЛЬНЫЕ ТЕХНИКИ; Зигзаг; Обметочный стежок; Установки машины; UTILITY STITCHES
- 24 Трикотажный стежок; This stitch is used to finish a raw edge on; This stitch is used to finish a raw edge on; Knit Stitch; This stitch is used to finish a raw edge on; Knit Stitch; This stitch is used to finish a raw edge on
- 25 Стежок стрейч зигзаг
- 27 To adjust buttonhole stitch density:
- 28 Зажгутованная петля; Corded Buttonhole
- 29 Втачивание молнии; Установка лапки для молнии; e r; Zipper Application; Fabric preparation; Zipper Application; e r; Fabric preparation
- 30 Stop the machine 2 ̋ (5 cm) before reaching
- 33 ДЕКОРАТИВНЫЕ СТРОЧКИ; Декоративные атласные строчки; Decorative Satin Stitches; Decorative Stretch Stitches
- 34 DECORATIVE STITCHES; DECORATIVE STITCHES; Smocking; DECORATIVE STITCHES; Smocking; DECORATIVE STITCHES; Smocking; DECORATIVE STITCHES; Smocking; DECORATIVE STITCHES; Smocking; DECORATIVE STITCHES; Smocking; DECORATIVE STITCHES
- 35 Узкие складки
- 37 После работы установите давление лапки на «3».; Аппликация
- 38 УХОД ЗА МАШИНОЙ; Чистка челнока и транспортёра ткани; Wipe the hook race with a soft, dry cloth.; CARE AND MAINTENANCE; Cleaning the Hook Race and Feed Dog
- 39 Make sure the knob of the bobbin holder fits
- 41 Куәлік нөмірі


