Кухонные комбайны Philips HR7766 - инструкция пользователя по применению, эксплуатации и установке на русском языке. Мы надеемся, она поможет вам решить возникшие у вас вопросы при эксплуатации техники.
Если остались вопросы, задайте их в комментариях после инструкции.
"Загружаем инструкцию", означает, что нужно подождать пока файл загрузится и можно будет его читать онлайн. Некоторые инструкции очень большие и время их появления зависит от вашей скорости интернета.


1
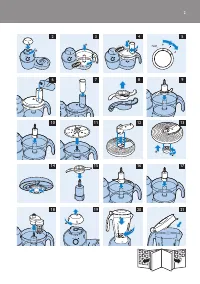
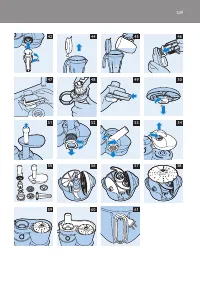
To remove any meat left behind in the cutter housing, pass pieces of bread through the
cutter housing.
2
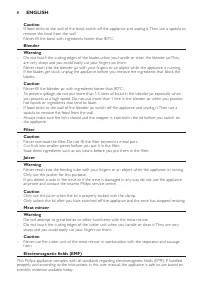
Switch off the appliance and unplug it.
3
Remove the pusher and the tray (Fig. 51).
4
Screw the screw ring anticlockwise (1) and remove it (2). Also remove the grinding disc, the
cutter unit and the worm shaft. (Fig. 52)
5
Press the release button (1), turn the cutter housing clockwise (2) and remove it from the
gear housing (3) (Fig. 53).
6
Turn the gear housing anticlockwise (1) and lift it off the motor unit (2) (Fig. 54).
7
Clean all parts that have come into contact with meat with hot water and some washing-up
liquid immediately after use (Fig. 55).
8
Rinse them with clean hot water and dry them immediately with a tea towel.
9
Lubricate the discs and the worm shaft with some vegetable oil before you store them.
storage
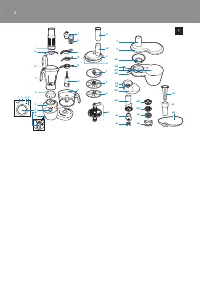
The appliance comes with a pulp container that allows you to store the par ts of the appliance in an
organised way.
1
Put the kneading accessory, the adjustable slicing disc and the shredding disc in the storage
box (Fig. 56).
2
Put the French fries disc in the storage box and fit the balloon beater on top of the tool
holder.
3
Put the blade unit on top of the balloon beater. (Fig. 57)
4
Put the granulating disc on top of the blade unit. (Fig. 58)
5
Remove the screw cap from the motor unit and assemble the pulp container with the sieve
onto the motor unit.
Note: You can store the screw cap in the storage box or in the blender jar.
6
Place the storage box in the pulp container (Fig. 59).
7
Assemble the lid on the pulp container and insert the pusher of the juicer into the
lid (Fig. 60).
8
Wind the mains cord round the bracket on the back of the motor unit (Fig. 61).
Environment
Do not throw away the appliance with the normal household waste at the end of its life, but hand it
in at an official collection point for recycling. By doing this, you help to preser ve the environment.
guarantee & service
If you need ser vice or information or if you have a problem, please visit the Philips website at
www.philips.com
or contact the Philips Consumer Care Centre in your countr y (you find its phone
number in the worldwide guarantee leaflet). If there is no Consumer Care Centre in your countr y,
go to your local Philips dealer.
EnglisH
16
Содержание
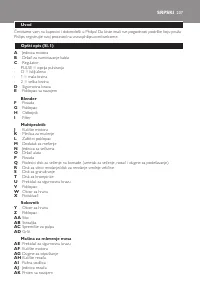
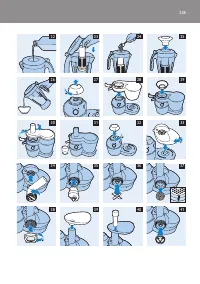
- 166 Выньте вилку сетевого шнура из розетки электросети.; Встроенный фиксатор
- 167 будет дополнять форму ручки.; камера подачи и толкатель; выпадение продуктов из камеры.; ножевой блок; ингредиентов или приготовления пюре.; советы
- 168 добавлением ингредиентов.
- 169 круглая насадка для взбивания; Поместите ингредиенты в чашу.; используйте насадку для теста.; Блендер; Блендер предназначен для:
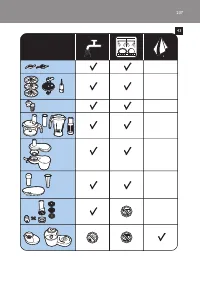
- 170 Фильтр; Закройте крышку, чтобы зафиксировать положение фильтра.
- 171 соковыжималка; Поставьте стакан или кувшин под носиком выхода сока (Рис. 31); Соберите соковыжималку, можно снова приступать к работе.
- 172 Разрежьте мясо на кусочки длиной 10 см, толщиной 2 см.; Приготовление колбас; Снимите диск с отверстиями и нож.
- 173 в загрузочную горловину.; Быстрая очистка кувшина блендера; Снимите ёмкость блендера и промойте её чистой водой.; Разберите круглую насадку для взбивания, чтобы лучше очистить ее.
- 174 компактно хранить части прибора.
- 175 двигателя контейнер для мякоти с фильтром.; защита окружающей среды; Проблема
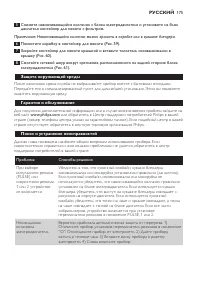
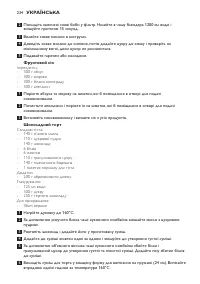
- 176 рецепты; стакан блендера и измельчайте в течение 15 секунд.


