Роутеры TP-Link TD-W8151N - инструкция пользователя по применению, эксплуатации и установке на русском языке. Мы надеемся, она поможет вам решить возникшие у вас вопросы при эксплуатации техники.
Если остались вопросы, задайте их в комментариях после инструкции.
"Загружаем инструкцию", означает, что нужно подождать пока файл загрузится и можно будет его читать онлайн. Некоторые инструкции очень большие и время их появления зависит от вашей скорости интернета.


TD-W8151N
150Mbps Wireless N ADSL2+ Modem Router User Guide
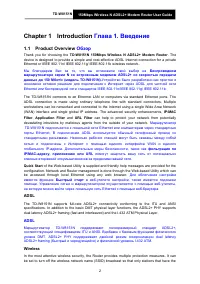
Chapter 1 Introduction
Глава 1. Введение
1.1 Product Overview
Обзор
Thank you for choosing the
TD-W8151N 150Mbps Wireless N ADSL2+ Modem Router
. The
device is designed to provide a simple and cost-effective ADSL Internet connection for a private
Ethernet or IEEE 802.11n/ IEEE 802.11g/ IEEE 802.11b wireless network.
Мы благодарим Вас за то, что вы остановили свой выбор на
Беспроводном
маршрутизаторе серии N со встроенным модемом ADSL2+ со скоростью передачи
данных до 150 Мбит/с (модель TD-W8151N).
Устройство было разработано как простое и
экономное сетевое решение для подключения к Интернет через ADSL для частной сети
Ethernet или беспроводной сети стандартов
IEEE 802.11n/IEEE 802.11g/ IEEE 802.11b.
The TD-W8151N connects to an Ethernet LAN or computers via standard Ethernet ports. The
ADSL connection is made using ordinary telephone line with standard connectors. Multiple
workstations can be networked and connected to the Internet using a single Wide Area Network
(WAN) interface and single global IP address. The advanced security enhancements,
IP
/
MAC
Filter
,
Application Filter
and
URL Filter
can help to protect your network from potentially
devastating intrusions by malicious agents from the outside of your network.
Маршрутизатор
TD-W8151N
подключается к локальной сети Ethernet или компьютерам через стандартные
порты Ethernet. В подключении ADSL используется обычный телефонный провод со
стандартными разъемами. Несколько рабочих станций могут быть связаны между собой
сетью и подключены к Интернет с помощью единого интерфейса WAN и единого
глобального IP-адреса. Дополнительные меры безопасности, такие как
фильтрация по
IP/MAC-адресу, приложению или
URL
помогут
защитить вашу сеть
от потенциально
опасных вторжений злоумышленников за пределами вашей сети.
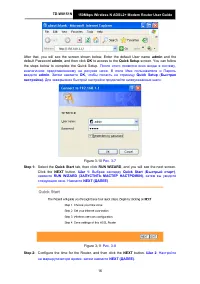
Quick Start
of the Web-based Utility is supplied and friendly help messages are provided for the
configuration. Network and Router management is done through the Web-based Utility which can
be accessed through local Ethernet using any web browser.
Для облегчения настройки
имеется функция
Быстрый старт
в веб-утилите настройки, также имеются подсказки
помощи. Управление сетью и маршрутизатором осуществляется с помощью веб-утилиты,
на которую можно войти через локальную сеть Ethernet с помощью веб-браузера.
ADSL
The TD-W8151N supports full-rate ADSL2+ connectivity conforming to the ITU and ANSI
specifications. In addition to the basic DMT physical layer functions, the ADSL2+ PHY supports
dual latency ADSL2+ framing (fast and interleaved) and the I.432 ATM Physical Layer.
ADSL
Маршрутизатор
TD-W8151N
поддерживает полноразмерный стандарт
ADSL2+,
соответствующий спецификациям ITU и ANSI. Вдобавок к базовым функциям физического
уровня DMT, ADSL2+ PHY поддерживает двойной режим синхронизации dual latency
ADSL2+ framing (быстрый и чередующийся) и физический уровень I.432 ATM.
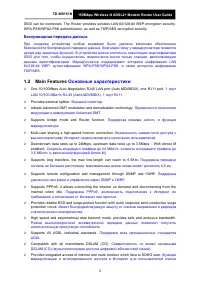
Wireless
In the most attentive wireless security, the Router provides multiple protection measures. It can
be set to turn off the wireless network name (SSID) broadcast so that only stations that have the
2
Содержание
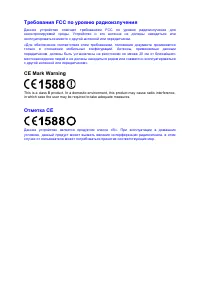
- 3 COPYRIGHT & TRADEMARKS; АВТОРСКОЕ ПРАВО И ТОРГОВЫЕ МАРКИ; Спецификации могут меняться без уведомления.; FCC STATEMENT
- 4 СЕРТИФИКАЦИЯ FCC; Изменить положение или передвинуть принимающую антенну.; FCC RF Radiation Exposure Statement
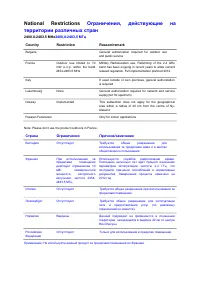
- 6 Country
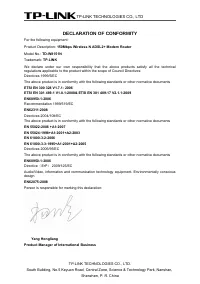
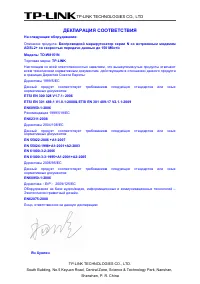
- 8 ДЕКЛАРАЦИЯ СООТВЕТСТВИЯ; На следующее оборудование:; нормативных документов:; Ян Хунлян
- 9 Менеджер по продукции в сфере международного бизнеса
- 10 CONTENTS
- 11 СОДЕРЖАНИЕ
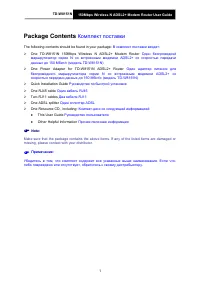
- 12 50Mbps Wireless N ADSL2+ Modem Router User Guide; Package Contents; Комплект поставки
- 13 Chapter 1 Introduction; Обзор; Thank you for choosing the; Беспроводном; and; фильтрация по; ADSL
- 14 Беспроводная передача данных; Основные характеристики
- 15 Допущения
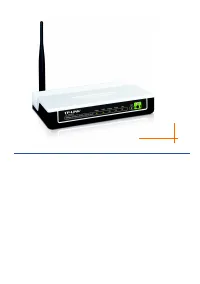
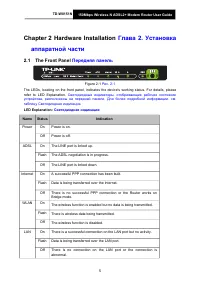
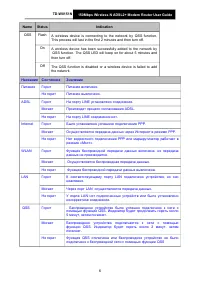
- 16 Chapter 2 Hardware Installation; Передняя панель; Светодиодные индикаторы, отображающие рабочее состояние; Светодиодная индикация:
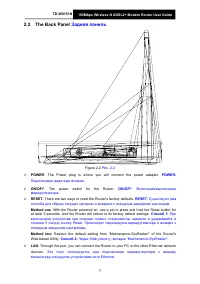
- 18 Задняя панель; POWER; : The Power plug is where you will connect the power adapter.; : There are two ways to reset the Router's factory defaults.; RESET; При; Method two; Эти порт используется для подключения маршрутизатора к вашему
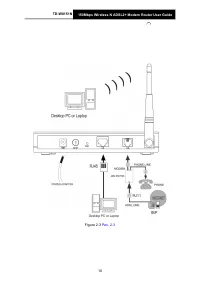
- 19 them by an external separate splitter. For details, please refer to; Antenna; Used for wireless operation and data transmit.; Installation Environment; The Router can be placed on a shelf or desktop.; Connecting the Router; Connect the ADSL Line.; Первый; LINE: Connect to the wall jack
- 20 PHONE: Connect to the phone sets; Шаг 2; Power on the computers and LAN devices.; Шаг 4
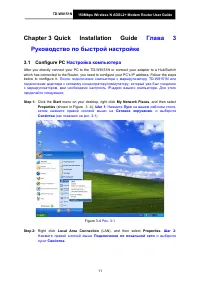
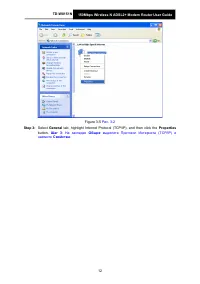
- 22 Chapter 3 Quick; Настройка компьютера; Click the; Start; menu on your desktop, right click; My Network Places; Right click; Local Area Connection
- 23 Select; General; На закладке; Общие; нажмите; Свойства
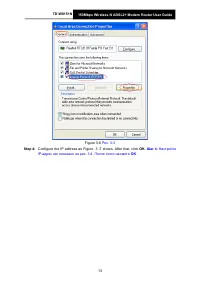
- 24 Configure the IP address as Figure 3 -7 shows. After that, click; Настройте; OK
- 25 menu on your desktop, select; run; in the field; on the next screen, and then press; Enter
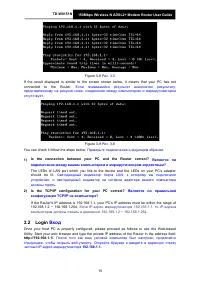
- 26 Если появившийся результат аналогичен результату,; ) Is the connection between your PC and the Router correct?; Светодиодный индикатор порта LAN, к которому вы подключили; ) Is the TCP/IP configuration for your PC correct?; Вход; После того как ваш узловой компьютер был настроен, проделайте
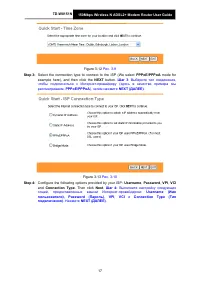
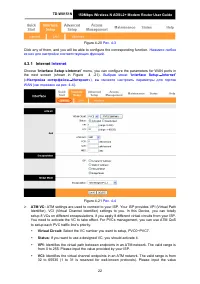
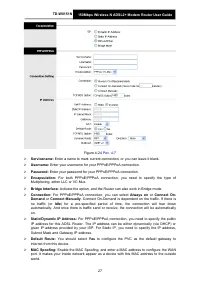
- 28 Select the connection type to connect to the ISP (We select; Шаг 3; Configure the following options provided by your ISP:; VPI
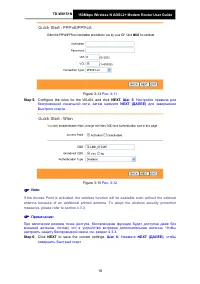
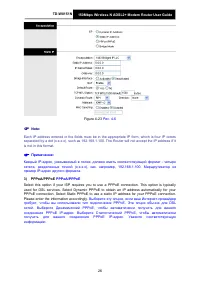
- 29 Configure the rules for the WLAN, and click; Click; NEXT; to save the current settings.
- 30 CLOSE; чтобы завершить
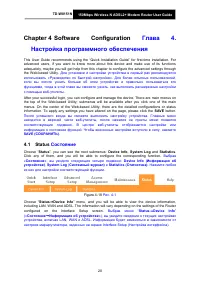
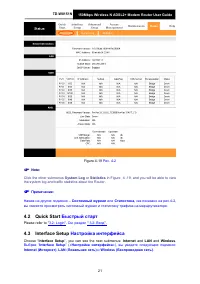
- 31 Chapter 4 Software; Состояние; Choose “
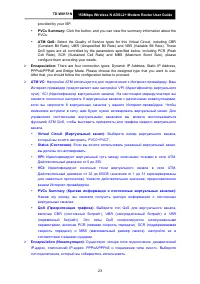
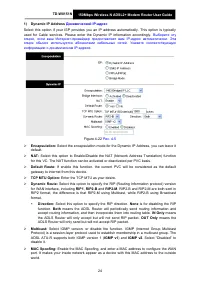
- 34 provided by your ISP.; ATM VC
- 37 Выберите эту опцию, если ваш Интернет-провайдер
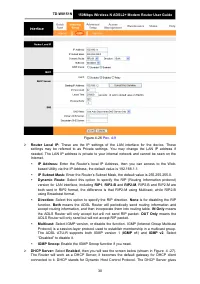
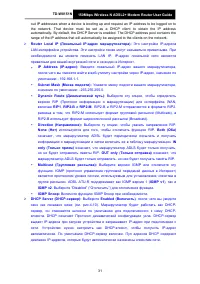
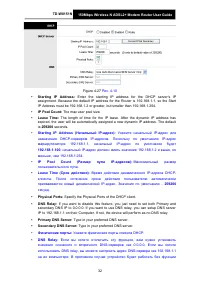
- 40 После того, как вы закончите настройку Интернет, нажмите; Локальная сеть; ” menu, and you will see the LAN screen (shown in Figure 4
- 44 Введите значение; Use Auto Discovered DNS Server Only; is selected in DNS Relay, this Router will accept the; Use User Discovered DNS Server Only; is selected in; SAVE; button to save it and invoke it.; Relay; Выбрав
- 45 Enter the DHCP server IP Address runs on WAN; DHCP Server IP for Relay Agent (IP-адрес DHCP-сервера для агента; If you select; Disabled; , the DHCP function will not take effect.; Беспроводная сеть; ” menu, and you will see the Wireless screen (shown in; Interface Setup→Wireless
- 47 Enter a value between 20-1000 milliseconds. The Beacon Interval; Fragmentation Threshold:; This value specifies the maximum size for a packet before; Access point Settings:; Настройки точки доступа. Здесь можно задать правила
- 48 Select the Bandwidth you want to use from the drop-down List.
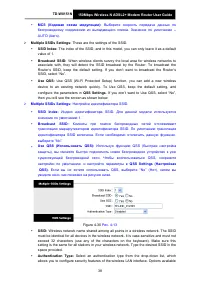
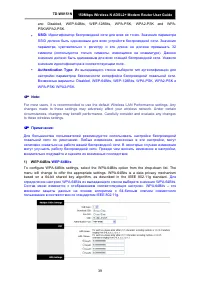
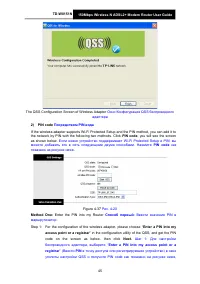
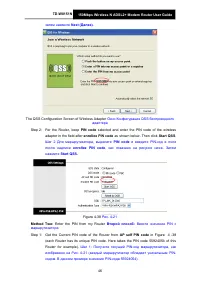
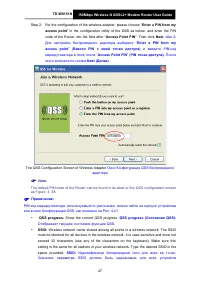
- 49 These are the settings of the SSID.; QSS Settings; then you will see the screen as shown below.; Multiple SSIDs Settings:; Select an authentication type from the drop-down list, which
- 50 Из выпадающего списка выберите тип аутентификации для
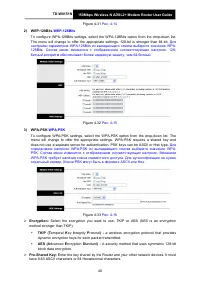
- 51 Для
- 52 (Advanced Encryption Standard) –симметричный алгоритм блочного
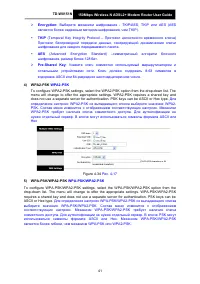
- 58 in the; Access Point PIN
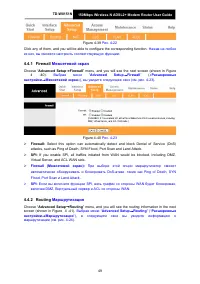
- 59 Расширенные настройки; Advanced Setup
- 60 Межсетевой экран; ” menu, and you will see the next screen (shown in Figure; Маршрутизация; Advanced Setup; ” menu, and you will see the routing information in the next
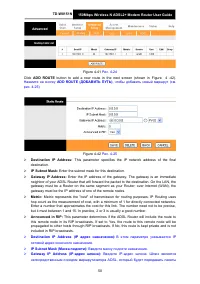
- 61 button to add a new route in the next screen (shown in Figure 4 -42).; ADD ROUTE; This parameter specifies the IP network address of the final
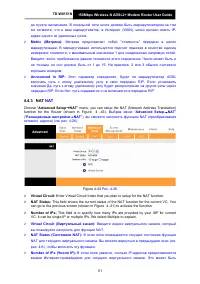
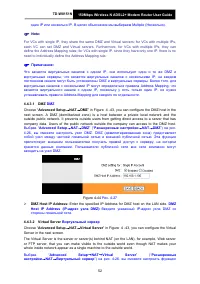
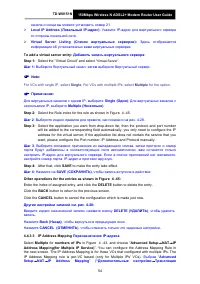
- 62 NAT; ” menu, you can setup the NAT (Network Address Translation); Advanced Setup; VC. It can be single IP or multiple IPs. We select Multiple to explain.
- 63 Выбрав “
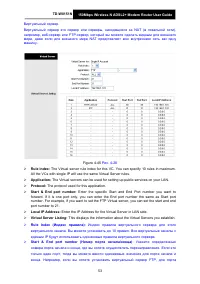
- 64 All the VCs with single IP will use the same Virtual Server rules.; Enter the specific Start and End Port number you want to; Virtual Server Listing:; : Индекс правила виртуального сервера для этого; : Укажите определенные
- 65 For VCs with single IP, select; Single
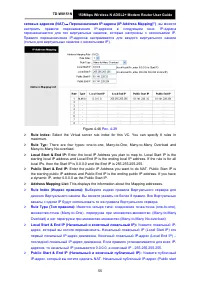
- 66 Enter the local IP Address you plan to map to. Local Start IP is the; Address Mapping List:; This displays the information about the Mapping addresses.
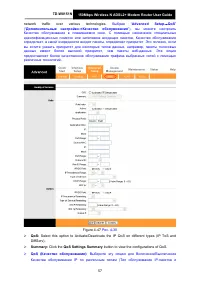
- 67 is only available for VCs with Multiple IPs.; QoS
- 68 network traffic over various technologies.; Advanced; QoS Settings Summary; button to view the configurations of QoS.
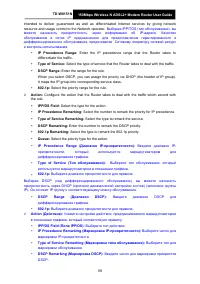
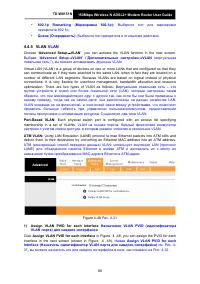
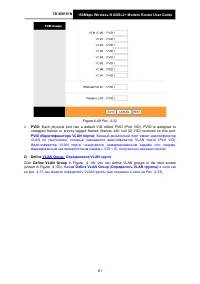
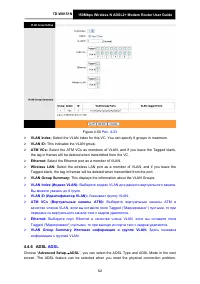
- 71 VLAN; ”, you can activate the VLAN function in the next screen.; ) Assign VLAN PVID for each Interface; Assign VLAN PVID for each Interface; in Figure 4 -48, you can assign the PVID for each
- 72 Каждый физический порт имеет идентификатор; VLAN Group Определение VLAN групп; Define VLAN Group; in Figure 4 -48, you can define VLAN groups in the next screen; Define VLAN Group (Определить VLAN группы); в окне как
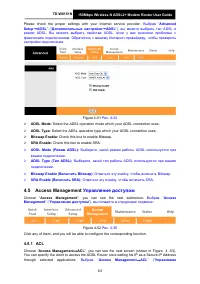
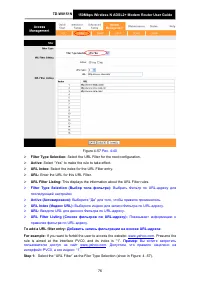
- 74 Access Management
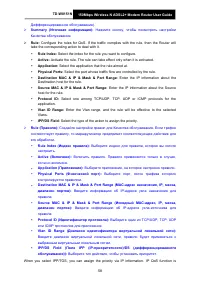
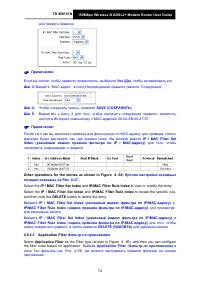
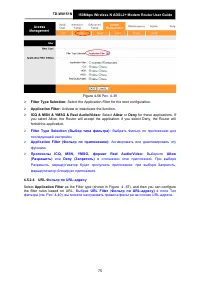
- 76 Фильтр
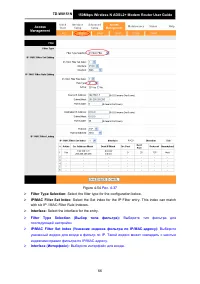
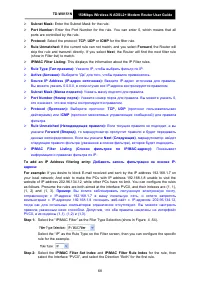
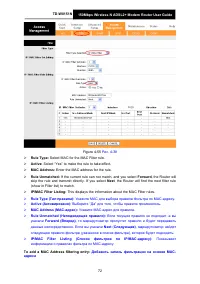
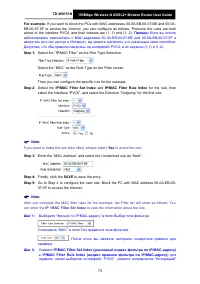
- 77 Select the filter type for the configuration below.
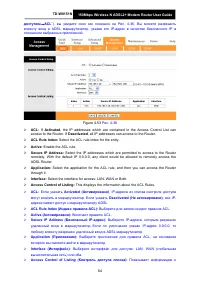
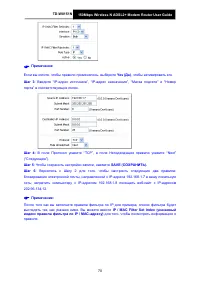
- 78 Выберите направления для данного правила фильтра по IP.; IP/MAC Filter Rule Index; together to appoint; IP/MAC Filter Set Index; вместе; Source IP Address:; means that all IP addresses are controlled by the rule.; Destination IP Address:; Enter the destination IP address for the rule. You can enter
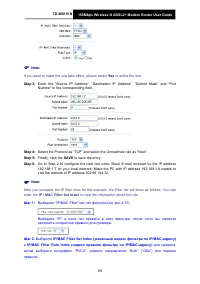
- 80 If you want to make the rule take effect, please select; Yes; Select the Protocol as “TCP” and select the Unmatched rule as “Next”.; to view the information about the rule.
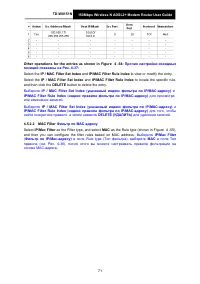
- 81 Если вы хотите, чтобы правило применялось, выберите; порта” в соответствующих полях.; Шаг 6; : Вернитесь к Шагу 2 для того, чтобы настроить следующие два правила:; IP / MAC Filter Set Index; для того, чтобы посмотреть информацию о
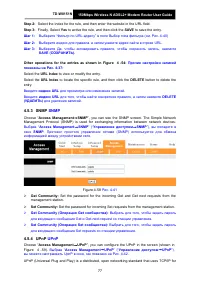
- 88 SNMP
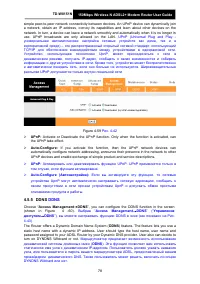
- 89 the UPnP take effect.; ”, you can configure the DDNS function in the screen; DDNS; Маршрутизатор предлагает возможность использования
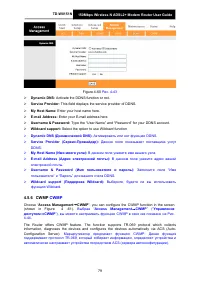
- 90 CWMP; Access Management
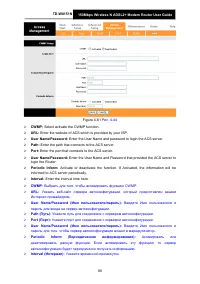
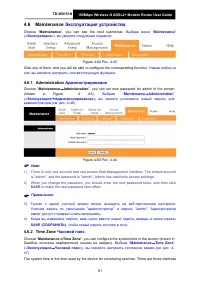
- 92 Эксплуатация устройства; Администрирование; Maintenance; to make the new password take effect.; Часовой пояс; Maintenance
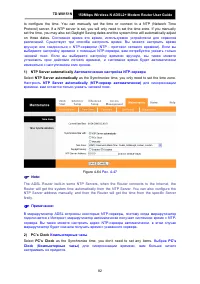
- 93 as the Synchronize time, you only need to set the time zone.; NTP Server automatically; PC’s Clock; as the Synchronize time, you don’t need to set any items.; PC’s
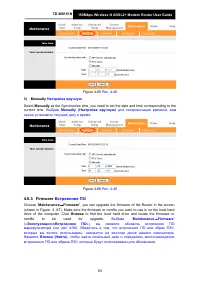
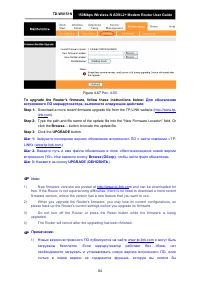
- 94 Manually; Встроенное ПО; ”, you can upgrade the firmware of the Router in the screen; Browse; to find the local hard drive and locate the firmware or
- 95 button to locate the update file.; UPGRADE; New firmware versions are posted at
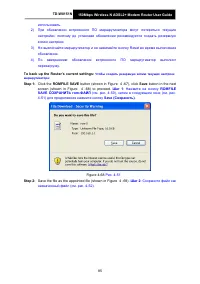
- 96 ROMFILE SAVE; button in the next; Шаг 1; : Нажмите на кнопку; ROMFILE; : Сохраните файл как
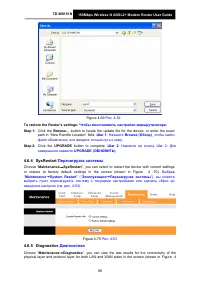
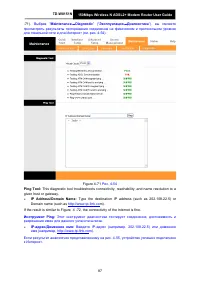
- 97 файл обновления, или введите точный путь к нему.; Перезагрузка системы; Диагностика
- 98 given host or gateway.
- 99 Справка; Help; »), вы сможете просмотреть информацию о том, как настроить любую
- 100 Нажав на закладку, вы получите соответствующую информацию.
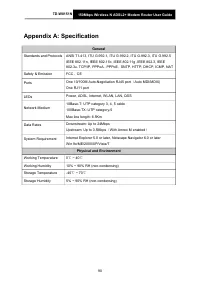
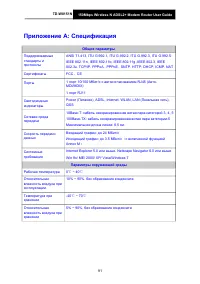
- 102 Приложение A: Спецификация; Общие параметры


