
Триммеры Hitachi CG25EUS - инструкция пользователя по применению, эксплуатации и установке на русском языке. Мы надеемся, она поможет вам решить возникшие у вас вопросы при эксплуатации техники.
Если остались вопросы, задайте их в комментариях после инструкции.
"Загружаем инструкцию", означает, что нужно подождать пока файл загрузится и можно будет его читать онлайн. Некоторые инструкции очень большие и время их появления зависит от вашей скорости интернета.


10
English
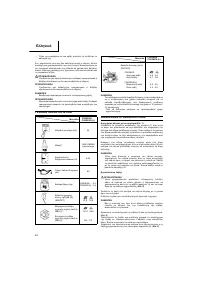
○
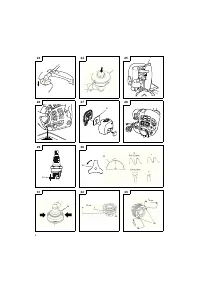
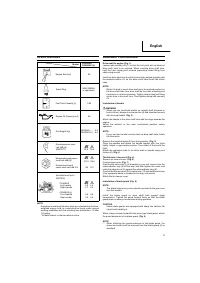
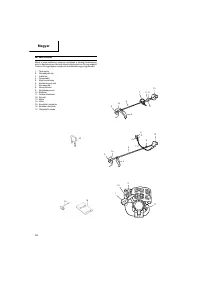
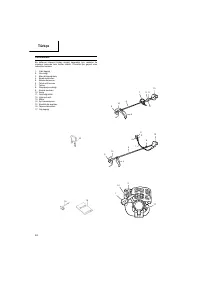
If your unit has guard location label on drive shaft tube, follow
the indication.
○
To remove the guard extension, refer to the drawings. Wear
gloves as the extension has a sharp line limiter, then push the
four square tabs on the guard one by one in order. (
Fig.
10
)
Installation
of
semi-auto
cutting
head
1. Function
Automatically feeds more nylon cutting line when it is tapped at
low rpm (not greater than 4500 rpm).
Speci
fi
cations
Code
No.
Type of
attaching screw
Direction of
rotation
Size of
attaching screw
6696454
Female screw
Counterclockwise
M10×P1.25-LH
Applicable nylon cord
Cord
diameter:
3.0 mm Length: 2 m
Cord
diameter:
2.4 mm Length: 4 m
2. Precautions
○
The case must be securely attached to the cover.
○
Check the cover, case and other components for cracks or
other damage.
○
Check the case and button for wear.
If the wear limit mark on the case is no longer visible or there
is a hole in the bottom of the button, change the new par ts
immediately. (
Fig.
11
)
○
The cutting head must be securely mounted to the unit ’s gear
case.
○
For outstanding per formance and reliability, always use Hitachi
nylon cutting line. Never use wire or other materials that could
become a dangerous projectile.
○
If the cutting head does not feed cutting line properly, check
that the nylon line and all components are properly installed.
Contact your Hitachi dealer if you need assistance.
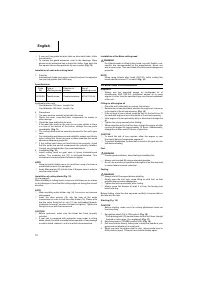
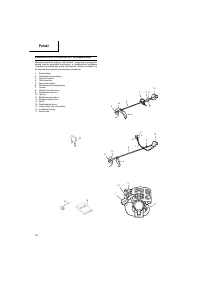
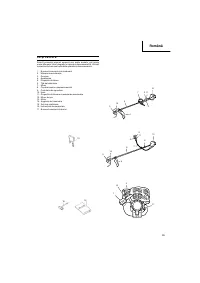
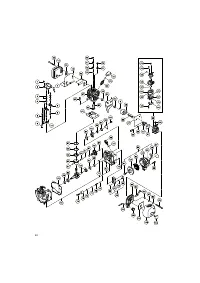
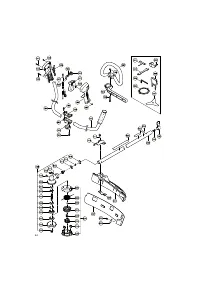
3. Installation
(
Fig.
12
)
○
Install cutting head on gear case of grass trimmers/brush
cutters. The mounting nut (12) is left-hand-threaded. Turn
clockwise to loosen/counterclockwise to tighten.
NOTE
○
Since the cutter holder cap is not used here, keep it for when a
metal blade is used, if so equipped.
○
Inser t Allen wrench (13) into the hole of the gear case in order to
lock the cutter holder.
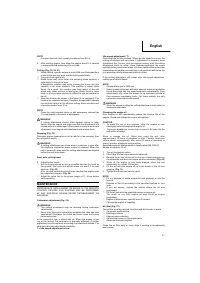
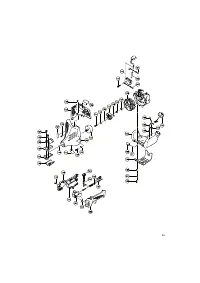
Installation
of
cutting
blade
(
Fig.
13
)
(If so equipped)
When installing a cutting blade, make sure that there are no cracks
or any damage in it and that the cutting edges are facing the correct
direction.
NOTE
○
When installing cutter holder cap (14), be sure to set concave
side upward.
○
Inser t the alien wrench (15) into the hole of the angle
transmission in order to lock the cutter holder (16). Please note
that the cutter
fi
xing bolt or nut (17) has left-handed threads,
(clockwise to loosen/ counter-clockwise to tighten). Tighten the
fi
xing bolt or nut with the box wrench.
CAUTION
○
Before operation, make sure the blade has been properly
installed.
○
If your unit is equipped with protection cover under a cutting
blade, check it for wear or cracks before operation. If any damage
or wear is found, replace it, as it is an article of consumption.
Installation
of
the
Brain
cutting
head
WARNING
For Hitachi heads or Hitachi alloy head, use only
fl
exible, non-
metallic line recommended by the manufacturer. Never use
wire or wire ropes. They can break o
ff
and become a dangerous
projectile.
NOTE
When using Hitachi alloy head (CH-100), initial cutting line
length should be about 17 cm each. (
Fig.
14
)
OPERATING
PROCEDURES
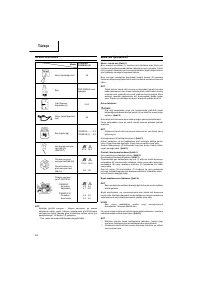
Engine
oil
○
Always use the speci
fi
ed engine oil (multigrade oil of
classi
fi
cation SAE 10W-30). Insu
ffi
cient engine oil or using
engine oil other than the speci
fi
ed type may cause breakdown
of the unit.
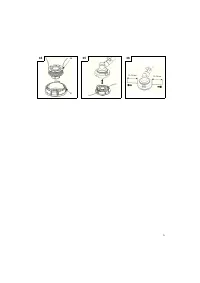
Filling
up
with
engine
oil
○
Place the unit horizontally on a clean,
fl
at sur face.
○
Remove the oil cap and check whether the engine oil comes up
to the mouth of the oil tank opening. (
Fig.
15
)
○
If the oil level is low or when using the unit for the
fi
rst time,
fi
ll
the tank with engine oil up to the mouth of the oil tank opening.
○
If the engine oil is conspicuously dir ty or discolored, change the
oil.
○
Tighten the oil cap securely after fueling.
○
When using the unit for the
fi
rst time, change the engine oil after
running the engine for approximately 10 hours. Subsequently,
change the oil after ever y 50 hours of operation.
CAUTION
○
To avoid the risk of burn injuries, allow the engine to cool
thoroughly before changing the engine oil.
○
To prevent breakdown, ensure that no sand or dir t gets into the
tank while refueling.
Fuel
WARNING
Provide good ventilation, when fueling or handling fuel.
○
Always use branded 89 octane unleaded gasoline.
○
Do not use a mixture of gasoline and engine oil as this may lead
to star ter failure or power reduction.
Fueling
WARNING
○
Always shut o
ff
the engine before refueling.
○
Slowly open the fuel tank, when
fi
lling up with fuel, so that
possible over-pressure disappears.
○
Tighten the fuel cap carefully, after fueling.
○
Always move the trimmer at least 3 m from the fueling area
before star ting.
Before fueling, clean the tank cap area carefully, to ensure that no
dir t falls into the tank.
Starting
(
Fig.
16
)
CAUTION
Before star ting, make sure the cutting attachment does not
touch any thing.
1. Set ignition switch (18) to ON position. (
Fig.
16
)
* Push priming bulb (19) several times so that fuel
fl
ows through
the bulb or return pipe. (If so equipped) (
Fig.
17
)
2. Set choke lever to CLOSED position (20). (
Fig.
18
)
3. Pull recoil star ter briskly, taking care to keep the handle in your
grasp and not allowing it to snap back.
4. When you hear the engine want to star t, return choke lever to
RUN position (open). Then pull recoil star ter briskly again.
000Book̲CG25EUS̲EE.indb 10
000Book̲CG25EUS̲EE.indb 10
2009/12/26 9:26:20
2009/12/26 9:26:20


