Усилители Onkyo TX-RZ710 - инструкция пользователя по применению, эксплуатации и установке на русском языке. Мы надеемся, она поможет вам решить возникшие у вас вопросы при эксплуатации техники.
Если остались вопросы, задайте их в комментариях после инструкции.
"Загружаем инструкцию", означает, что нужно подождать пока файл загрузится и можно будет его читать онлайн. Некоторые инструкции очень большие и время их появления зависит от вашей скорости интернета.


23
> Перед тем, как начать
эксплуатацию
> Подсоединение > Настройка
> Воспроизведение
> Наименования органов
управления и отображения
23
> Before start
> Hookup
> Setup
> Playback
> Part Names
Network Functions
Network Services
1. Switch the input on the TV to that assigned to
the unit.
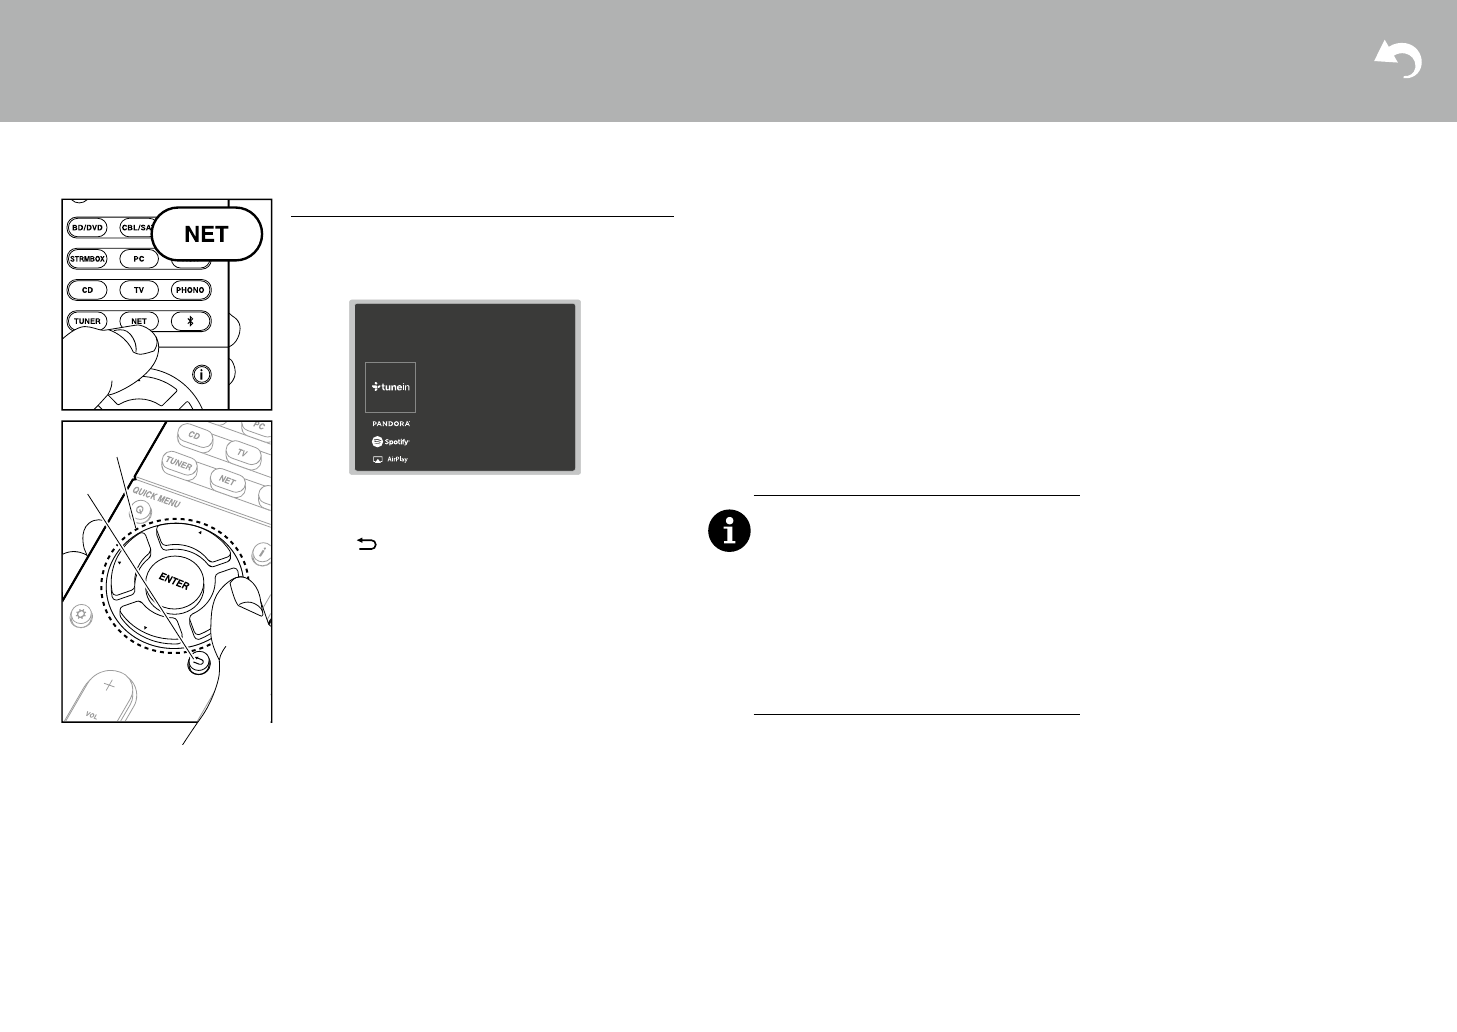
2. Press NET to display the network service list
screen.
3. Select the item with the cursors of the remote
controller and press ENTER to confirm your
selection (a). To return to the previous
screen, press (b).
Internet Radio
When this unit is connected to a network, you
can listen to TuneIn or other preregistered
Internet radio services. After selecting the
desired service, follow the on-screen
instructions, using the cursors to select radio
stations and programs, then press ENTER to
play. Play starts when 100% is displayed for
buffering.
Music Server
You can play music files stored on home-
network compliant PCs or NAS devices
connected to the same network as this unit.
Select the server with the cursors, select the
desired music file and press ENTER to start
playback. Play starts when 100% is displayed
for buffering.
0
This unit is compatible with Windows Media
®
Player 11 or 12 network servers or NAS that
are compatible with home network
functionality. You may need to make some
settings in advance to use Windows Media
®
Player 11 or 12. Enable media streaming for
this player in Windows Media
®
Player. For
details, see the Advanced Manual.
USB
Play music files on a USB storage device.
Connect the USB storage device to the USB
jack on the rear of the unit, select USB in the list
of network services, and press ENTER to
confirm. Select the desired folder or music file
with the cursors, and press ENTER to confirm
and start playback.
0
Operation cannot be guaranteed for all USB
storage devices.
0
This unit can use USB storage devices that
comply with the USB mass storage device
class standard. The unit is also compatible
with USB storage devices using the FAT16 or
FAT32 file system formats.
a
b
Notes:
0
Network services become selectable after the
network starts up even if they cannot be
selected first.
0
Functionality may be introduced by firmware
updates and service providers may cease
services, meaning that some network services
and content may become unavailable in the
future. Furthermore, available services may
vary depending on your area of residence.
SN29402172_TX-RZ710_BAS_En.book 23 ページ 2016年2月17日 水曜日 午後7時25分
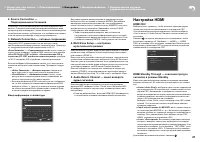
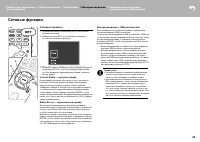
Сетевые сервисы
1. Переключите вход телевизора на тот, на который
назначен ресивер.
2. Нажмите кнопку NET для отображения экрана
со списком сетевых сервисов.
23
> Before start
> Hookup
> Setup
> Playback
> Part Names
Network Functions
Network Services
1. Switch the input on the TV to that assigned to
the unit.
2. Press NET to display the network service list
screen.
3. Select the item with the cursors of the remote
controller and press ENTER to confirm your
selection (a). To return to the previous
screen, press (b).
Internet Radio
When this unit is connected to a network, you
can listen to TuneIn or other preregistered
Internet radio services. After selecting the
desired service, follow the on-screen
instructions, using the cursors to select radio
stations and programs, then press ENTER to
play. Play starts when 100% is displayed for
buffering.
Music Server
You can play music files stored on home-
network compliant PCs or NAS devices
connected to the same network as this unit.
Select the server with the cursors, select the
desired music file and press ENTER to start
playback. Play starts when 100% is displayed
for buffering.
0
This unit is compatible with Windows Media
®
Player 11 or 12 network servers or NAS that
are compatible with home network
functionality. You may need to make some
settings in advance to use Windows Media
®
Player 11 or 12. Enable media streaming for
this player in Windows Media
®
Player. For
details, see the Advanced Manual.
USB
Play music files on a USB storage device.
Connect the USB storage device to the USB
jack on the rear of the unit, select USB in the list
of network services, and press ENTER to
confirm. Select the desired folder or music file
with the cursors, and press ENTER to confirm
and start playback.
0
Operation cannot be guaranteed for all USB
storage devices.
0
This unit can use USB storage devices that
comply with the USB mass storage device
class standard. The unit is also compatible
with USB storage devices using the FAT16 or
FAT32 file system formats.
a
b
Notes:
0
Network services become selectable after the
network starts up even if they cannot be
selected first.
0
Functionality may be introduced by firmware
updates and service providers may cease
services, meaning that some network services
and content may become unavailable in the
future. Furthermore, available services may
vary depending on your area of residence.
SN29402172_TX-RZ710_BAS_En.book 23 ページ 2016年2月17日 水曜日 午後7時25分
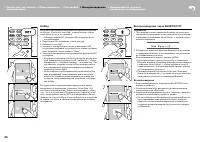
3.
выберите пункт с помощью кнопок курсора на пульте
и нажмите ENTER, чтобы подтвердить ваш выбор
(а). Для возврата к предыдущему экрана, нажмите
кнопку
(b).
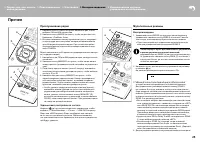
Internet Radio — интернет-радио
Когда данный ресивер подключен к сети, вы можете
слушать TuneIn или другие заранее зарегистриро-
ванные интернет радио сервисы. После выбора
требуемого сервиса, следуйте инструкциям на экране,
с помощью кнопок курсора выберите радиостанцию
и программу, затем нажмите клавишу ENTER, чтобы
начать воспроизведение. воспроизведение начинается
после того, как на дисплее отображается 100 % буфери-
зация потока данных.
Music Server — музыкальный сервер
вы можете воспроизводить музыкальные файлы,
хранящиеся на устройствах, совместимых с домашней
сетью, типа ПК или NAS-накопителей, подключенных
к той же самой сети, что и ресивер.
выберите сервер с помощью кнопок курсора, затем вы-
берите нужный музыкальный файл и нажмите клавишу
ENTER, чтобы начать воспроизведение. воспроизведе-
ние начинается после того, как на дисплее отображает-
ся 100 % буферизация потока данных.
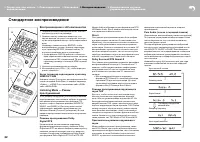
Воспроизведение с USB-накопителей
воспроизводите музыкальные файлы, хранящиеся
на запоминающем USB устройстве.
Подключите запоминающее USB устройство к USB пор-
ту на задней панели ресивера, выберите нужную папку
или музыкальный файл с помощью кнопок курсора,
и нажмите ENTER, чтобы подтвердить выбор и начать
воспроизведение.
•
Функционирование не может быть гарантировано
для всех USB устройств хранения данных.
•
Данный ресивер может использования для вос-
произведения только USB-устройства хранения
данных, удовлетворяющие стандарту на класс
массовых USB запоминающих устройств. ресивер
так же совместим с USB-устройствами хранения
данных, использующими файловую систему FAT16
или файловую систему FAT32.
Примечания:
•
сетевые сервисы становятся выбираемыми
только после запуска сети, даже если они
не могут быть выбраны в первый момент.
•
функциональные возможности иногда могут
быть реализованы только путем обновления
прошивки ПО, а сервис-провайдеры могут
перестать оказывать услуги, и это означает,
что некоторые сетевые службы и контент мо-
гут стать недоступным в будущем. Кроме того,
доступные услуги могут варьировать в зависи-
мости от вашего региона проживания.
Сетевые функции
Содержание
- 2 Перед тем, как начать эксплуатацию; Main features
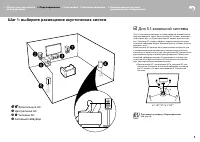
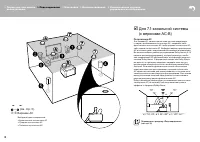
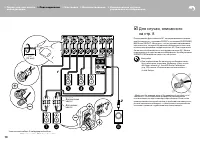
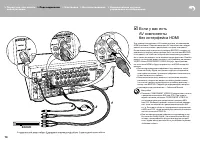
- 3 Шаг 1: выберите размещение акустических систем; Фронтальные Ас; Step1: Choose your Speaker Layout
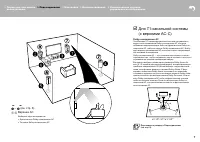
- 4 Surround Back Speakers); Surround Back Speakers; Surround Back Speakers)
- 5 верхние Ас
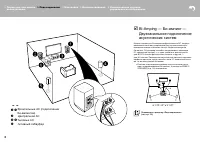
- 8 Speakers; Двухканальное подключение; Center Speaker; Speakers
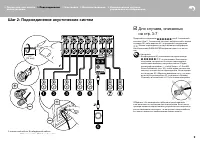
- 9 Для случаев, описанных; Step2: Connect the Speakers
- 10 Для случая, описанного
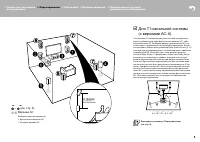
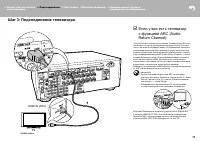
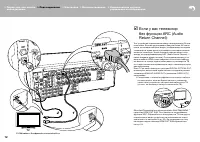
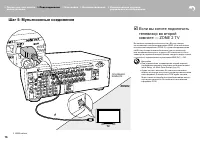
- 11 Шаг 3: Подсоединение телевизора; если у вас есть телевизор; TV; Step3: Connect the TV; ARC TV
- 12 если у вас телевизор
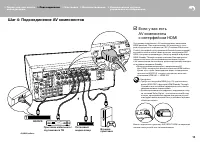
- 13 GAME; если у вас есть; GAME; HDMI AV Components; Приставка кабельного /
- 14 OR; Non-HDMI AV Components
- 15 Audio Components; если у вас есть аудио; Audio Components
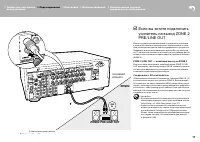
- 16 MAIN ROOM; ZONE 2 TV; если вы хотите подключить; Шаг 5: Мультизонные соединения
- 18 ZONE 2B; ZONE 2 SPEAKER
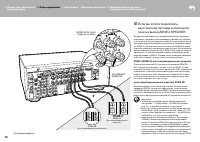
- 19 Шаг 6: Подсоединение остальных кабелей; Сетевое соединение; Step6: Connect Other Cables
- 20 Шаг 7: Включение и первоначальная настройка; AccuEQ Room Calibration; SETUP MIC; AccuEQ Room Calibration; SETUP MIC
- 21 HDMI Setup; Network Connection; Audio Return Channel
- 22 Воспроизведение с AV-компонентов; AV Component Playback; AV Component Playback; Стандартное воспроизведение
- 23 Network Services; Network Functions; Network Services; Сетевые функции
- 24 Воспроизведение через BLUETOOTH; AirPlay
- 25 Прослушивание радио; Мультизонные режимы; Listening To the Radio; Прочее; Listening To the Radio; Others; Listening To the Radio
- 26 Прочие функции; Если ресивер работает с ошибками
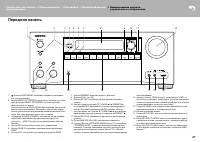
- 27 Front Panel; Передняя панель
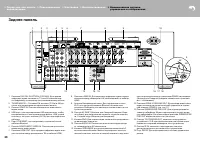
- 28 Rear Panel; Задняя панель
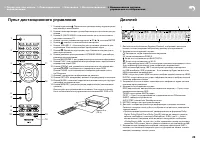
- 29 Пульт дистанционного управления
- 30 Информация о лицензиях и торговых марках

