Усилители Onkyo TX-RZ710 - инструкция пользователя по применению, эксплуатации и установке на русском языке. Мы надеемся, она поможет вам решить возникшие у вас вопросы при эксплуатации техники.
Если остались вопросы, задайте их в комментариях после инструкции.
"Загружаем инструкцию", означает, что нужно подождать пока файл загрузится и можно будет его читать онлайн. Некоторые инструкции очень большие и время их появления зависит от вашей скорости интернета.


21
> Перед тем, как начать
эксплуатацию
> Подсоединение
> Настройка
> Воспроизведение > Наименования органов
управления и отображения
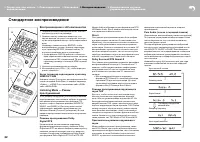
2. Source Connection —
Подсоединение источников
Убедитесь, что источник входного сигнала подключен пра-
вильно. следуйте указаниям руководства и выберите вход,
который нужно подтвердить, затем начните воспроизведение
на выбранном плеере, и убедитесь, что изображение появля-
ется на экране телевизора, а звук воспроизводится.
3. Network Connection — сетевые соединения
Настройте Wi-Fi подключение к точке доступа, такой
как беспроводной маршрутизатор локальной сети. существу-
ют следующие два метода подключение по Wi-Fi:
«Scan Networks» — «Сканирование сетей»:
поиск точки до-
ступа с этого ресивера. Узнайте SSID точки доступа заранее.
«Use iOS Device (iOS7 or later)» -«Использование iOS-у
-
стройства (ОС iOS7 или более поздней версии)»:
раздели-
те Wi-Fi настройки iOS устройства с данным ресивером.
если вы выбрали «сканирование сетей», есть еще две воз-
можности выбора метода подключения. Проверьте следую-
щее.
•
«Enter Password» — «Введите пароль»:
введите па-
роль (или ключ) в точку доступа для подключения.
•
«Push Button» — «Нажатием кнопки»:
если у точки
доступа есть кнопка автоматического соединения, вы
можете подключиться без ввода пароля.
•
если идентификатор SSID точки доступа не отображает-
ся, то в то в экране со списком идентификаторов SSID,
выберите «Other…» (другое) с помощью кнопки курсора
на пульте дистанционного управления и нажмите Enter,
а затем следуйте инструкциям на экране.
Ввод информации с клавиатуры
21
> Before start
> Hookup
> Setup
> Playback
> Part Names
2. Source Connection
Check that each input source is connected correctly. Follow
the guidance, select the input you want to confirm, start
play of the selected player, and confirm that the images
appear on the TV and that sound is played.
3. Network Connection
Set up Wi-Fi connection with an access point such as a
wireless LAN router. There are the following two methods of
connecting by Wi-Fi:
"Scan Networks":
Search for an access point from this
unit. Find out the SSID of the access point beforehand.
"Use iOS Device (iOS7 or later)":
Share the iOS device's
Wi-Fi settings with this unit.
If you select "Scan Networks", there are a further two
choices of connection method. Check the following.
0
"Enter Password":
Enter the password (or key) of the
access point to connect.
0
"Push Button":
If the access point has an automatic
connection button, you can connect without entering a
password.
0
If the SSID of the access point is not displayed, then in
the screen listing the SSIDs, select "Other..." with the
cursor on the remote controller and press ENTER, then
follow the onscreen instructions.
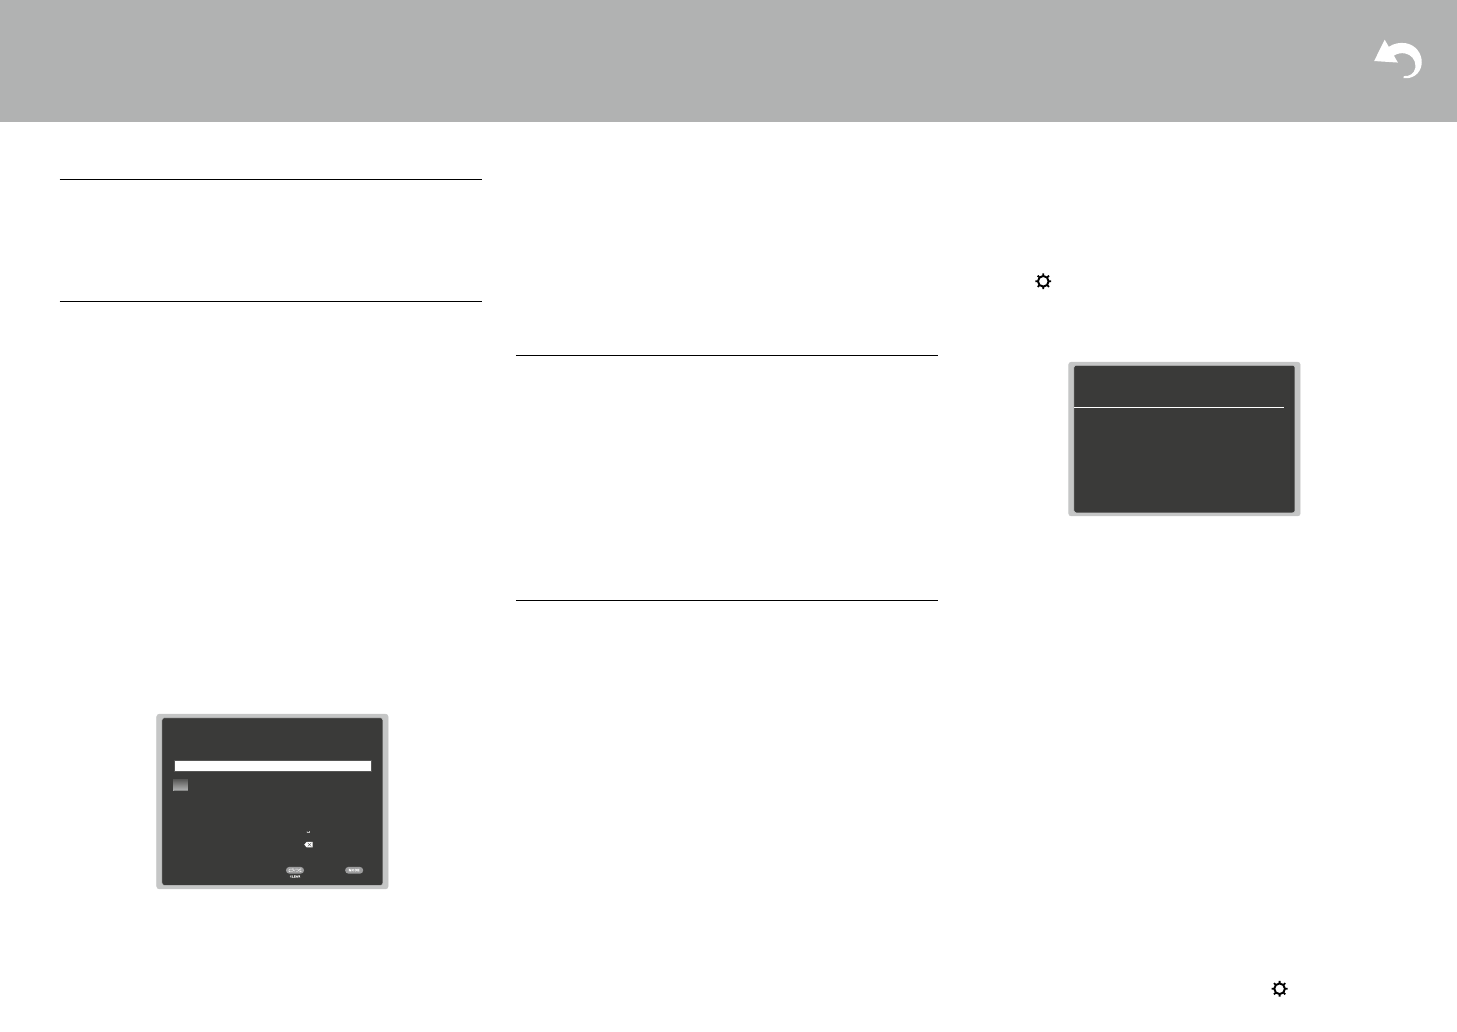
Keyboard input
To switch between upper and lower case, select "A/a" on
the screen and press ENTER. To select whether to mask
the password with "
*
" or display it in plain text, press
MEMORY on the remote controller. Press CLEAR to delete
all the input characters.
0
A confirmation screen asking you to agree to the privacy
policy is displayed during network setting. Select "Yes"
and press ENTER to indicate agreement.
4. Multi Zone Setup
Make these settings to enjoy video and audio in a room
other than the main room (ZONE 2).
Select "Using AV Receiver" when connecting speakers in
the separate room. Select "with External Premain Amplifier"
when connecting a pre-main amplifier in the separate room.
Select "with External Power Amplifier" when connecting a
power amplifier.
If you are going to be connecting a TV in the separate room
(ZONE 2), then when "Would you be using TV in 2nd
room?" is displayed, select "Yes".
5. Audio Return Channel
If you have connected a TV that supports ARC, select
"Yes". This unit's ARC setting turns on and you can listen to
the TV's audio through this unit.
0
If you select "Yes", the HDMI CEC function is enabled
and power consumption increases during standby.
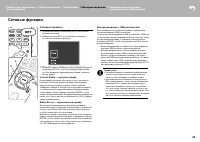
Wi-Fi Setup
SSID
When finished, select the "OK" key.
Ɵ
ơ
OK
A/a
a b c d e
f
g h
i
j
k
l
m
n o p q
r
s
t
u v w x
y
z
1 2 3 4 5 6 7 8 9 0
-
^
\
,
.
/
;
: @ [
]
A/a
All Erase
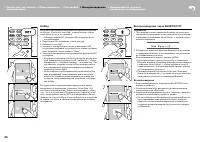
HDMI Setup
HDMI CEC
Make this setting to enable the control feature for devices
complying with the CEC standard. This is set to on
automatically if you have selected "Yes" in "5. Audio Return
Channel" in the Initial Setup.
Press the button on the remote controller to set "5.
Hardware" – "HDMI" – "HDMI CEC" to "On" on the TV
screen. Also enable the CEC control feature on the CEC
device you have connected.
HDMI Standby Through
Even if this unit is in standby, the input signals from AV
components are transmitted to the TV.
0
"Auto" / "Auto (Eco)":
Select one of these settings
when connected AV components comply with the CEC
standard. Irrespective of the input selector selected
immediately before switching the unit to standby, you can
transmit the input signals from AV components to the TV.
Select "Auto (Eco)" if the TV is also CEC-compliant. You
can reduce power consumption in standby mode.
0
Input selector names for "BD/DVD", etc.:
You can
transmit the input signals from the set input selector to
the TV. It can be selected when "HDMI CEC" is set to
"Off".
0
"Last":
You can transfer the input signals of the input
selector selected immediately prior to the unit being
switched to standby. It can be selected when "HDMI
CEC" is set to "Off". With this setting, you can switch the
input selector even in the standby mode.
To exit the settings, press .
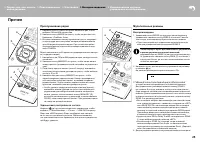
5-1 HDMI
HDMI CEC
HDMI Standby Through
Audio TV Out
Audio Return Channel
Auto Lip Sync
On
Auto(Eco)
Auto
Auto
On
SN29402172_TX-RZ710_BAS_En.book 21 ページ 2016年2月17日 水曜日 午後7時25分
Для переключения меж ду верхним и нижним регистром,
выберите «A / a» на экране и нажмите ENTER. Для выбора
маскировки пароля звездочками «
» или отображения
в виде обычного текста, нажмите кнопку MEMORY на пульте
дистанционного управления. Нажимайте кнопку CLEAR,
чтобы удалить все введенные символы.
•
Экран подтверж дения запросит вас согласиться
с договором о политике конфиденциальности, который
отображается во время настройки сети. выберите «Yes»
и нажмите клавишу ENTER, чтобы указать на согласие.
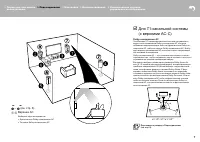
4. Multi Zone Setup — настройка
мультизонного режима
если вы хотите слушать аудио в еще одной комнате, помимо
основного зала, выберите способ выдачи звука для отдель-
ной комнаты (ZONE 2).
если у вас есть колонки в отдельной комнате, подключенные
колоночным кабелем диктора, выберите «Using AV Receiver».
если же у вас в отдельной комнате есть предварительно под-
ключенный аналоговым аудио кабелем усилитель мощности,
то выберите вариант «with External Premain Amplifier».
если вы собираетесь подключать телевизор в отдельной
комнате (ZONE 2), тогда при выводе в строке меню предло-
жения «Would you be using TV in 2nd room?», выберите «Yes».
5. Audio Return Channel — канал возврата
аудио сигналов
если вы подключили телевизор, который поддерживает
функции ARC, выберите «Yes». После этого настройка ARC
активируется и можно слушать звук телевизора через дан-
ный ресивер.
•
если вы выбрали»Yes», функция HDMI CEC активируется
и потребление в режиме ожидания standby возрастает.
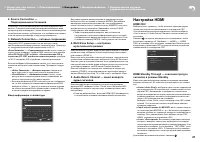
Настройка HDMI
HDMI CEC
выберите этот параметр, чтобы включить функцию управ-
ления для устройств совместимых со стандартом CEC.
Этот режим включается автоматически, если вы выбрали
«Yes» в меню «5. Audio Return Channel» в меню начальной
установки.
Нажмите на пульте дистанционного управления, чтобы
установить параметр «5. Hardware» — «HDMI» — «HDMI
CEC» в значение «On» на экране телевизора. включите так-
же функцию управления CEC на подключенном устройстве,
совместимом со стандартом CEC.
21
> Before start
> Hookup
> Setup
> Playback
> Part Names
2. Source Connection
Check that each input source is connected correctly. Follow
the guidance, select the input you want to confirm, start
play of the selected player, and confirm that the images
appear on the TV and that sound is played.
3. Network Connection
Set up Wi-Fi connection with an access point such as a
wireless LAN router. There are the following two methods of
connecting by Wi-Fi:
"Scan Networks":
Search for an access point from this
unit. Find out the SSID of the access point beforehand.
"Use iOS Device (iOS7 or later)":
Share the iOS device's
Wi-Fi settings with this unit.
If you select "Scan Networks", there are a further two
choices of connection method. Check the following.
0
"Enter Password":
Enter the password (or key) of the
access point to connect.
0
"Push Button":
If the access point has an automatic
connection button, you can connect without entering a
password.
0
If the SSID of the access point is not displayed, then in
the screen listing the SSIDs, select "Other..." with the
cursor on the remote controller and press ENTER, then
follow the onscreen instructions.
Keyboard input
To switch between upper and lower case, select "A/a" on
the screen and press ENTER. To select whether to mask
the password with "
*
" or display it in plain text, press
MEMORY on the remote controller. Press CLEAR to delete
all the input characters.
0
A confirmation screen asking you to agree to the privacy
policy is displayed during network setting. Select "Yes"
and press ENTER to indicate agreement.
4. Multi Zone Setup
Make these settings to enjoy video and audio in a room
other than the main room (ZONE 2).
Select "Using AV Receiver" when connecting speakers in
the separate room. Select "with External Premain Amplifier"
when connecting a pre-main amplifier in the separate room.
Select "with External Power Amplifier" when connecting a
power amplifier.
If you are going to be connecting a TV in the separate room
(ZONE 2), then when "Would you be using TV in 2nd
room?" is displayed, select "Yes".
5. Audio Return Channel
If you have connected a TV that supports ARC, select
"Yes". This unit's ARC setting turns on and you can listen to
the TV's audio through this unit.
0
If you select "Yes", the HDMI CEC function is enabled
and power consumption increases during standby.
Wi-Fi Setup
SSID
When finished, select the "OK" key.
Ɵ
ơ
OK
A/a
a
b
c
d
e
f
g
h
i
j
k
l
m
n
o
p
q
r
s
t
u
v
w
x
y
z
1
2
3
4
5
6
7
8
9
0
-
^
\
,
.
/
;
:
@
[
]
A/a
All Erase
HDMI Setup
HDMI CEC
Make this setting to enable the control feature for devices
complying with the CEC standard. This is set to on
automatically if you have selected "Yes" in "5. Audio Return
Channel" in the Initial Setup.
Press the
button on the remote controller to set "5.
Hardware" – "HDMI" – "HDMI CEC" to "On" on the TV
screen. Also enable the CEC control feature on the CEC
device you have connected.
HDMI Standby Through
Even if this unit is in standby, the input signals from AV
components are transmitted to the TV.
0
"Auto" / "Auto (Eco)":
Select one of these settings
when connected AV components comply with the CEC
standard. Irrespective of the input selector selected
immediately before switching the unit to standby, you can
transmit the input signals from AV components to the TV.
Select "Auto (Eco)" if the TV is also CEC-compliant. You
can reduce power consumption in standby mode.
0
Input selector names for "BD/DVD", etc.:
You can
transmit the input signals from the set input selector to
the TV. It can be selected when "HDMI CEC" is set to
"Off".
0
"Last":
You can transfer the input signals of the input
selector selected immediately prior to the unit being
switched to standby. It can be selected when "HDMI
CEC" is set to "Off". With this setting, you can switch the
input selector even in the standby mode.
To exit the settings, press
.
5-1 HDMI
HDMI CEC
HDMI Standby Through
Audio TV Out
Audio Return Channel
Auto Lip Sync
On
Auto(Eco)
Auto
Auto
On
SN29402172_TX-RZ710_BAS_En.book 21 ページ 2016年2月17日 水曜日 午後7時25分
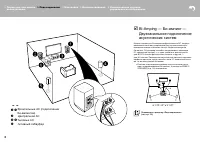
HDMI Standby Through — сквозной пропуск
сигналов в режиме Standby
Даже если данный ресивер находится в режиме ожидания,
входные сигналы от AV компонентов передаются на телеви-
зор.
•
«Auto» / «Auto (Eco)»:
выберите один из этих параметров
при подключении AV-компонентов, совместимых со стан-
дартом сес. Независимо от выбранного селектором
входа непосредственно перед переключением ресивера
в режим ожидания, вы можете передавать входные сиг-
налы от AV-компонентов на телевизор.
выберите «Auto (Eco)», если телевизор тоже сес-совме-
стимый. Это позволяет снизить потребление энергии
в режиме ожидания.
•
«Input selector names for BD / DVD, etc.»:
«имена входно-
го селектора для BD / DVD и т. д.»: вы можете передавать
входные сигналы от заданного входного селектора на те-
левизор. Этот режим может быть выбран, когда «сес
HDMI» установлен в положение «Off».
•
«Last»: «Последний»:
вы сможете передавать входные
сигналы с входного селектора, выбранного последним
перед переключением ресивера в режим ожидания. Этот
режим можно выбрать, если параметр " сес HDMI " уста-
новлено в положение «Off». с помощью этой установки,
вы можете переключать селектор входов даже в режиме
ожидания.
Для выхода из режима настройки, нажмите
.
Содержание
- 2 Перед тем, как начать эксплуатацию; Main features
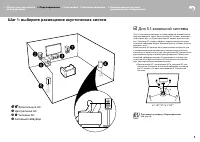
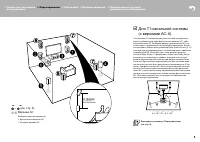
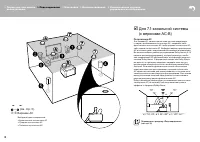
- 3 Шаг 1: выберите размещение акустических систем; Фронтальные Ас; Step1: Choose your Speaker Layout
- 4 Surround Back Speakers); Surround Back Speakers; Surround Back Speakers)
- 5 верхние Ас
- 8 Speakers; Двухканальное подключение; Center Speaker; Speakers
- 9 Для случаев, описанных; Step2: Connect the Speakers
- 10 Для случая, описанного
- 11 Шаг 3: Подсоединение телевизора; если у вас есть телевизор; TV; Step3: Connect the TV; ARC TV
- 12 если у вас телевизор
- 13 GAME; если у вас есть; GAME; HDMI AV Components; Приставка кабельного /
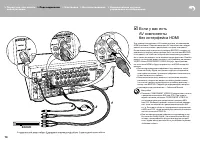
- 14 OR; Non-HDMI AV Components
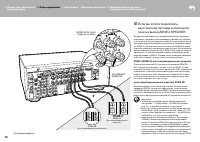
- 15 Audio Components; если у вас есть аудио; Audio Components
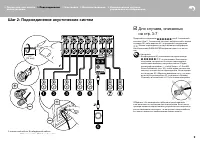
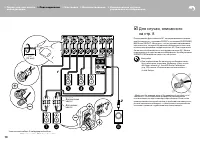
- 16 MAIN ROOM; ZONE 2 TV; если вы хотите подключить; Шаг 5: Мультизонные соединения
- 18 ZONE 2B; ZONE 2 SPEAKER
- 19 Шаг 6: Подсоединение остальных кабелей; Сетевое соединение; Step6: Connect Other Cables
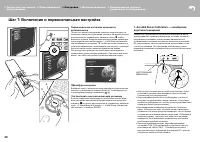
- 20 Шаг 7: Включение и первоначальная настройка; AccuEQ Room Calibration; SETUP MIC; AccuEQ Room Calibration; SETUP MIC
- 21 HDMI Setup; Network Connection; Audio Return Channel
- 22 Воспроизведение с AV-компонентов; AV Component Playback; AV Component Playback; Стандартное воспроизведение
- 23 Network Services; Network Functions; Network Services; Сетевые функции
- 24 Воспроизведение через BLUETOOTH; AirPlay
- 25 Прослушивание радио; Мультизонные режимы; Listening To the Radio; Прочее; Listening To the Radio; Others; Listening To the Radio
- 26 Прочие функции; Если ресивер работает с ошибками
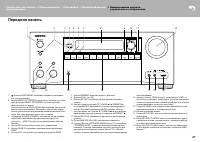
- 27 Front Panel; Передняя панель
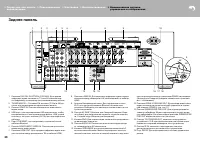
- 28 Rear Panel; Задняя панель
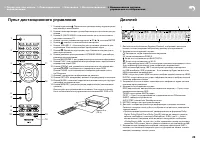
- 29 Пульт дистанционного управления
- 30 Информация о лицензиях и торговых марках

