Усилители Onkyo TX-RZ710 - инструкция пользователя по применению, эксплуатации и установке на русском языке. Мы надеемся, она поможет вам решить возникшие у вас вопросы при эксплуатации техники.
Если остались вопросы, задайте их в комментариях после инструкции.
"Загружаем инструкцию", означает, что нужно подождать пока файл загрузится и можно будет его читать онлайн. Некоторые инструкции очень большие и время их появления зависит от вашей скорости интернета.


20
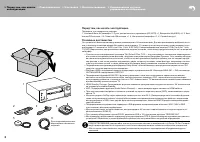
> Перед тем, как начать
эксплуатацию
> Подсоединение
> Настройка
> Воспроизведение > Наименования органов
управления и отображения
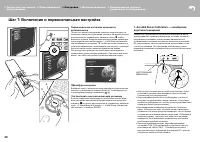
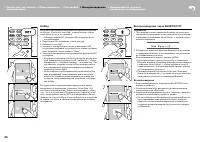
Шаг 7: Включение и первоначальная настройка
Первоначальная настройка начинается
автоматически
После того как все соединения сделаны, измените вход те-
левизора на вход этого ресивера, вставьте батарейки в пульт
дистанционного управления и нажмите кнопку , чтобы
включить питание. Когда вы включаете ресиверв первый раз,
процедура Начальная Настройки — Initial Setup автоматиче-
ски показывается на экране Тв, чтобы вы могли сделать все
установки параметров, необходимые для запуска с помощью
простых шагов после появления указания на экране.
Эти инструкции проведет вас через некоторые моменты,
которые вам нужно заранее проверить. Прочитать все их за-
ранее, так чтобы настройка и установка прошла гладко.
20
> Before start
> Hookup
> Setup
> Playback
> Part Names
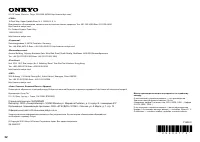
Step7: Power On & Initial Setup
Initial Setup starts automatically
Once all connections are complete, change the TV's input
to the input for this unit, inset batteries in the remote
controller, and press
Í
to turn the power on. When you
turn the unit on for the first time, Initial Setup is
automatically shown on the TV to enable you to make
settings required for startup using simple operations
following onscreen guidance.
These instructions will guide you through some items that
you need to check beforehand. Read beforehand so the
setup goes smoothly.
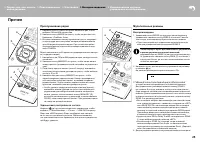
Operation
Select the item with the cursors of the remote controller
and press ENTER (a). To return to the previous screen,
press (b).
To redo the Initial Setup
If you terminate the procedure on the way or want to
change a setting made during Initial Setup, press on
the remote controller, select "7. Miscellaneous" – "Initial
Setup", and press ENTER.
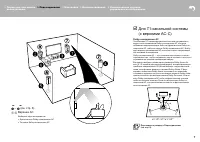
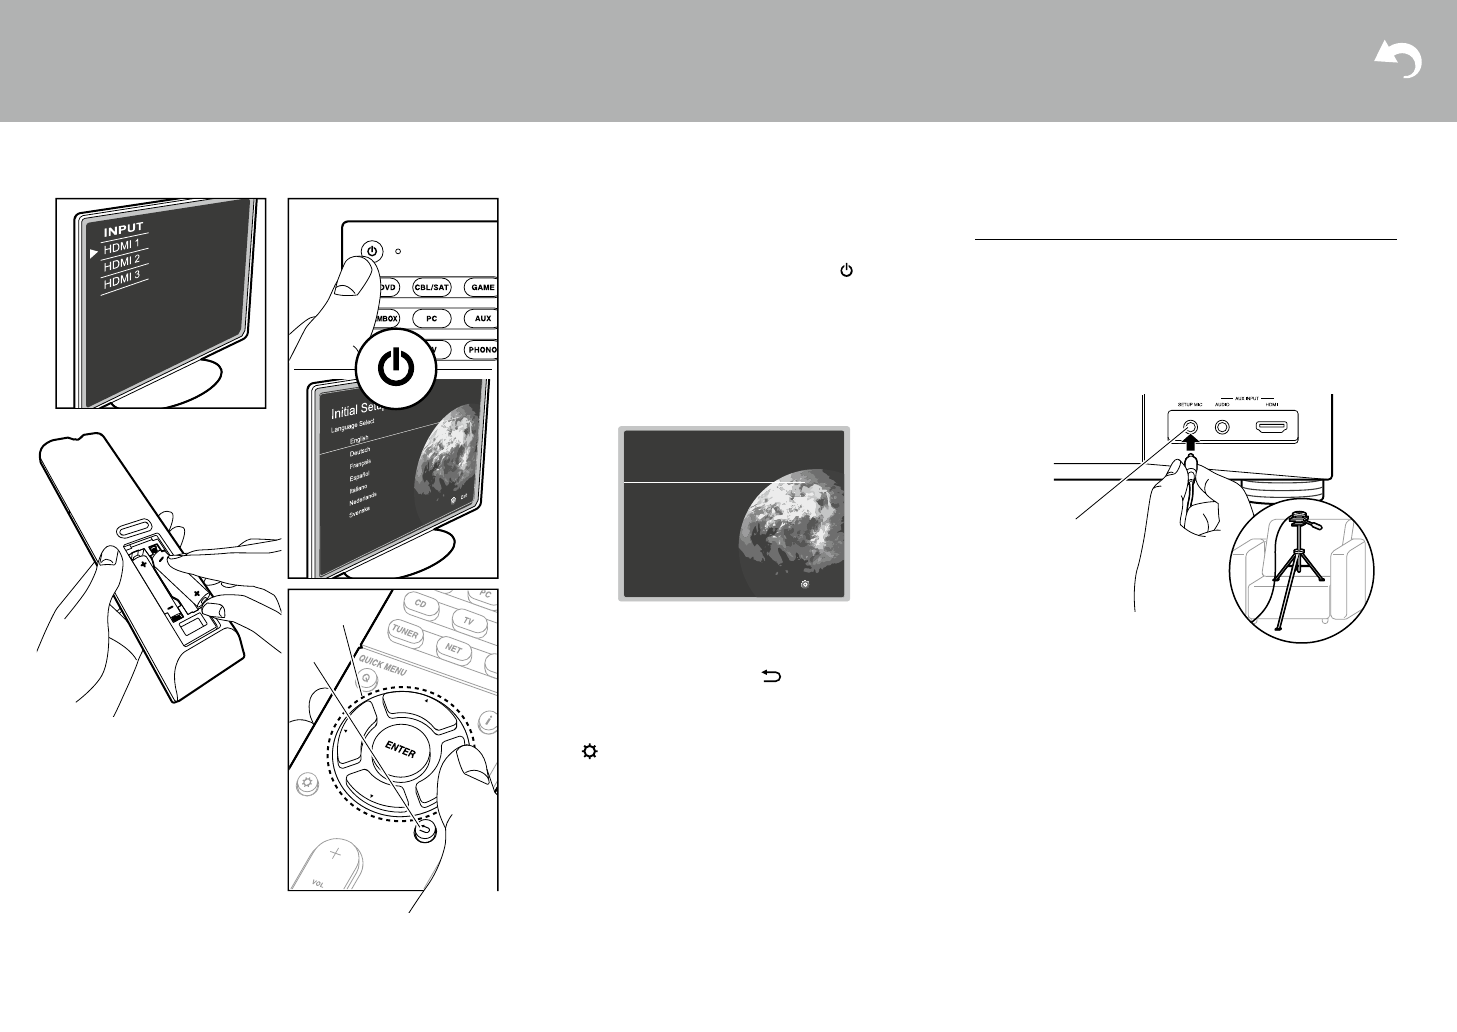
1. AccuEQ Room Calibration
Place the supplied speaker setup microphone in the
listening position, measure the test tones emitted by the
speakers, then the unit automatically sets the optimum
volume level for each speaker, the crossover frequencies,
and the distance from the listening position. This also
enables correction of distortion caused by the acoustic
environment of the room.
0
When putting the speaker setup microphone on a tripod,
refer to the illustration when putting it in place.
0
The subwoofer sound may not be detected since it is
extremely low frequencies. Set the subwoofer volume to
more than halfway.
0
Calibration takes several minutes to be completed. The
speakers emit the test tone at high volume during
measurement, so be careful of your surroundings. Keep
the room as quiet as possible during measurement. If
the measurement is interrupted, turn off the household
appliances.
0
When using THX certified speakers, THX recommends
setting the crossover frequency to "80Hz(THX)". It is
also recommended to manually adjust the settings for
each speaker to suit the specific characteristics of each
room.
a
b
English
Deutsch
Français
Español
Italiano
Nederlands
Svenska
Exit
Initial Setup
Language Select
SETUP MIC
SN29402172_TX-RZ710_BAS_En.book 20 ページ 2016年2月17日 水曜日 午後7時25分
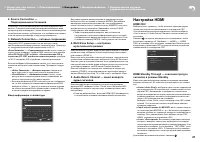
Процедура настройки
выберите пункт с помощью кнопок курсора на пульте дистан-
ционного управления и нажмите Enter (а). Чтобы вернуться
к предыдущему экрану, нажимайте
(в).
Что повторить еще раз начальную установку
если вы завершили процедуру на полпути или хотите изме-
нить настройки сделанные во время начальной настройки,
нажмите на пульте дистанционного управления, выберите
пункт «7. Miscellaneous (разное)» — «Initial Setup (Начальная
Настройка)», и нажмите ENTER.
1. AccuEQ Room Calibration — калибровка
акустики помещения
разместите прилагаемый настроечный микрофон в месте
прослушивания, проведите измерения тестовых сигналов,
излучаемых колонками, затем ресивер автоматически
устанавливает оптимальные уровни громкости для каж дой
Ас, рассчитывает частоты кроссовера, и расстояние от ме-
ста прослушивания. Эта процедура обеспечивает так же
коррекцию искажений, вызванных акустической обстановкой
в комнате.
20
> Before start
> Hookup
> Setup
> Playback
> Part Names
Step7: Power On & Initial Setup
Initial Setup starts automatically
Once all connections are complete, change the TV's input
to the input for this unit, inset batteries in the remote
controller, and press
Í
to turn the power on. When you
turn the unit on for the first time, Initial Setup is
automatically shown on the TV to enable you to make
settings required for startup using simple operations
following onscreen guidance.
These instructions will guide you through some items that
you need to check beforehand. Read beforehand so the
setup goes smoothly.
Operation
Select the item with the cursors of the remote controller
and press ENTER (a). To return to the previous screen,
press (b).
To redo the Initial Setup
If you terminate the procedure on the way or want to
change a setting made during Initial Setup, press on
the remote controller, select "7. Miscellaneous" – "Initial
Setup", and press ENTER.
1. AccuEQ Room Calibration
Place the supplied speaker setup microphone in the
listening position, measure the test tones emitted by the
speakers, then the unit automatically sets the optimum
volume level for each speaker, the crossover frequencies,
and the distance from the listening position. This also
enables correction of distortion caused by the acoustic
environment of the room.
0
When putting the speaker setup microphone on a tripod,
refer to the illustration when putting it in place.
0
The subwoofer sound may not be detected since it is
extremely low frequencies. Set the subwoofer volume to
more than halfway.
0
Calibration takes several minutes to be completed. The
speakers emit the test tone at high volume during
measurement, so be careful of your surroundings. Keep
the room as quiet as possible during measurement. If
the measurement is interrupted, turn off the household
appliances.
0
When using THX certified speakers, THX recommends
setting the crossover frequency to "80Hz(THX)". It is
also recommended to manually adjust the settings for
each speaker to suit the specific characteristics of each
room.
a
b
English
Deutsch
Français
Español
Italiano
Nederlands
Svenska
Exit
Initial Setup
Language Select
SETUP MIC
SN29402172_TX-RZ710_BAS_En.book 20 ページ 2016年2月17日 水曜日 午後7時25分
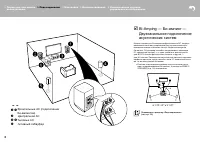
НАсТрОеЧНЫЙ
МиКрОФОН
•
используйте штатив или что-либо аналогичное, чтобы
установить настроечный микрофон на высоте ушей
слушателей (см. рисунок выше).
•
Звук сабвуфера может быть не обнаружен, так как он
излучает на чрезвычайно низких частотах. Установите
громкость сабвуфера так, чтобы ручка регулировки была
повернута более чем наполовину.
•
Для завершения калибровки потребуется несколько
минут. Колонки излучают тестовый сигнал на высокой
громкости в течение процесса измерения, так что будьте
осторожны в отношении вашего окружения. соблюдайте
в комнате тишину, насколько это возмо жно во время
измерения. если измерение прерывается, выключите
все бытовые приборы в комнате.
•
При использовании колонок, сертифицированных
по нормам ТНХ, ТНХ рекомендует установить частоту
кроссовера на «80Hz (THX) ". рекомендуется так же
вручную настроить параметры для каж дой Ас с учетом
конкретных особенностей комнаты.
20
> Before start
> Hookup
> Setup
> Playback
> Part Names
Step7: Power On & Initial Setup
Initial Setup starts automatically
Once all connections are complete, change the TV's input
to the input for this unit, inset batteries in the remote
controller, and press
Í
to turn the power on. When you
turn the unit on for the first time, Initial Setup is
automatically shown on the TV to enable you to make
settings required for startup using simple operations
following onscreen guidance.
These instructions will guide you through some items that
you need to check beforehand. Read beforehand so the
setup goes smoothly.
Operation
Select the item with the cursors of the remote controller
and press ENTER (a). To return to the previous screen,
press (b).
To redo the Initial Setup
If you terminate the procedure on the way or want to
change a setting made during Initial Setup, press on
the remote controller, select "7. Miscellaneous" – "Initial
Setup", and press ENTER.
1. AccuEQ Room Calibration
Place the supplied speaker setup microphone in the
listening position, measure the test tones emitted by the
speakers, then the unit automatically sets the optimum
volume level for each speaker, the crossover frequencies,
and the distance from the listening position. This also
enables correction of distortion caused by the acoustic
environment of the room.
0
When putting the speaker setup microphone on a tripod,
refer to the illustration when putting it in place.
0
The subwoofer sound may not be detected since it is
extremely low frequencies. Set the subwoofer volume to
more than halfway.
0
Calibration takes several minutes to be completed. The
speakers emit the test tone at high volume during
measurement, so be careful of your surroundings. Keep
the room as quiet as possible during measurement. If
the measurement is interrupted, turn off the household
appliances.
0
When using THX certified speakers, THX recommends
setting the crossover frequency to "80Hz(THX)". It is
also recommended to manually adjust the settings for
each speaker to suit the specific characteristics of each
room.
a
b
English
Deutsch
Français
Español
Italiano
Nederlands
Svenska
Exit
Initial Setup
Language Select
SETUP MIC
SN29402172_TX-RZ710_BAS_En.book 20 ページ 2016年2月17日 水曜日 午後7時25分
Содержание
- 2 Перед тем, как начать эксплуатацию; Main features
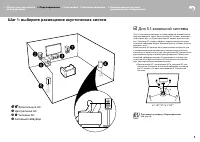
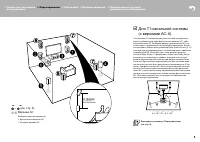
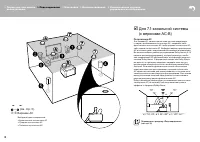
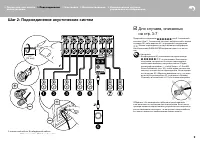
- 3 Шаг 1: выберите размещение акустических систем; Фронтальные Ас; Step1: Choose your Speaker Layout
- 4 Surround Back Speakers); Surround Back Speakers; Surround Back Speakers)
- 5 верхние Ас
- 8 Speakers; Двухканальное подключение; Center Speaker; Speakers
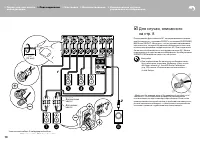
- 9 Для случаев, описанных; Step2: Connect the Speakers
- 10 Для случая, описанного
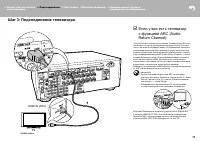
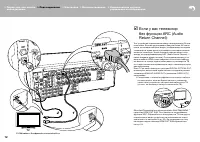
- 11 Шаг 3: Подсоединение телевизора; если у вас есть телевизор; TV; Step3: Connect the TV; ARC TV
- 12 если у вас телевизор
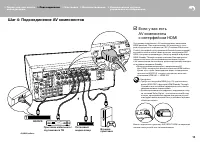
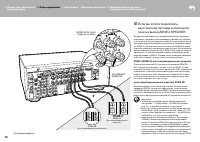
- 13 GAME; если у вас есть; GAME; HDMI AV Components; Приставка кабельного /
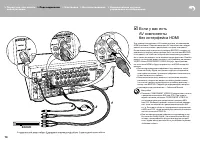
- 14 OR; Non-HDMI AV Components
- 15 Audio Components; если у вас есть аудио; Audio Components
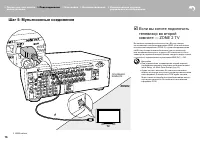
- 16 MAIN ROOM; ZONE 2 TV; если вы хотите подключить; Шаг 5: Мультизонные соединения
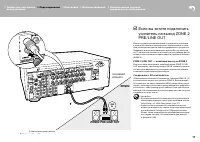
- 18 ZONE 2B; ZONE 2 SPEAKER
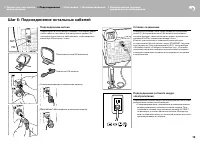
- 19 Шаг 6: Подсоединение остальных кабелей; Сетевое соединение; Step6: Connect Other Cables
- 20 Шаг 7: Включение и первоначальная настройка; AccuEQ Room Calibration; SETUP MIC; AccuEQ Room Calibration; SETUP MIC
- 21 HDMI Setup; Network Connection; Audio Return Channel
- 22 Воспроизведение с AV-компонентов; AV Component Playback; AV Component Playback; Стандартное воспроизведение
- 23 Network Services; Network Functions; Network Services; Сетевые функции
- 24 Воспроизведение через BLUETOOTH; AirPlay
- 25 Прослушивание радио; Мультизонные режимы; Listening To the Radio; Прочее; Listening To the Radio; Others; Listening To the Radio
- 26 Прочие функции; Если ресивер работает с ошибками
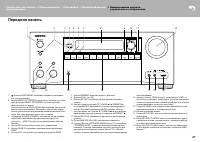
- 27 Front Panel; Передняя панель
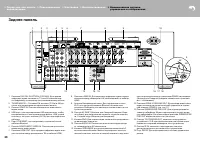
- 28 Rear Panel; Задняя панель
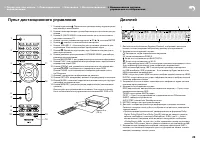
- 29 Пульт дистанционного управления
- 30 Информация о лицензиях и торговых марках

