
Хлебопечки BRAYER BR2702 - инструкция пользователя по применению, эксплуатации и установке на русском языке. Мы надеемся, она поможет вам решить возникшие у вас вопросы при эксплуатации техники.
Если остались вопросы, задайте их в комментариях после инструкции.
"Загружаем инструкцию", означает, что нужно подождать пока файл загрузится и можно будет его читать онлайн. Некоторые инструкции очень большие и время их появления зависит от вашей скорости интернета.


7
EN
• Read the safety measures and operating
recommendations.
• Check the delivery set.
• Examine the Bread maker for damages, in case of
damage do not plug it into the mains.
•
Make sure that the specifications of power supply
voltage specified on the label correspond to the
specifications of your mains.
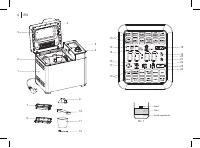
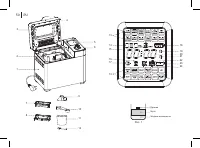
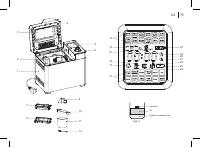
• Wipe the outer surface of the unit body (1) with a clean,
slightly damp cloth to remove dust.
• Open the lid (4).
• Take the handle of the baking form (2) and lift it slightly,
turn the handle counterclockwise and take the form (2)
out.
• Wash the form (2) and the container for adding the
ingredients (7) , the paddle (9), the measuring cup (11),
the hook (10), the measuring spoon (12) with warm
water using neutral detergent, rinse and dry them.
• Install the baking form (2) back to its place and turn it
clockwise as far as it will go, install the kneading paddle
(9) on the axle in the baking form (2).
• Install the container (7) into the holder (8).
• Close the lid (4).
• Place the bread maker so that the distance between
the bread maker and the wall or furniture is at least 20
cm and the free space above the bread maker is at
least 50 cm.
Note:
the bread maker is intended for operation within a
wide range of temperatures, however, excessively high
or low temperature in the room affects the dough rise
process and consequently the size and density of bread.
The optimal room temperature shall be from +15 to +34°C.
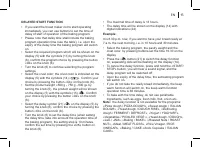
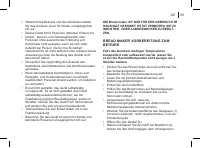
THE FIRST SWITCHING-ON OF THE BREAD MAKER
• To remove foreign smells, it is recommended to switch
the bread maker on for the first time without loading
ingredients and with the open lid (4).
• Insert the power plug into the mains socket, you will
hear a sound signal and digital symbols (20) «2:54»
will be shown on the display (5) you will hear a sound
signal, and the display (5) will show the program
«Classic/BASIC BREAD», separating dots will be
glowing constantly.
• Crust color indication (14) - medium «
».
• Weight indication (15): « » 750 g.
• These settings are set by default.
• Press the «START / STOP» button on the knob (6) to
start the default baking program, all program symbols
(13) on the display (5) will go out, except for the
«BASIC BREAD» program, the dividing points will be
flashing, the digital symbols (20) will show the time
remaining until the end of the program operation.
• After 10 minutes, press the «START/STOP» button
on the knob (6) to stop the baking program, the digital
symbols of the program operation time will be flashing,
press and hold the «START/STOP» button again.
Note:
when switching the bread maker on for the first time,
a foreign smell or some smoke from the heating element
can appear — this is acceptable and it is not covered by
warranty.
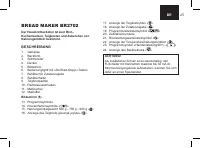
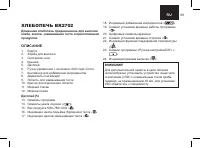
Содержание
- 49 ОПИСАНИЕ
- 51 Перед использованием хлебопечки внимательно
- 54 ПЕРВОЕ ВКЛЮЧЕНИЕ ХЛЕБОПЕЧКИ
- 62 ФУНКЦИЯ ОТЛОЖЕННЫЙ СТАРТ
- 63 ФУНКЦИЯ ПОДДЕРЖАНИЯ ТЕМПЕРАТУРЫ; ФУНКЦИЯ ПАМЯТЬ
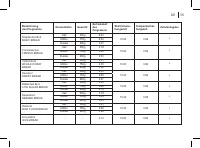
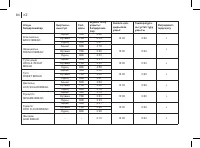
- 64 Мука
- 66 ПОРЯДОК ЗАКЛА ДКИ ИНГРЕДИЕНТОВ В
- 67 ДОБАВЛЕНИЕ ИНГРЕДИЕНТОВ; ВЫПЕЧКА ХЛЕБА
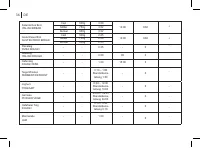
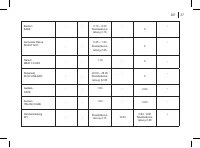
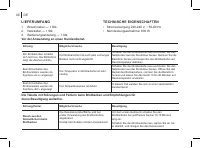
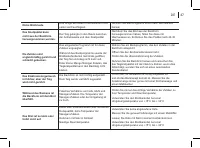
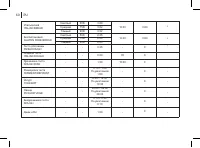
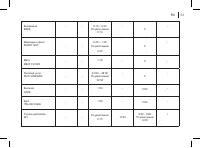
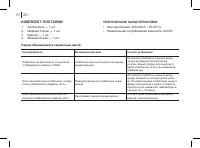
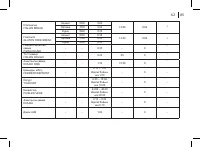
- 70 Перед обращением в сервисный центр.; Неисправность; КОМПЛЕКТ ПОСТАВКИ; Мерный стакан — 1 шт.; ТЕХНИЧЕСКИЕ ХАРАКТЕРИСТИКИ; Номинальная потребляемая мощность: 600 Вт
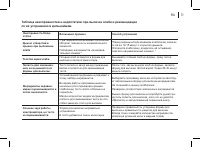
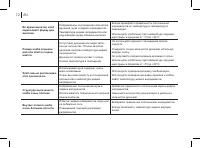
- 71 по их устранению в дальнейшем.
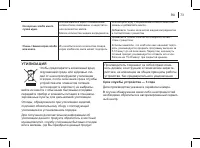
- 73 УТИЛИЗАЦИЯ; Срок службы устройства — 3 года
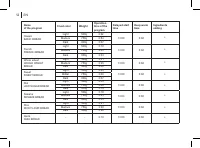
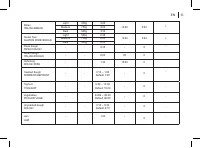
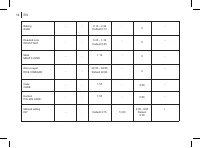
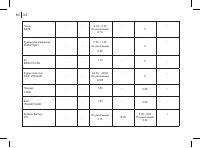
Характеристики

Остались вопросы?Не нашли свой ответ в руководстве или возникли другие проблемы? Задайте свой вопрос в форме ниже с подробным описанием вашей ситуации, чтобы другие люди и специалисты смогли дать на него ответ. Если вы знаете как решить проблему другого человека, пожалуйста, подскажите ему :)


