
Хлебопечки BRAYER BR2702 - инструкция пользователя по применению, эксплуатации и установке на русском языке. Мы надеемся, она поможет вам решить возникшие у вас вопросы при эксплуатации техники.
Если остались вопросы, задайте их в комментариях после инструкции.
"Загружаем инструкцию", означает, что нужно подождать пока файл загрузится и можно будет его читать онлайн. Некоторые инструкции очень большие и время их появления зависит от вашей скорости интернета.


20
DE
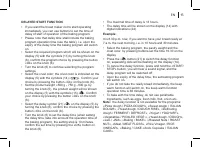
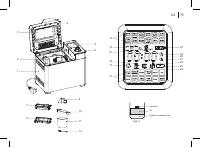
• Turn the knob (6) to continue selecting the program
settings.
•
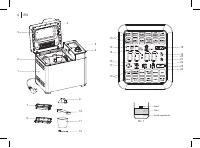
Select the crust color; the crust color is indicated on the
display (5) with the symbols (14) «
». Confirm your
choice by pressing the button «Ok» on the knob (6).
• Set the product weight «500 g - 750 g - 900 g» by
turning the knob (6), the product weight will be shown
on the display (5) with the symbols (15) «
». Confirm
your choice by pressing the button «Ok» on the knob
(6).
• Press the «START/STOP» button on the knob (6)
to start the baking/cooking program, all program
symbols (13) on the display (5) will go out, except for
the selected and set program, the dividing points will
be flashing, the digital symbols (20) will show the time
remaining until the end of the program operation.
Note:
if you want to start the preset baking program
performing immediately, skip delay time setting.
• The cycles of the bread maker are displayed on the
display (5) by the indication (13, 14, 15, 16, 17, 18, 20,
21, 22, 24) (the description of the symbols of the cycles
of the bread maker is given above).
•
Recommendation:
— after 5-minute dough kneading,
it is recommended to check its consistency. The dough
should form a soft glutinous lump, if the dough lump is
very dry, add some liquid to it, if the dough lump is too
damp, add some flour (from 1/2 to 1 teaspoon or as
necessary).
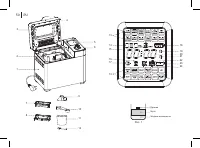
• You can control the bread baking process through the
viewing window (3) in the lid (4).
ATTENTION!
During the baking program operation,
never open the lid (4), in case of sudden change of
temperature, the dough can drop and will not rise any
more.
•
After finishing of the baking program, you will hear
sound signals and the keep warm function will switch
on, the keep warm function operation time is 60
minutes.
• To cancel the keep warm function and to switch the
bread maker off, press and hold the «START/STOP»
button within 3 seconds.
• Remove the power plug from the mains socket.
• Open the lid (4) using heat-resistant kitchen
potholders, lift slightly and take the handle, turn the
baking form (3) counterclockwise and remove it from
the bread maker.
• Leave the form to cool, for approximately 10-15
minutes.
• Separate the pastry from the form (2) walls using a
plastic kitchen spatula.
• Do not use metal objects that can damage the non-
stick coating of the form (2).
• To remove the pastry turn the form (2) upside down
and shake it.
• Before cutting the bread, remove the paddle (9) with
the hook (10).
• Cut the bread with a sharp bread knife.
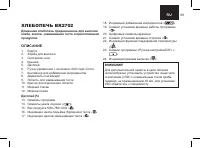
Содержание
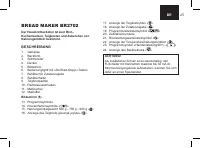
- 49 ОПИСАНИЕ
- 51 Перед использованием хлебопечки внимательно
- 54 ПЕРВОЕ ВКЛЮЧЕНИЕ ХЛЕБОПЕЧКИ
- 62 ФУНКЦИЯ ОТЛОЖЕННЫЙ СТАРТ
- 63 ФУНКЦИЯ ПОДДЕРЖАНИЯ ТЕМПЕРАТУРЫ; ФУНКЦИЯ ПАМЯТЬ
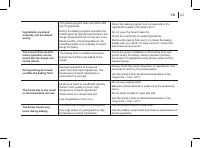
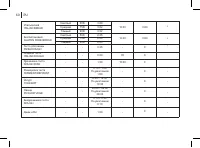
- 64 Мука
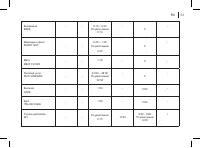
- 66 ПОРЯДОК ЗАКЛА ДКИ ИНГРЕДИЕНТОВ В
- 67 ДОБАВЛЕНИЕ ИНГРЕДИЕНТОВ; ВЫПЕЧКА ХЛЕБА
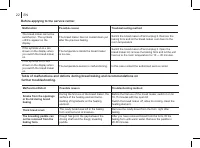
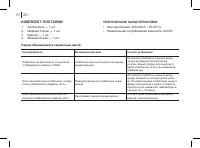
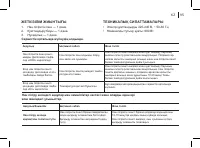
- 70 Перед обращением в сервисный центр.; Неисправность; КОМПЛЕКТ ПОСТАВКИ; Мерный стакан — 1 шт.; ТЕХНИЧЕСКИЕ ХАРАКТЕРИСТИКИ; Номинальная потребляемая мощность: 600 Вт
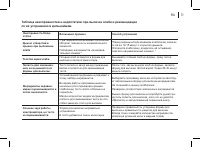
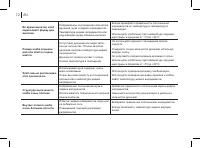
- 71 по их устранению в дальнейшем.
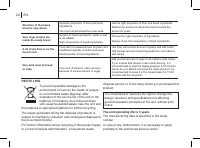
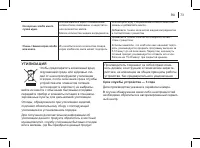
- 73 УТИЛИЗАЦИЯ; Срок службы устройства — 3 года
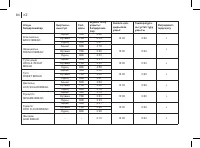
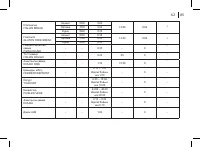
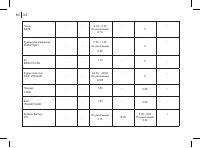
Характеристики

Остались вопросы?Не нашли свой ответ в руководстве или возникли другие проблемы? Задайте свой вопрос в форме ниже с подробным описанием вашей ситуации, чтобы другие люди и специалисты смогли дать на него ответ. Если вы знаете как решить проблему другого человека, пожалуйста, подскажите ему :)


