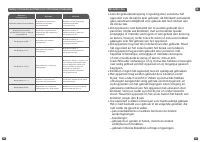
Чайники Tefal BJ551B10 - инструкция пользователя по применению, эксплуатации и установке на русском языке. Мы надеемся, она поможет вам решить возникшие у вас вопросы при эксплуатации техники.
Если остались вопросы, задайте их в комментариях после инструкции.
"Загружаем инструкцию", означает, что нужно подождать пока файл загрузится и можно будет его читать онлайн. Некоторые инструкции очень большие и время их появления зависит от вашей скорости интернета.


9
8
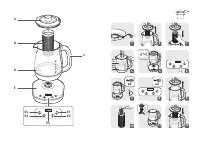
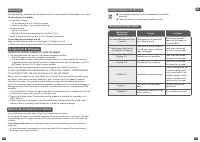
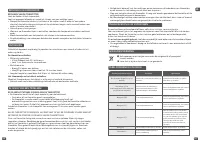
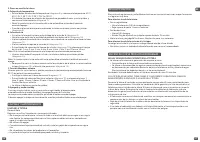
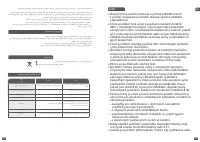
DESCRIPTION
A Cover
B Tea Basket
C Handle
D Teapot
E Control base
E1
On/Off button
E2
Temperature selection button
E3
Infusion time selection button
E4
Keep Warm selection button
E5
Screen
BEFORE USING FOR THE FIRST TIME
The performance in water of our product are tested at 100% during manufacturing. It might
still have some smudge of water inside the product. It does not compromize the quality and
hygiene of our product.
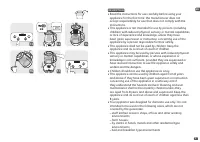
1. Remove all packaging, stickers and accessories both inside and outside the tea maker.
2. Adjust the length of the cable by unwinding it from under the base. Hook the cable into
the slot.
(Diagram 1)
Fill the teapot with water and discard it two or three times as it could contain dust. Rinse the
teapot, the tea basket and the lid separately.
USE
1. Set the base on a flat, stable and heat-resistant surface that is not exposed to
splashes of water or any heat source.
2. Opening the lid
• Grasp the teapot handle and remove the lid with the basket
(diagram 2/3)
. Do not
operate the tea maker without its lid. If the lid is lost or broken, please contact your After-
Sales service centre.
• The tea maker must only be used with the base provided.
3. Fill the teapot with the desired quantity of water
(diagram 4)
• Never fill the teapot when it is sitting on its base.
• Do not fill it above the maximum level, or below the minimum level. If it is not filled to the
minimum level, temperature accuracy cannot be reached (temperature accuracy +/- 3°C).
• If the teapot is too full, boiling water may spill out. Do not operate the tea maker without
water. Check that the lid is properly closed before use.
• Do not put the tea basket back in the teapot.
4. Set the teapot on its base and REPLACE THE LID (diagram 5). Connect the tea maker
power cable.
• the base will light up and indicate the water temperature in real time.
(diagram 5)
5. Starting the tea maker
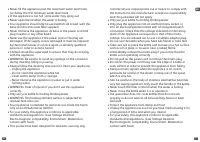
A. Temperature selection
– Press the temperature selection button
(diagram 6)
, select the temperature: 40°C, 60°C,
70°C, 80°C, 85°C, 90°C, 95°C or 100°C.
– The temperature selection indicator light flashes 4 times and beeps, and heating begins
(diagram 7)
.
– Note: It is possible to start the cycle before the automatic start by pressing the on/off
button.
– When the required temperature is reached, the tea maker stops and beeps twice
(diagram 8).
B. Tea infusion
– Without removing the teapot from its base, remove the lid from the tea basket
(diagram 9)
– Fill the tea basket with the desired quantity of tea leave or tea bag(s)
(diagram 10)
– Replace the tea basket in the teapot, taking care not to burn yourself by touching the
lid
(diagram 11).
– Replace the lid of the tea basket
(diagram 12).
– Press the infusion time selection button
(diagram 13)
, select the infusion time: 1 min,
2 min, 3 min, 4 min, 5 min, 6 min, 7 min, 8 min, 9 min or 10 min
Note: Your tea will automatically be infused at the pre-selected temperature.
– Once the infusion time is reached, the tea maker stops and beeps twice
(diagram 14).
Note: It is possible to start the cycle before the automatic start by pressing the on/off
button.
– So that the tea is not over-infused, remove the tea basket from the teapot and replace
the lid
(diagram 15)
, your tea is ready to be served
(diagram 16)
.
C. Keep Warm function
Once your tea is infused, it is possible to keep the pre-selected temperature (maximum 95°C)
for the time you desire.
– Replace the teapot on its control base
(diagram 17).
– Press the Keep Warm selection button
(diagram 18)
, select the time: 1 hour, 2 hours, 3
hours, 4 hours, 5 hours, 6 hours, 7 hours or 8 hours. Once the Keep Warm function has
finished:
– The tea maker stops and beeps twice.
D. Shut-down and standby
If no cycle is ongoing and if no buttons are pressed, the machine goes automatically into
standby mode and switches off after 5 minutes.
The machine can be switched on again simply by pressing the on/off button.
If you wish to switch the machine off manually, press and hold the on/off button.
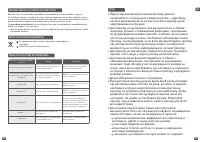
CLEANING AND MAINTENANCE
CLEANING YOUR TEA MAKER
Unplug it.
Let it cool down and clean it with a damp sponge.
•
Never immerse the tea maker, its base, the cord or the electric plug in water or any other
liquid: the electrical connections or the switch must not come into contact with water or
any other liquid.
•
Do not use scouring pads.
•
When your tea maker has finished infusing, prevent temperature shocks with cold water.
•
Do not put the product parts in the dishwasher.
•
The lid gasket has been designed to be removable in order to allow clean the lid.
EN
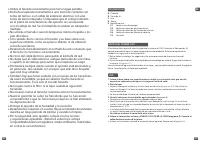
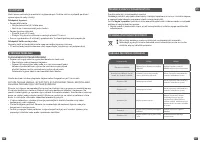
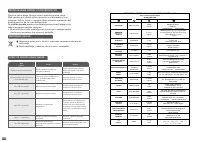
Характеристики

Остались вопросы?Не нашли свой ответ в руководстве или возникли другие проблемы? Задайте свой вопрос в форме ниже с подробным описанием вашей ситуации, чтобы другие люди и специалисты смогли дать на него ответ. Если вы знаете как решить проблему другого человека, пожалуйста, подскажите ему :)


