
Пылесос Dyson UP15 Small Ball Multifloor - инструкция пользователя по применению, эксплуатации и установке на русском языке. Мы надеемся, она поможет вам решить возникшие у вас вопросы при эксплуатации техники.
Если остались вопросы, задайте их в комментариях после инструкции.
"Загружаем инструкцию", означает, что нужно подождать пока файл загрузится и можно будет его читать онлайн. Некоторые инструкции очень большие и время их появления зависит от вашей скорости интернета.


33
•
Clean the clear bin with cold water only.
•
Do not use detergents, polishes or air fresheners to clean the clear bin.
•
Do not put the clear bin in a dishwasher.
•
Do not immerse the whole cyclone in water or pour water into the cyclones.
•
Clean the cyclone shroud with a cloth or dry brush to remove lint and dust.
•
Ensure the clear bin is completely dry before replacing.
•
To refit:
– fit the cyclone shroud into the clear bin so that the silver button clicks
and engages
– close the clear bin base so it clicks into place
– push the cyclone and clear bin unit into the main body of the appliance; it will
click into place
– ensure the cyclone and clear bin unit is secure.
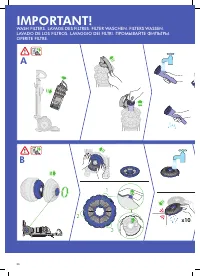
WASHING YOUR FILTERS
•
Your appliance has two washable filters, located as shown.
•
Check and wash the filters regularly according to instructions to
maintain performance.
•
Switch ‘OFF’ and unplug before checking or removing the filters.
•
The filters may require more frequent washing if vacuuming fine dust.
•
Wash with cold water only. Do not use detergents.
•
Do not put the filters in a dishwasher, washing machine, tumble dryer, oven,
microwave or near a naked flame.
FILTER A
•
Remove the cyclone and clear bin (see ‘Emptying the clear bin’).
•
Release the catch on the front of the cyclone handle and then remove the filter.
•
Wash the filter with cold water only. Hold under a tap and run water through the
open end until the water runs clear. Turn upside down and tap out.
•
Squeeze and twist with both hands to make sure the excess water is removed.
•
Run water over the outside of the filter until the water runs clear.
•
Squeeze and twist with both hands to make sure the excess water is removed.
•
Stand the filter on its wide, open end to dry. Leave to dry completely for a
minimum of 24 hours.
•
Replace the filter into the cyclone. Swing the handle back into place. Ensure the
latch clicks to engage and is secure. Fit the cyclone and clear bin unit onto the
appliance (instructions above).
FILTER B
•
Lay the appliance on its side.
•
To remove filter B:
– turn the blue central locking dial on the outer cover of the ball anti-clockwise
until the cover is released
– lift off the cover
– turn the filter one-quarter anti-clockwise to release.
•
Remove the baffle by pressing down firmly on each of the release clips and
push from underneath to release filter B as shown in the " Washing your filters"
section.
•
To avoid damage; do not use sharp tools to remove baffle.
•
Wash the filter with cold water only. No hot water and no detergents.
•
Filter B should be rinsed and tapped out until the water runs clear, then tapped
out again to ensure all excess water is removed. (Tap on the plastic rim, not the
filter material.) Leave to dry completely for a minimum of 24 hours.
•
It is normal for the filter in the ball to turn grey in colour.
•
To refit filter B:
– align the arrow on the baffle with the arrow on the filter, press firmly until all
three clips click into place
– refit the filter on to the ball
– secure the filter by turning it clockwise so the arrows align.
•
When refitting the outer cover of the ball, keep turning the central locking dial
clockwise. When it starts to click it is locked.
BLOCK AGES – THERMAL CUT-OUT
•
This appliance is fitted with an automatically resetting thermal cut-out.
•
Large items may block the tools or wand inlet. If any part becomes blocked the
appliance may overheat and automatically cut-out.
•
If this happens, follow the instructions below in ‘Looking for blockages’.
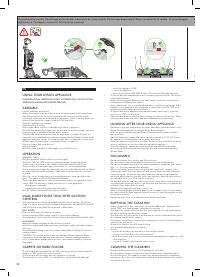
LOOKING FOR BLOCK AGES
•
Switch ‘OFF’ and unplug before looking for blockages. Failure to do so could
result in personal injury.
•
Leave to cool down for 1-2 hours before checking the filters or for blockages.
•
Clear any blockage before restarting.
•
Look for blockages in the wand, airways and cleaner head.
•
To release the hose from the machine, you will need to remove the wand.
•
Remove the clear bin and cyclone unit. Then release the hose from the appliance
by pressing the red tab on the base of the hose – you can see it from the front of
the appliance.
•
Check for blockages in the hose.
•
Beware of sharp objects when checking for blockages.
•
To refit the hose, align the guides on the base of the hose with the channels in
the neck of the airway. Ensure the red tab faces the front of the appliance. Push
the hose on. It will click into place. To refit the wand follow the instructions above
in the ‘Operation’ section.
•
To remove the base plate to access an obstruction, see ‘Base plate –
disassembly/reassembly’.
•
To look for blockages in the front airway between the ball and the cleaner
head you will need to remove the cleaner head: see ‘Base plate – disassembly/
reassembly’ below on how to do this.
•
To look for blockages in the rear airway between the ball and the cleaner
head you will need to release the elasticated rear connection. Pull the plastic
connector towards you to release from the upper airway. To replace it, pull it
a little way out on the horizontal so that it aligns with the upper airway. Gently
release it so it pulls itself back into place.
•
Beware of sharp objects when checking for blockages.
•
Refit all parts securely before using.
•
Clearing blockages is not covered by your guarantee.
BRUSH BAR – CLEARING OBSTRUCTIONS
•
If your brush bar is obstructed, it may shut ‘OFF’. If this happens, you will need
to remove the blockage.
•
Switch ‘OFF’ and unplug before proceeding. Failure to do so could result in
personal injury.
•
Beware of sharp objects when clearing obstructions.
•
If you still cannot clear the obstruction, please follow the instructions below to
remove the base plate. This gives more access to the obstruction. Alternatively,
contact a Dyson expert on the Dyson Helpline or visit the website. Clearing
brush bar obstructions is not covered by your guarantee.
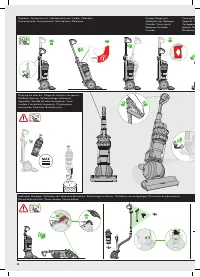
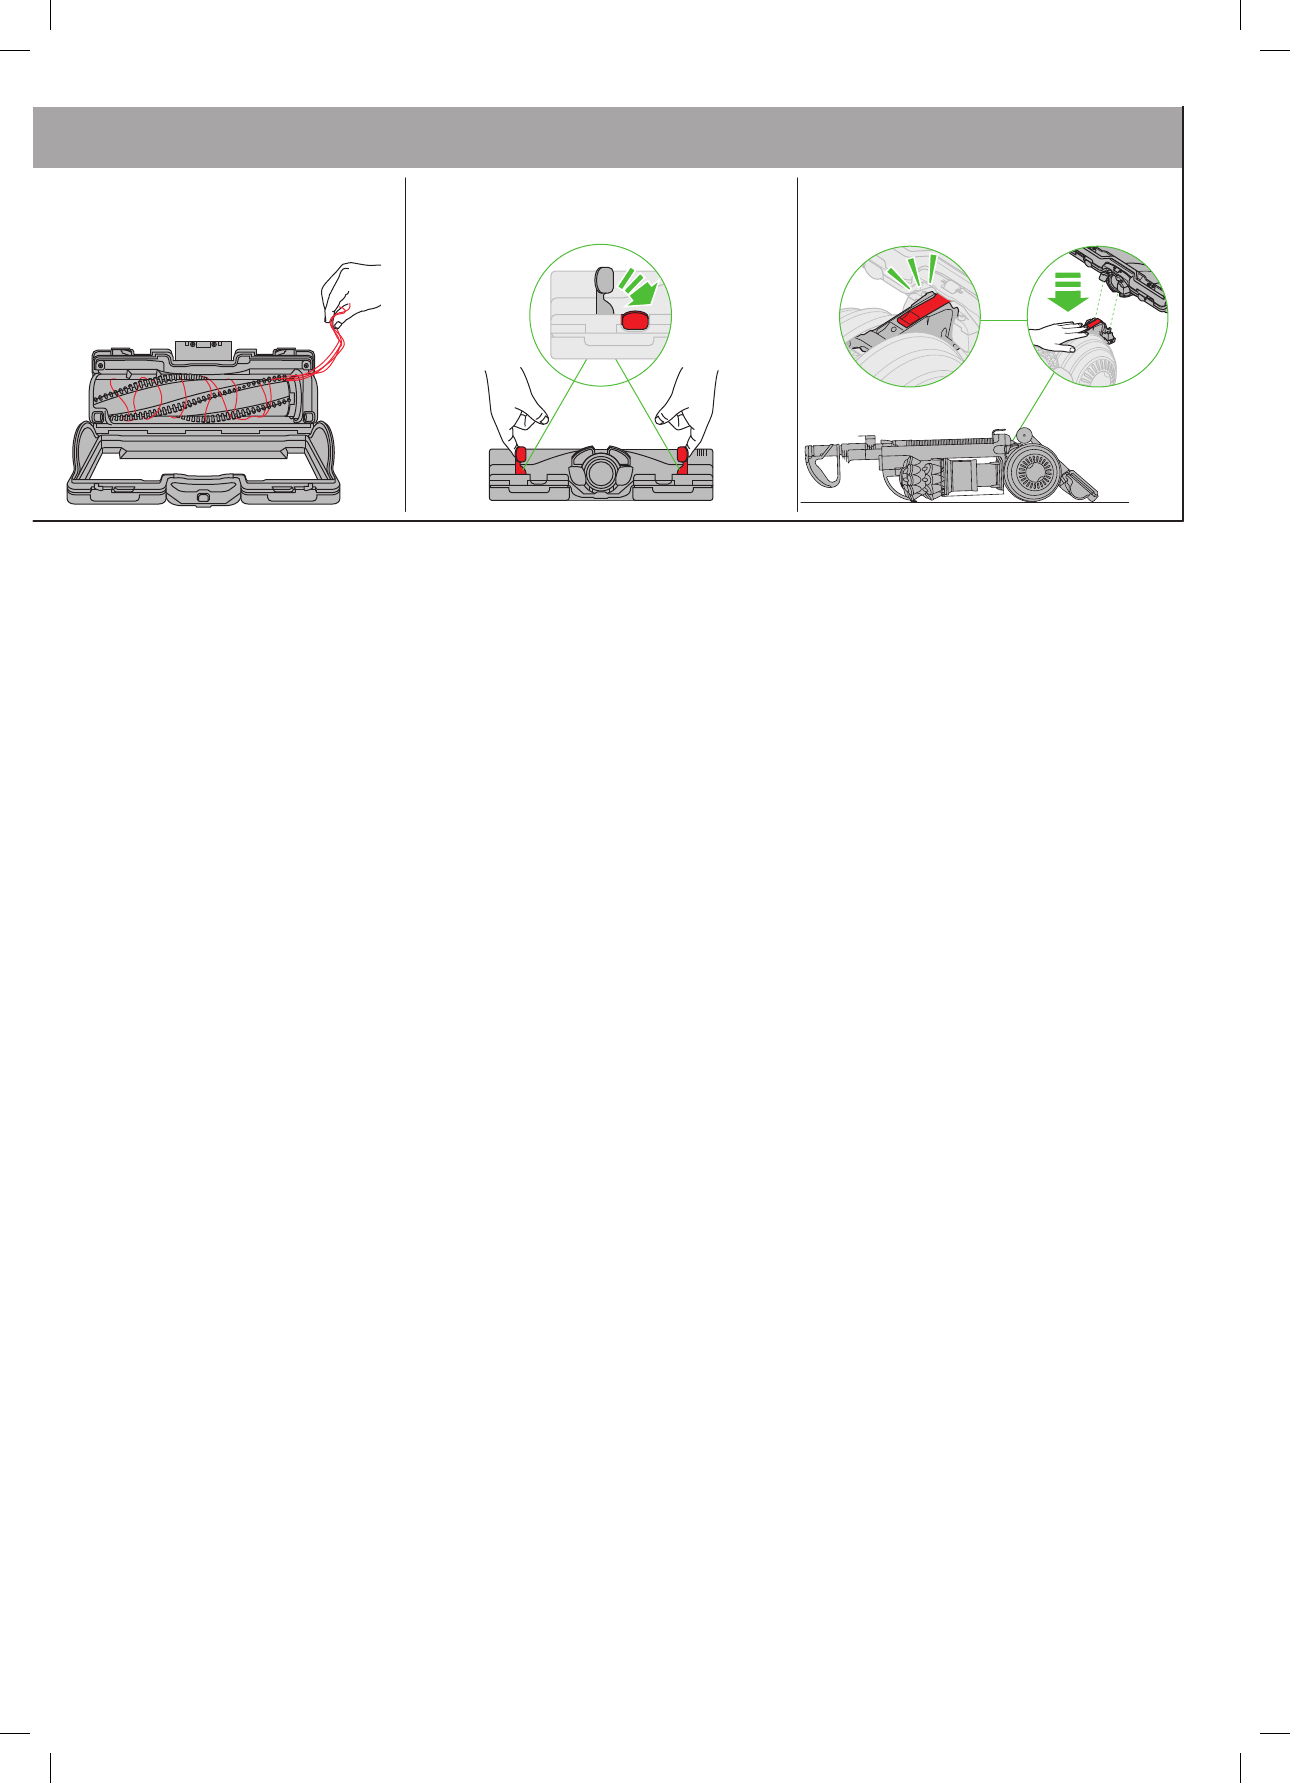
BASE PLATE – DISASSEMBLY/REASSEMBLY
•
Switch ‘OFF’ and unplug before proceeding. Failure to do so could result in
personal injury.
•
Lay the appliance on its front.
•
There is a red latch on the connection between the ball and cleaner head. Slide
it towards the ball, supporting the appliance as you do so.
•
Pull the cleaner head away from the appliance. Use a constant, firm pressure.
•
At each end of the cleaner head there are two red levers:
– pivot the levers up and out towards the end of the cleaner head until they click
– swing the base plate open.
•
Beware of sharp objects when clearing obstructions.
•
To refit the base plate:
– fit the lugs on the lower edge of the base plate behind the lip on the base of
the cleaner head
– swing the base plate down, ensuring it fits correctly; it will click into place.
•
To secure the base plate pivot both levers back into position so they are flush
with the surface of the cleaner head.
•
Lay the appliance on its back.
•
Attach the cleaner head by sliding it on to the connections on the lower front
part of the ball. Ensure the electrical plug on the cleaner head fits into the
twin-block connection on the body of the appliance, which is directly above the
airway. Push firmly: the cleaner head will click into place.
BRUSH BAR – TROUBLESHOOTING
•
If the brush bar has stopped spinning, follow the instructions above on clearing
obstructions. Alternatively, contact a Dyson expert on the Dyson Helpline or visit
the website.
DISPOSAL INFORMATION
•
Dyson products are made from high grade recyclable materials. Recycle
where possible.
•
This marking indicates that this product should not be disposed with other
household wastes throughout the EU. To prevent possible harm to the
A
B
clik
clik
clik
clik
x10
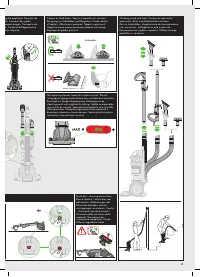
Base plate reassembly
.
Remontage de la semelle
.
Anbringen der Bodenplatte
.
Montage bodemplaat
.
Montar el cepillo
.
Riassemblaggio della piastra
.
Установка подошвы щетки и электрощетки на место
.
Ponovna sestava podvozja
.


