
Плита La Cornue CornuFe 110 F1 - инструкция пользователя по применению, эксплуатации и установке на русском языке. Мы надеемся, она поможет вам решить возникшие у вас вопросы при эксплуатации техники.
Если остались вопросы, задайте их в комментариях после инструкции.
"Загружаем инструкцию", означает, что нужно подождать пока файл загрузится и можно будет его читать онлайн. Некоторые инструкции очень большие и время их появления зависит от вашей скорости интернета.


32
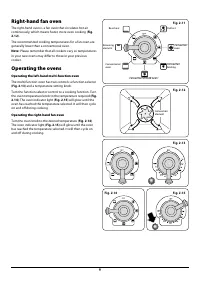
INSTALLATION
Check the appliance is electrically safe when you have finished.
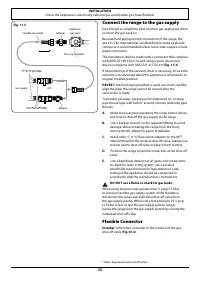
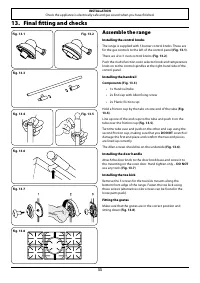
Connecting if the supplied cord and
plug is not suitable.
To access the electrical connections, undo the screws and
remove the electrical cover (
).
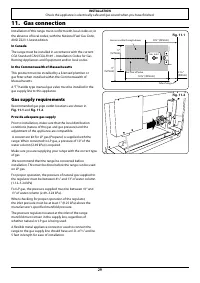
DISCONNECT THE ELECTRICAL SUPPLY.
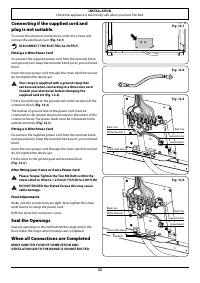
Fitting a 3-Wire Power Cord
Disconnect the supplied power cord from the terminal block
and ground post. Keep the terminal block parts; you will need
them.
Insert the new power cord through the strain relief device but
do not tighten the device yet.
Your range is supplied with a ground strap that
can be used when connecting to a three wire cord.
Consult your electrician before changing the
supplied cord kit (Fig. 12.2).
Fit the Ground strap to the ground and center terminal of the
connector block (
The neutral or ground wire of the power cord must be
connected to the neutral terminal located in the center of the
connector block. The power leads must be connected to the
outside terminals (
).
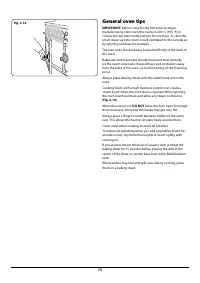
Fitting a 4-Wire Power Cord
Disconnect the supplied power cord from the terminal block
and ground post. Keep the terminal block parts; you will need
them.
Insert the new power cord through the strain relief device but
do not tighten the device yet.
Fit the wires to the ground post and terminal block
(
)
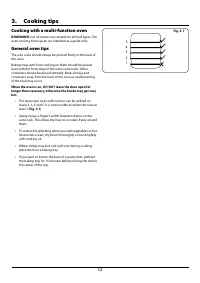
After fitting your 3 wire or 4 wire Power Cord
Please Torque Tighten the Two M6 Bolts within the
strain relief to 1Nm to 1.2 Nm (0.74 ft-lb to 0.89 ft-lb)
DO NOT EXCEED the Stated Torque this may cause
cable damage.
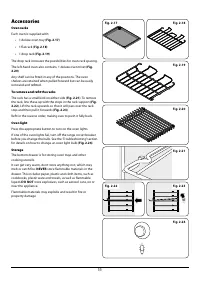
Final Adjustments
Make sure the connections are tight. Now tighten the strain
relief device to clamp the power cord.
Refit the electrical connection cover.
Seal the Openings
Seal any openings in the wall behind the range and in the
floor under the range when hookups are completed.
When all Connections are Completed
MAKE SURE THE FLOW OF COMBUSTION AND
VENTILATION AIR TO THE RANGE IS UNOBSTRUCTED.
Fig. 12.1
Fig. 12.2
Fig. 12.3
Fig. 12.4
Ground strap
Ground post
White: Neutral
Strain relief device
Ground: earth
Ground post
Red: live
Red: live
Black: live
Black: live
White: Neutral
Strain relief device
M6 Bolts
Характеристики

Остались вопросы?Не нашли свой ответ в руководстве или возникли другие проблемы? Задайте свой вопрос в форме ниже с подробным описанием вашей ситуации, чтобы другие люди и специалисты смогли дать на него ответ. Если вы знаете как решить проблему другого человека, пожалуйста, подскажите ему :)


