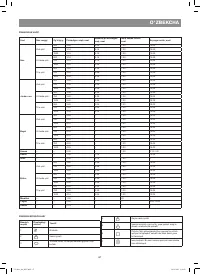
Мультиварки VITEK VT-4209 BW - инструкция пользователя по применению, эксплуатации и установке на русском языке. Мы надеемся, она поможет вам решить возникшие у вас вопросы при эксплуатации техники.
Если остались вопросы, задайте их в комментариях после инструкции.
"Загружаем инструкцию", означает, что нужно подождать пока файл загрузится и можно будет его читать онлайн. Некоторые инструкции очень большие и время их появления зависит от вашей скорости интернета.


9
ENGLISH
Note
: - Yeast should not come in contact with the liquids or salt before the dough
kneading. Make a cavity in the flour with your finger and put the yeast there.
– Wipe the crumbled ingredients or spilled liquids from the form (2) surface.
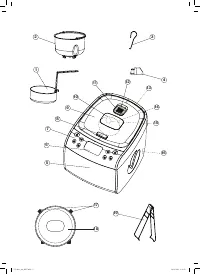
– Open the lid (9) by pressing the button (8), if the bowl (20) is placed in the pro-
cess chamber, then remove it.
– Take the form (2) by the handle, put it into the process chamber and turn it clock-
wise until bumping.
Note:
- In the heating element (14) there is temperature sensor (15). Make sure that
the movement of the sensor is not limited.
– Close the lid (9).
– Insert the power cord jack into the connector (16) and the power cord plug into
the mains socket. At that, there will be a sound signal, the display (6) will show
symbols: «00:00».
– Press the button (34) «BREAD-MAKER», the flashing indicator of the «Bread»
baking program will appear on the display.
– Select the necessary program by consequently pressing the button (36)
«MENU». The symbol of the appropriate program will flash, and the display will
show the duration of the program, set by default (see the table “Baking pro-
grams duration”).
– Confirm the selection of the program, by pressing the button (37) “OK”, the sym-
bol of the program will remain lit.
– Select the type of crust (light « », medium « » or dark « ») by repeatedly
pressing the “MENU” button (36), the symbol of the corresponding crust type
will flash.
– Press the button (37) “OK”, the weight of the product will remain lit.
– Select the type of crust (light, medium or dark) by repeatedly pressing the button
(36) “MENU”, the symbol of the appropriate crust type will flash.
– Press the button (37) “OK”, the symbol of the crust type will remain lit.
– Set the delayed start function. For this purpose use the buttons (32) «+» and (33)
«-» to set the required time, after which cooking will be over. If you want to start
cooking immediately, skip this step.
Note:
-
Delayed start function is not available for the programs “Gluten free”, “Jam”
and “Dough 2”.
– Press button (35) “START / STOP” to switch the cooking program on. The dis-
play will show the remaining cooking time and the symbol of the current cooking
stage (see «Cooking stages»).
Note:
– If you have activated the delayed start function, the display will also show the
symbol , when the unit starts cooking, the symbol
will go out.
– If the baking form (2) is set incorrectly, you will hear the successive sound signals
and the display will show the symbols «Err». Switch the unit off by pressing and
holding the button (35) “Start / Stop”, open the lid and fix the baking form (2) by
turning it clockwise until it is fixed.
– To switch the baking program off, press and hold the button (35) “START / STOP”
and hold it for 3 seconds.
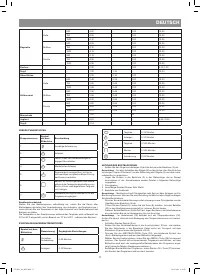
– In some baking programs (see table), you can add additional ingredients (nuts,
dried fruits, etc.). During baking program operation, you will hear a sound sig-
nal, open the lid (9), add the required ingredients, and then close the lid, baking
program will continue to operate.
– Four sound signals will indicate the completion of the baking program. The
unit will be switched automatically to the keep warm mode, the symbol
will
appear on the display and the display will show the time of unit operation in the
keep warm mode.
Note:
- Keep warm function is not available for programs «Dough 1», «Dough 2»
and «Yogurt».
– When the keep warm mode is completed, you will hear 4 sound signals, the dis-
play will show symbol
.
Note:
– Despite the unit keeps the ready dish warm for one hour, it is not recommended
to leave the cooked food in the baking form (2) for a long time, because this may
cause bread burning.
– To cancel the keep warm mode, press and hold the button (35) “START/STOP”
for 3 seconds.
– Do not use the keep warm function for heating up food.
– At the end of the baking program, unplug the power cord from the mains socket
and disconnect the power cord from the connector (16), located on the multi-
cooker body (5).
– Open the lid (9) by pressing the button (8).
– Put on thermal protective potholders, take the form (2) by the handle, turn it
counter-clockwise and remove it.
– Let the form cool down for 10 minutes.
– Separate the pastry from the form (2) walls and bottom using a spatula with non-
stick coating.
– In order to remove the bread baked turn the form (2) upside down and shake it
carefully.
– Remove the paddle (4) out of the bread with the hook (3) and let it cool down
for 10 minutes.
– Cut the bread with a sharp bread knife.
User mode for bread-maker settings
1. Press the button (34) «BREAD-MAKER», the display will show the flashing indi-
cator «Bread».
2. Press the button (34) «BREAD-MAKER» once againg, the display will show the
symbol of the first usee program «bp1».
3. By pressing the button (36) «MENU» consequently, select the program number
(«bp1», «bp2»… «bp5»).
4. To switch to settings of the selected program, press and hold for 3 seconds the
button (34) «BREAD-MAKER», the display will show the symbol
(preheating)
and the time of this stage.
5. Use the buttons (32) «+» and (33) «-» to set the preheating time.
6. Press the button (36) “MENU”, the display will show the graphic symbol and the
length of the next baking stage (see “User mode stages”).
7. Repeat the steps 4-5 for the remaining baking stages (except keep warm stage).
8. Adjusting the duration of the baking stages, adjust the temperature inside the
process chamber during proofing (the display will show the symbol
and the
temperature (°)).
9. Use the buttons (32) «+» and (33) «-» to set heating temperature, press the but-
ton (36) “MENU”.
10. Use the buttons (32) «+» and (33) «-» to set heating temperature during baking
(symbol
).
11. Save the settings of the program, by pressing and holding for 3 seconds the but-
ton (37) “OK.”
Note: If you do not want to save the program settings, press the button (37)
“OK” without holding.
12. Press button (35) «START/STOP» to switch baking on.
Note:
–
To switch the program on with preset settings, follow the steps described
in paragraphs 1-3 and 12.
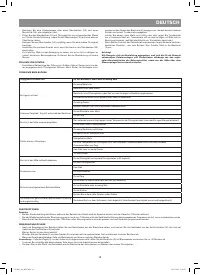
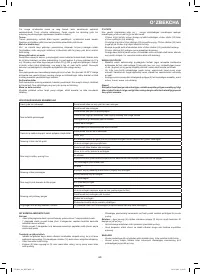
IMPORTANT RECOMMENDATIONS
Ingredients
Flour
The characteristics of flour are determined not only by the sort but also by the
conditions of grain cultivation, processing method and storage. Try to bake bread
using flour of different manufacturers and grades and find the one corresponding
to your needs. The basic types of bread flour are wheat and rye flour. Wheat flour is
used more widely, it is because bread of wheat flour has a pleasant taste and has
high nutritional value.
Bread flour
Bread (refined) flour made of inner part of grain only, contains the maximal gluten
quantity that provides the crumb elasticity and prevents bread dropping. Pastry
made of bread flour is more puffy.
Whole-grain flour (wholemeal)
Whole-grain (wholemeal) flour is obtained by grinding whole wheat grains together
with the membrane. This sort of flour is distinguished for its enhanced nutrition
value. Whole-grain bread is usually smaller in size. In order to improve the consumer
properties of bread whole-grain flour is often mixed with bread flour.
Corn and oatmeal flour
In order to improve the bread texture and additional flavor properties mix wheat or
rye flour with corn or oatmeal one.
Sugar
Sugar enriches the pastry in additional flavors and gives bread golden color. Sugar
is a nutritional medium for yeast growth. Add to pastry not only refined but brown
sugar and sugar powder as well.
Yeast
Yeast growth is accompanied by emission of carbon dioxide, that contributes to
the formation of porous crumb. Flour and sugar are a nutritional medium for yeast
growth. Add fresh compressed yeast or fast-acting yeast powder. Dissolve fresh
compressed yeast in warm liquid (water, milk, etc.), and add fast-acting yeast to
the flour (it does not require preliminary activation, i.e. adding of water). Follow the
recommendations on the packing or observe the following proportions:
1 tea spoon of fast-acting yeast powder is equal to 1,5 of tea spoon of fresh
compressed yeast.
Store yeast in a refrigerator. Yeast is destructed at high temperatures, and the dough
rises poorly.
Salt
Salt gives bread additional flavor and color, but slows down the yeast growth. Do not
use excessive quantities of salt. Always use fine salt (coarse one can damage the
form’s non-stick coating).
Eggs
Eggs improve the structure and volume of the pastry, give additional flavor. Eggs
should be whipped carefully before adding to the dough.
Animal and vegetable fats
Animal and vegetable fats make the pastry softer and increase its storage life. Cut
butter into small cubes or let it melt a little before adding it.
Baking powder and soda
Soda and baking powder (leaven) shorten the time necessary for dough rising. It
is necessary to mix soda with citric acid and a little flour beforehand (5 g of baking
soda, 3 g of citric acid and 12 g of flour). This amount of the powder (20 g) is rated
for 500 g of flour. Do not use vinegar for soda slaking, it will make the crumb less
homogeneous and damper. Baking powder (leaven) is just to be poured into the
form following recipe instructions.
Water
Water temperature plays the crucial role in bread making process. Optimal water
temperature is 20-25°С, you may as well use milk instead of water or enrich bread
flavor by using some natural juice.
Dairy foods
Diary foods improve the nutrition value and flavor of the bread. The crumb becomes
more beautiful and savoury. Use fresh diary foods or powdered milk.
Fruit and berries
Use only fresh and quality fruit and berries for jam making.
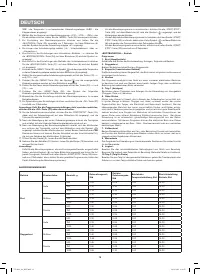
DOSAGE
The secret of good bread lies not only in the quality of ingredients but also in precise
abidance to their proportions.
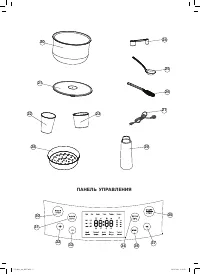
– Use a kitchen scale or the measuring cup (22) and spoon (24), included in the
delivery set.
– Fill the measuring cup (22) with liquid to the appropriate mark. Check dosage,
placing the cup (22) on a flat surface.
– Clean the cup (22) carefully before measuring another type of liquid.
VT-4209_A4_NEV.indd 9
18.11.2013 9:42:54
Содержание
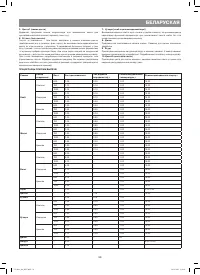
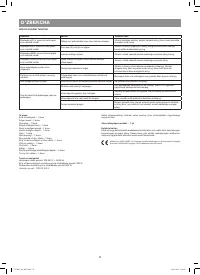
- 22 Запрещается использовать устройство вне помещений.; ПЕРЕД ПЕРВЫМ ИСПОЛЬЗОВАНИЕМ; щий символ программы приготовления «Суп» и символы времени «0:30».
- 23 «Пицца» составляет 1 час.
- 24 Примечания
- 25 настроена, на дисплее отобразится символ «
- 26 Примечание
- 27 «СТАРТ/СТОП» и удерживайте её в течение 3 секунд.
- 29 Хлеб прилип к стенкам формы для выпечки
- 71 Uz


