Мультиварки VITEK VT-4209 BW - инструкция пользователя по применению, эксплуатации и установке на русском языке. Мы надеемся, она поможет вам решить возникшие у вас вопросы при эксплуатации техники.
Если остались вопросы, задайте их в комментариях после инструкции.
"Загружаем инструкцию", означает, что нужно подождать пока файл загрузится и можно будет его читать онлайн. Некоторые инструкции очень большие и время их появления зависит от вашей скорости интернета.


7
ENGLISH
•
Put filter paper or a thin cotton cloth into a metal sieve or a strainer and filter
the oil.
– Do not mix up different types of oil.
– At long intervals between cooking of product portions, switch the deep fryer off.
– It is better to fry products with high content of water (for instance, potatoes) in
small intervals; take the basket out and shake the content of the basket peri-
odically.
– After frying of a food portion, remove the remaining products from the oil imme-
diately, this way you can prolong the oil life.
– Regularly change oil (approximately after 8-12 uses).
– Oil should be changed if it starts bubbling while heating, if it has unpleasant taste
or odor, as well as if it darkened or became dense.
– If you use the «Deep fryer» program seldom, store oil or fat in closed plastic or
glass containers in a cool place (preferably in a fridge).
– Do not store the oil in the bowl (20).
Cooking recommendations
– When frying several types of products, put products requiring lower processing
temperature first.
– As a rule, heat treated products require higher frying temperature and less cook-
ing time than raw products.
«MULTICOOK» mode
The «MULTICOOK» mode supports 45 programs with user settings. Due to this
mode you can set the cooking temperature and duration and heating type: lower
heating element or «convection» (simultaneous operation of lower and side heating
elements).
User program is divided into 4 steps, each of them may take up to 4 hours (240
minutes). Set the heating temperature for every cooking step. Lower heating
element temperature (marked with the symbol «d») is set within the range from 40°
to 180°С, for convection mode (symbol «c») select the temperature within the range
from 70° to 160°С.
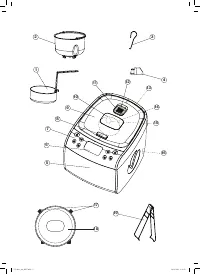
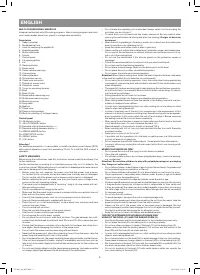
1. Open the lid (9) by pressing the button (8) and place the bowl (20) into the pro-
cess chamber.
2. Put the food into the bowl (20) following the recommendations given in the recipe
(see the recipe book).
Note
:
Make sure that the products and liquids level does not exceed the level
of maximal mark «10» and is not lower than the level of minimal mark «2».
Maximal level mark for porridges (except rice) is «8»
3. Place the bowl (20) in the process chamber. Make sure that the outer surface
of the bowl is clean and dry, and the bowl itself is placed evenly and is in secure
contact with heating element (14) surface.
4. If you steam products, pour water into the bowl (20) so that boiling water doesn’t
reach the bottom of the basket (28). Put the food into the basket (28) and place
it on the bowl (20).
5. Close the lid (9).
6. Insert the power cord jack into the connector (16) and the power cord plug into
the socket. There will be a sound signal, the display (6) will show the symbols
«00:00».
User program settings
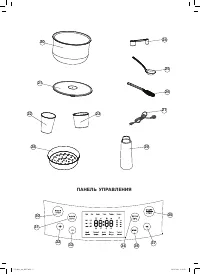
1. Press the button (30) «MULTICOOK», the symbol
and the first user program
indication «P01» will appear on the display and then the user program settings data
will be shown: 4 cooking steps will be shown on the display (6) - d1, d2, d3, d4
and c1, c2, c3, c4 («d» is the lower heating element, «c» is the convection), 100°
is the temperature on the corresponding cooking step, 0:00 is the step duration.
2. Consequently pressing the button (36) «MENU» select the number of the user
program («P01», «P02» ... «P45») which you want to set.
3. To set the user program press and hold during 3 seconds the button (30)
«MULTICOOK». The first cooking step symbol «d1» will appear on the display (6).
4. You can select the heating type («d» - lower heating element or «c» - «convec-
tion»).
5. To switch to «convection» mode settings press the button (34) «BREAD MAKER»,
the symbol «c» will appear on the display (6).
6. To switch to lower heating element settings press the button (31)
«MULTICOOKER», the symbol «d» will be shown on the display (6).
7. Press the button (36) «MENU» the symbol
and the set temperature for this
cooking step will be shown on the display (6).
8. Use the buttons (32) «+» and (33) «-» to set the required heating temperature.
9. Press the button (36) «MENU», the symbol
and the preset cooking duration
will be shown on the display.
10. Set the cooking step duration with the buttons (32) «+» and (33) «-».
11. Press the button (36) «MENU», the next cooking step symbol will appear on the
display.
12. Repeat the user program setting steps for other operation steps.
13. To save the settings press and hold during 3 seconds the button (37) «OK».
Note: If you don’t want to save the program settings, press the (37) «OK»
without holding it.
14. To start cooking press the button (35) «START/STOP», the cooking time will be
shown on the display (6) and the dots will blink.
15. After the first cooking step is finished, you will hear sound signals and the next
cooking step will switch on automatically.
16. When the user program is finished, the multicooker will be switched off, you will
hear sound signals and the symbol «
» will appear on the display; switch the
multicooker off, unplug it and disconnect the power cord from the connector (16)
on the multicooker body (5).
17. Open the lid (9) and let the unit cool down.
18. Remove the bowl (20) using the tongs (19) and clean the unit.
Note:
– If you selected the user program which was not preliminary set, the symbol «
» will appear on the display, and you will hear repeating sound signals. Press and
hold the button (35) «START/STOP» for 3 seconds and then set the selected pro-
gram (see chapter «User program settings»).
– To pause the user program press the button (35) START/STOP, the symbol «
»
will appear on the display and the time indications will be flashing.
– To resume the user program press the button (35) START/STOP again, the sym-
bol «
» on the display (6) will go out and the dots will blink.
– To switch the user program off press and hold the button (35) «START/STOP»
for 3 seconds.
“BREAR-MAKER” mode
Programs
1. Bread (basic mode)
It includes all the three stages of bread making: dough kneading, dough rising and
baking.
2. Rye
Bake healthful bread of rye flour.
3. Baguette (French bread)
Bread making takes more time, the bread has large porous crumb and crispy crust.
4. Pie
This program allows using the unit as an ordinary electric oven. Use it for baking
from ready-made dough or for baked bread additional browning.
5. Dough 1 (dough kneading)
Use this program to knead dough for home-baked pastry (pies, pizza, etc.).
6. Gluten free
Gluten or fibrin is the albumen found in the seeds of Gramineae plants (wheat, rye
and oats are especially rich in it) and determining such characteristics of dough as
elasticity and springiness. With the help of digestive enzyme most people including
children successfully break up gluten that serves as a good source of albumen. But
there is a group of people with genetic predisposition for gluten provoking coeliacia,
quite a rare disease. When suffering from this disease it is necessary to eliminate
gluten-containing foods from the diet. You can bake gluten-free dietarybread in our
bread maker (usually of rice, corn, buckwheat flour or special baking mixes).
7. Wholegrain
Bake healthful bread of fine or crude flour. It is not recommended to use the delay
function when making this bread as that may cause undesirable effects.
8. Jam
Use this program for homemade jam. Chop the fruit for jam beforehand.
9. Yogurt
Make the tastiest natural yogurt of milk and leaven. Use yogurt or prebiotics as a
leaven. See the details in the “Recipe book”.
10. Dough 2 (dough for paste)
Make dough for homemade pasta; add tomato paste or herbs in order to give dough
additional color and aroma.
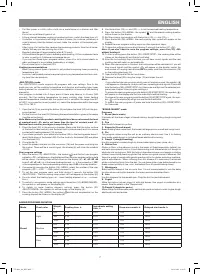
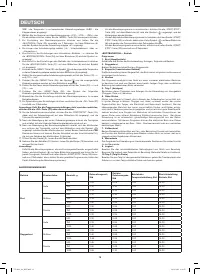
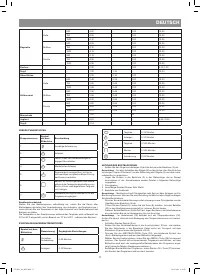
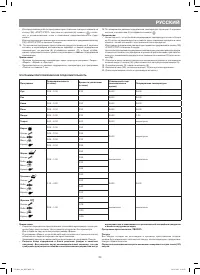
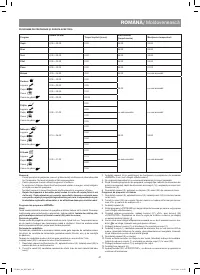
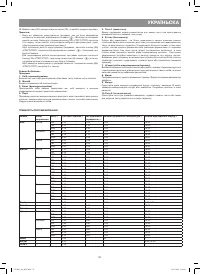
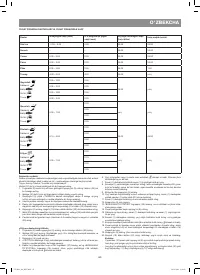
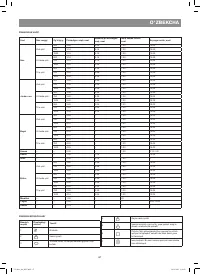
BAKING PROGRAMS DURATION
Mode
Crust color
Weight,
g
Cooking time, h
Ingredients adding
time, h
Keep warm mode, h
Delayed start mode, h
Bread
Light
500
3:05
2:09
1:00
15:00
750
3:10
2:14
1:00
15:00
1000
3:15
2:19
1:00
15:00
Medium
500
3:10
2:14
1:00
15:00
750
3:15
2:19
1:00
15:00
1000
3:20
2:24
1:00
15:00
Dark
500
3:20
2:24
1:00
15:00
750
3:25
2:29
1:00
15:00
1000
3:30
2:34
1:00
15:00
VT-4209_A4_NEV.indd 7
18.11.2013 9:42:53
Содержание
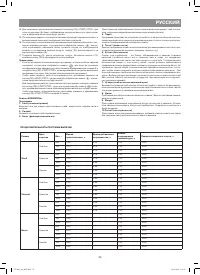
- 22 Запрещается использовать устройство вне помещений.; ПЕРЕД ПЕРВЫМ ИСПОЛЬЗОВАНИЕМ; щий символ программы приготовления «Суп» и символы времени «0:30».
- 23 «Пицца» составляет 1 час.
- 24 Примечания
- 25 настроена, на дисплее отобразится символ «
- 26 Примечание
- 27 «СТАРТ/СТОП» и удерживайте её в течение 3 секунд.
- 29 Хлеб прилип к стенкам формы для выпечки
- 71 Uz


