
Фрезеры Bosch 0.601.624.020 - инструкция пользователя по применению, эксплуатации и установке на русском языке. Мы надеемся, она поможет вам решить возникшие у вас вопросы при эксплуатации техники.
Если остались вопросы, задайте их в комментариях после инструкции.
"Загружаем инструкцию", означает, что нужно подождать пока файл загрузится и можно будет его читать онлайн. Некоторые инструкции очень большие и время их появления зависит от вашей скорости интернета.


English |
25
Bosch Power Tools
1 609 92A 0B3 | (30.4.14)
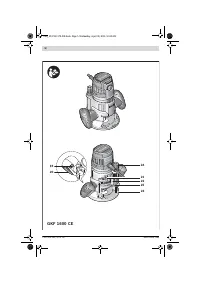
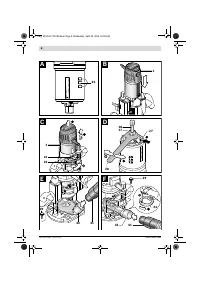
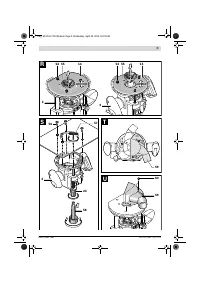
Routing with Guide Bushing (see figures N – Q)
The guide bushing
53
enables template and pattern routing
on workpieces.
In order to use the guide bushing
53
, the guide bushing adapt-
er
50
must be inserted into the guide plate
14
first.
Place the guide bushing adapter
50
from above onto the
guide plate
14
and tighten it firmly with the 2 fastening
screws
51
. Pay attention that the release lever for the guide
bushing adapter
52
is freely movable.
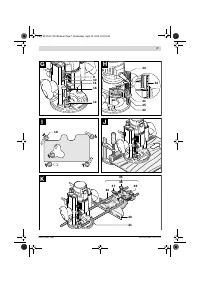
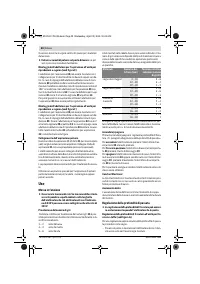
Choose a suitable guide bushing, depending on the thickness
of the template or the pattern. Because of the projecting
height of the guide bushing, the template must have a mini-
mum thickness of 8 mm.
Actuate the release lever
52
and insert the guide bushing
53
from below into the guide bushing adapter
50
. Ensure that
the encoding keys clearly engage in the grooves of the guide
bushing.
Check the clearance from router bit centre and guide bushing
edge, see section “Centring the Base Plate”.
Select a router bit with a diameter smaller than the in-
terior diameter of the guide bushing.
For routing with the guide bushing
53
proceed as follows:
–
Note:
Take into consideration that for routing work with
the non-plunge base
3
, the router bit
18
always protrudes
out of the base plate
13
. Do not damage the template or
the workpiece.
– Guide the switched on power tool with the guide bushing
toward the template.
– When using the plunge base
2
: Press the release lever for
plunge action
7
down and slowly guide the router down un-
til the set depth-of-cut is reached. Let go of release lever
7
again to lock this plunging depth.
– Guide the switched on power tool with the protruding
guide bushing alongside the template applying lateral
pressure.
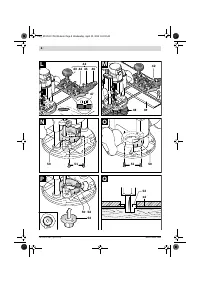
Centring the Base Plate (see figure R)
To ensure that the distance from router bit centre and guide
bushing edge is uniform, the guide bushing and the guide
plate can be adjusted to each other, if required.
– When using the plunge base
2
: Press the release lever for
plunge action
7
down and guide the router toward the base
plate to the stop. Let go of release lever
7
again to lock this
plunging depth.
– Loosen fastening screws
54
approx. 2 turns, so that guide
plate
14
can move freely.
– Insert the centring pin
55
into the tool holder as shown in
the figure. Hand-tighten the tightening nut so that the cen-
tring pin can still be moved freely.
– Align the centring pin
55
and the guide bushing
53
to each
other by slightly moving the guide plate
14
.
– Retighten the fastening screws
54
again.
– Remove the centring pin
55
from the tool holder.
– When using the plunge base
2
: Press the release lever for
plunge action
7
and guide the router back to the upper-
most position.
Operation with Router Table (see figure S)
The non-plunge base
3
can be used with a suitable router ta-
ble. To install the router, remove the guide plate
14
and fas-
ten the non-plunge base
3
to the router table with the fasten-
ing screws
56
.
For mounting of the non-plunge base, please observe
the operating instructions of your router table.
If neces-
sary, matching holes must be drilled into the router table in
order to mount the non-plunge base.
For fine adjustment of the depth-of-cut, it is best to use the ex-
tension
58
or the specialty Allen key
57
.
Routing with Extraction Hood (see figures T – U)
For routing edges, the extraction hood
59
can additionally be
used.
– Fasten the extraction hood
59
with the 2 fastening screws
60
to the base plate
13
. The extraction hood
59
can be fas-
tened in 3 different positions, as shown in the figure.
– Remove the extraction hood again for routing smooth
plane surfaces.
Maintenance and Service
Maintenance and Cleaning
Before any work on the machine itself, pull the mains
plug.
For safe and proper working, always keep the machine
and ventilation slots clean.
In extreme conditions, always use dust extraction as
far as possible. Blow out ventilation slots frequently
and install a residual current device (RCD).
When work-
ing metals, conductive dust can settle in the interior of the
power tool. The total insulation of the power tool can be im-
paired.
If the replacement of the supply cord is necessary, this has to
be done by Bosch or an authorized Bosch service agent in or-
der to avoid a safety hazard.
After-sales Service and Application Service
Our after-sales service responds to your questions concern-
ing maintenance and repair of your product as well as spare
parts. Exploded views and information on spare parts can al-
so be found under:
www.bosch-pt.com
Bosch’s application service team will gladly answer questions
concerning our products and their accessories.
In all correspondence and spare parts order, please always in-
clude the 10-digit article number given on the type plate of
the machine.
OBJ_BUCH-1178-004.book Page 25 Wednesday, April 30, 2014 10:24 AM
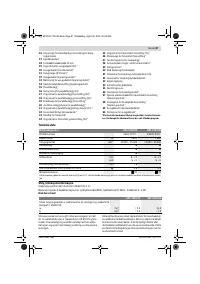
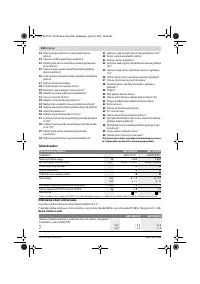
Содержание
- 151 Указания по безопасности
- 153 Описание продукта и услуг; Применение по назначению
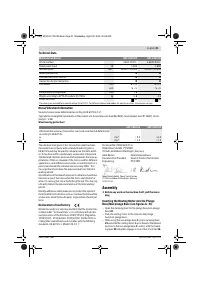
- 154 Технические данные; Заявление о соответствии
- 155 Сборка; Отсос пыли и стружки
- 156 Работа с инструментом; Включение электроинструмента
- 157 Указания по применению
- 159 Техобслуживание и сервис; Техобслуживание и очистка
- 160 Утилизация
Характеристики

Остались вопросы?Не нашли свой ответ в руководстве или возникли другие проблемы? Задайте свой вопрос в форме ниже с подробным описанием вашей ситуации, чтобы другие люди и специалисты смогли дать на него ответ. Если вы знаете как решить проблему другого человека, пожалуйста, подскажите ему :)


