Кофеварка Clatronic ES 2968 - инструкция пользователя по применению, эксплуатации и установке на русском языке. Мы надеемся, она поможет вам решить возникшие у вас вопросы при эксплуатации техники.
Если остались вопросы, задайте их в комментариях после инструкции.
"Загружаем инструкцию", означает, что нужно подождать пока файл загрузится и можно будет его читать онлайн. Некоторые инструкции очень большие и время их появления зависит от вашей скорости интернета.


E
N
G
LI
S
H
E
N
G
LI
S
H
ENGLISH
39
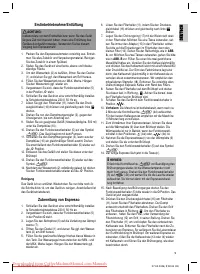
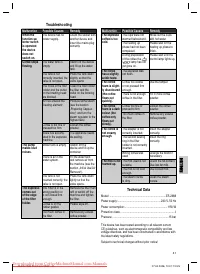
Initial Use / Air Removal
CAUTION:
Particularly before initial use and if you have not used the
machine for a long time, air has to be removed from it. During
this procedure you should not use any espresso powder!
1. Unpack the espresso machine carefully. Take out all the ac-
cessories and the packing material. Wash the accessories
in a sink.
2. Place the machine on a solid fl at surface that is resistant to
heat.
3. In order to fi ll the water tank (2), open the lid (1) and pull the
water tank out by the handle.
4. Fill the water tank up to the MAX. mark. Reinsert the water
tank if necessary.
5. Ensure that the function selection switch (5) is turned to the
O
position.
6. Connect the machine to a correctly installed 230 V,
50 Hertz safety socket.
7. Release the fi lter holder (11) by pressing the pressure
compensation lever (16) and turning it to the left ( ) at the
same time.
8. Now turn the steam quantity control (3) in an anticlockwise
direction as far as it will go.
9. Place a suitable vessel (heat-resistant/approx. 500 ml)
under the steam nozzle (10).
10. Turn the function selector switch (5) to the symbol
„
/
“. The machine now begins to pump.
11. Close the steam quantity control (3) when an even jet
comes out of the steam nozzle (10). Then turn the function
selector switch (5) back to the „
O
“ position.
12. Empty the vessel and place it under the brewing head.
13. Turn the function selector switch (5) back to the „
/
“
symbol.
14. When the water tank (2) is completely empty, turn the
function selector switch back to the „
O
“ position.
Cleaning
The air has now been removed from the machine. Now please
repeat steps 8 to 14 twice in order to clean the machine. The
machine is then ready for operation.
Making a Espresso
1. Connect the machine to a correctly installed 230 V, 50 Hz
safety socket.
2. Ensure that the function selection switch (5) is turned to the
O
position.
3. Place the drip grid (6) on the recess of the drip tray (7).
4. Open the lid (1) and pull the water tank (2) out by the handle
if necessary.
5. Fill the required amount of fresh clear water into the tank.
The water level must be between the MIN.- and MAX. mark.
Reinsert the water tank if necessary.
6. Release
the
fi lter holder (11) by pressing the pressure
compensation lever (16) and turning it to the left ( ) at the
same time.
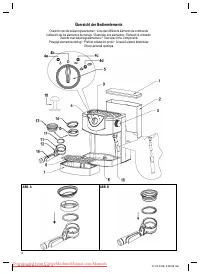
7. Insert the second sealing ring (17) into the fi lter holder with
the bulge facing upwards. When you would like to prepare
a cup of coffee, always place the adapter (15) in the fi lter
holder, taking note of the indentations in the fi lter holder, and
then the small fi lter (14). Please proceed in the order shown
in
ABB. A
. If you would like to prepare two cups, proceed
as shown in
ABB. B
. Now add one to two level measuring
spoons of coffee. Distribute the coffee evenly and press
the coffee powder lightly with a measuring spoon or other
spoon. The aim of pressing the coffee powder with the
spoon is to distribute it evenly in the coffee bowl rather than
compressing it. We recommend that you use the tamper
supplied (18). Carefully remove any excess espresso coffee
from the edge of the fi lter.
8. Place
the
fi lter holder on the brewing head and turn it tight
in the direction of „ “. Ensure that the fi lter holder is fi rmly
secured in the brewing head.
9. Turn the device to the „
“ position with the function
selector switch.
10.
Pre-heating:
The machine is ready for operation when after
approx. 2 minutes the „
/
“ (4d) control lamp lights up.
For the best coffee taste we recommend that the machine
be pre-heated for 10 minutes.
11. In order to preheat your espresso cups, place them on the
warming plate (9) above the percolating head. The hotplate
is only in operation when the function selector switch is in
the positions „ “ (4a) or „
“ (4c).
12. Remove the espresso cup(s) from the warming plate (9) and
place them under the percolating head.
13. Turn the function selector switch (5) to the symbol
„
/
“.
14. The espresso is now ready and is poured into the cup(s).
NOTE:
If the control lamp „
/
“ goes off again before
percolation has fi nished, the water temperature is no
longer high enough. Turn the function selector switch (5)
to „
“ (4c) and wait until the lamp goes on again. You
can now continue preparing the espresso.
15. When percolation is fi nished, turn the function switch (5)
back to the
O
position. The device is now switched off.
16. Press the pressure compensation lever (16) on the fi lter
holder (11) before you remove the fi lter holder. The steam
escapes below the fi lter holder. Turn the handle of the fi lter
holder in the direction „ “. In order to empty the fi lter holder
hold the fi lter in its position using the fi lter retaining device
(12) on the handle. Turn the fi lter holder (11) and knock out
the used coffee. Remove the fi lter holder after making an
espresso. By doing so, you will extend the service life of the
rubber seal in the brewing head. To make other espressos,
fi ll the coffee bowl (13 or 14) with coffee powder again and
carry out the brewing procedure as described above.
05-ES 2968 ProfiCook NEW 39
07.04.2006, 10:01:06 Uhr


