
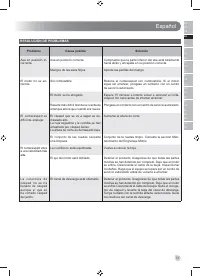
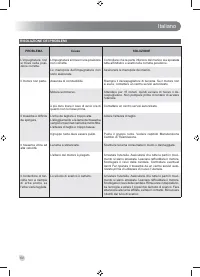
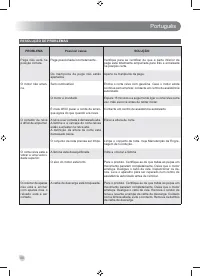
Газонокосилки Ryobi RLM4114 5133002884 - инструкция пользователя по применению, эксплуатации и установке на русском языке. Мы надеемся, она поможет вам решить возникшие у вас вопросы при эксплуатации техники.
Если остались вопросы, задайте их в комментариях после инструкции.
"Загружаем инструкцию", означает, что нужно подождать пока файл загрузится и можно будет его читать онлайн. Некоторые инструкции очень большие и время их появления зависит от вашей скорости интернета.


English
9
EN
FR
DE
ES
IT
NL
PT
DA
SV
FI
NO
RU
PL
CS
HU
RO
LV
LT
ET
HR
SL
SK
BG
UK
TR
0.79 mm. To widen gap, if necessary, carefully bend
the ground (top) electrode. To lessen gap, gently tap
ground electrode on a hard surface.
■
Seat spark plug in position; thread in by hand to prevent
cross-threading.
■
Tighten with wrench to compress washer. If spark plug
is new, use 1/2 turn to compress washer appropriate
amount. If reusing old spark plug, use 1/8 to 1/4 turn for
proper washer compression.
NOTE:
An improperly tightened spark plug will become
very hot and could damage the engine.
■
Reinstall spark plug boot.
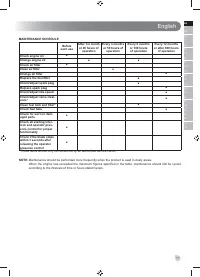
DRIVE GEAR MAINTENANCE
See figure 12.
To ensure smooth operation of wheels, the wheel assembly
should be cleaned before storage.
■
Remove the hub cap.
■
Remove the nut and wheel and set aside.
■
Remove dust cover, e-ring, washer, pins, and wheel
gear. Clean any dirt from these items and the end of
the drive shaft by wiping with a dry cloth. If necessary,
rubbing alcohol may be used to remove any stubborn
dirt.
CAUTION:
Do not lubricate any of the wheel components
Lubrication may cause the wheel components to fail during
use, which could result in mower damage.
■
Reinstall wheel gear with the arrows facing the front
of the mower. Reinstall pins, washer, e-ring, and dust
cover.
■
Reinstall wheel and nut. Tighten nut to secure.
REPLACING WHEELS
See figure 13.
WARNING
Use only the manufacturer’s replacement wheels. Using
wheels that are not approved by the manufacturer is
hazardous and could result in serious personal injury.
■
Stop the product. Make sure that all moving parts have
come to a complete stop. Allow the product to cool
down. Disconnect the spark plug wire.
■
Remove the hub cap.
■
Remove the nut from the wheel axle, then remove the
wheel.
■
Replace with new wheel and reinstall nut to secure.
STORING THE PRODUCT
When storing the mower for 30 days or more:
■
If using a fuel stabilizer, follow the stabilizer
manufacturer’s directions to add stabilizer to petrol in
the fuel tank. Run the engine at least 10 minutes after
adding stabilizer to allow the stabilizer to reach the
20161014v1
carburettor.
WARNING
Do not store the product with petrol in the tank inside a
building where fumes may reach an open
fl
ame or spark.
■
If not using a fuel stabilizer, allow the engine to run until
the product is completely out of fuel.
■
Once the engine has stopped, allow the blade to come
to a complete stop and disconnect the spark plug wire.
■
Turn the fuel valve to the closed position.
■
Turn the product on its side (with carburettor facing up)
and clean grass clippings that have accumulated on the
underside of the mower deck.
■
Clean the underside of the mower deck.
■
Wipe the product clean with a dry cloth.
■
Check all nuts, bolts, knobs, screws, and fasteners for
tightness.
■
Inspect moving parts for damage, breakage, and wear.
Have repairs made on any damaged or missing parts.
■
Store the product in a well-ventilated area that is clean,
dry, and is out of the reach of children.
■
Do not store near corrosive materials, such as fertilizer
or rock salt.
To lower the handle before storing
See figure 14.
■
Loosen the starter rope guide knob. Remove starter
rope from guide and allow to retract into engine.
■
Fully loosen the handle knobs on the sides of the
handle and fold the upper handle down.
■
Push inward on each side of the lower handle, and
lift the sides of the lower handle past the edges of the
handle mounting brackets.
■
Fold the lower handle forward, making sure not to bend
or kink the control cables.
TRANSPORTATION
■
Stop the product. Make sure that all moving parts have
come to a complete stop. Allow the product to cool
down before storing or transporting. Disconnect the
spark plug wire.
■
Clean all foreign materials from the product. Store the
product in a cool, dry, and well-ventilated place that
is inaccessible to children. Keep away from corrosive
agents such as garden chemicals and de-icing salts.
Do not store outdoors.
■
For transportation in a vehicle, secure the product
against movement or falling to prevent injury to persons,
damage to the product, or loss of fuel.


