
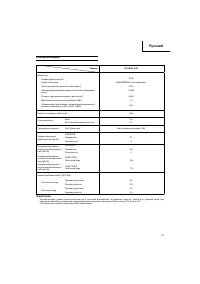
Триммеры Hitachi CG40EAF - инструкция пользователя по применению, эксплуатации и установке на русском языке. Мы надеемся, она поможет вам решить возникшие у вас вопросы при эксплуатации техники.
Если остались вопросы, задайте их в комментариях после инструкции.
"Загружаем инструкцию", означает, что нужно подождать пока файл загрузится и можно будет его читать онлайн. Некоторые инструкции очень большие и время их появления зависит от вашей скорости интернета.


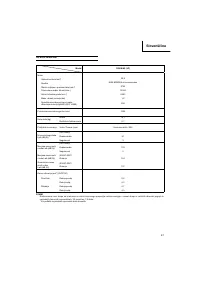


11
English
Before fueling, clean the tank cap area carefully, to ensure that
no dir t falls into the tank. Make sure that the fuel is well mixed by
shaking the container, before fueling.
Starting
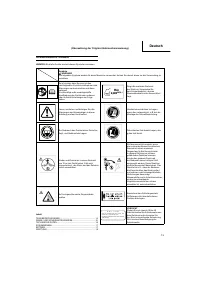
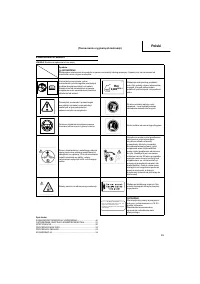
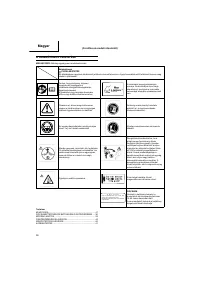
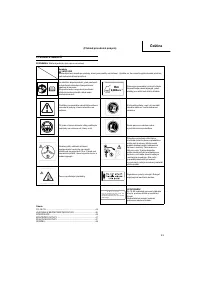
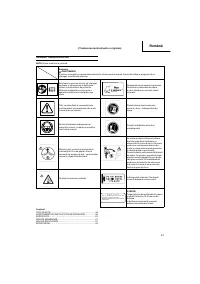
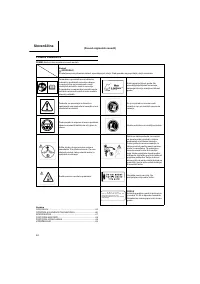
CAUTION
Before star ting, make sure the cutting attachment does not
touch any thing.
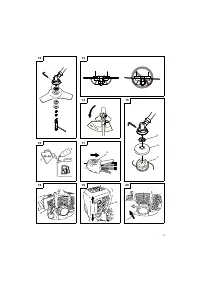
1. Slide ignition switch (18) to RUN position. (
Fig.
17
)
* Push priming bulb (19) several times so that fuel
fl
ows through
return pipe. (
Fig.
18
)
2. Set choke lever (20) to START position (A). (
Fig.
19
)
3. Pull recoil star ter briskly, taking care to keep the handle in your
grasp and not allowing it to snap back. (
Fig.
20
)
4. When you hear the engine want to star t, return choke lever to
RUN position (B). Then pull recoil star ter briskly again.
NOTE
If engine does not star t, repeat procedures from 2 to 4.
5. After star ting engine, allow the engine about 2– 3 minutes to
warm up before subjecting it to any load.
Cutting
(
Fig.
21,
22
)
○
When cutting, operate engine at over 6500 min
-1
. Extended
time of use at low rpm may wear out the clutch prematurely.
○
Cut grass from right to left.
○
When working on a slope, the blade should allow the contour
from top to bottom, with the operator looking down to the left.
○
Blade thrust may occur when the spinning blade contacts a
solid object in the critical area.
A dangerous reaction may occur causing the entire unit and
operator to be thrust violently. This reaction is called blade
thrust. As a result, the operator may lose control of the unit
which may cause serious or fatal injur y. Blade thrust is more
likely to occur in areas where it is di
ffi
cult to see the material to
be cut.
○
The blade turns counter-clockwise, therefore, be advised to
operate the unit from right to left for e
ffi
cient cutting. Keep
onlookers out of working area at least 15 m.
WARNING
If cutting attachment should strike against stones or other
debris, stop the engine and make sure that the attachment
and related par ts are undamaged. When grass or vines wrap
around attachment, stop engine and attachment and remove
them.
Stopping
(
Fig.
23
)
Decrease engine speed and run at an idle for a few minutes, then
turn o
ff
ignition switch (18).
WARNING
A cutting attachment can injure while it continues to spin after
the engine is stopped or power control is released. When the
unit is turned o
ff
, make sure the cutting attachment has stopped
before the unit is set down.
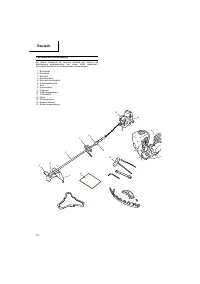
How
to
use
nylon
head
When cutting, operate engine at over 6500 min
-1
. Extended use at
low rpm may wear out the clutch prematurely.
This product is designed so that it will stop cutting when the nylon
line becomes 16 cm or longer.
WARNING
A cutting attachment can injure while it continues to spin after the
engine is stopped or power control is released. When the unit is
turned o
ff
, make sure the cutting attachment has stopped before
the unit is set down.
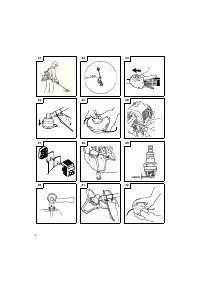
Set the engine speed as low as possible and tap the Head on the
ground. (
Fig.
24
) Also, you can extend nylon line with hands but the
engine must be completely stopped. (
Fig.
25
)
Adjust nylon line to proper length 11-14 cm before each operation.
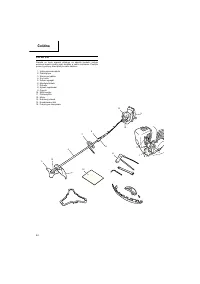
MAINTENANCE
MAINTENANCE, REPL ACEMENT OR REPAIR OF THE EMISSION
CONTROL DEVICES AND SYSTEMS MAY BE PERFORMED
BY ANY NON-ROAD ENGINE REPAIR ESTABLISHMENT OR
INDIVIDUAL.
Carburetor
adjustment
(
Fig.
26
)
WARNING
○
The cutting attachment may be spinning during carburetor
adjustments.
○
Never star t the engine without the complete clutch cover and
tube assembled! Other wise the clutch can come loose and
cause personal injuries.
In the carburetor, fuel is mixed with air. When the engine is test
run at the factor y, the carburetor is basically adjusted. A fur ther
adjustment may be required, according to climate and altitude. The
carburetor has one adjustment possibility:
T
=
Idle
speed
adjustment
screw.
Idle
speed
adjustment
(
T
)
Check that the air
fi
lter is clean. When the idle speed is correct, the
cutting attachment will not rotate. If adjustment is required, close
(clockwise) the T-screw, with the engine running, until the cutting
attachment star ts to rotate. Open (counter-clockwise) the screw
until the cutting attachment stops. You have reached the correct idle
speed when the engine runs smoothly in all positions well below the
rpm when the cutting attachment star ts to rotate.
If the cutting attachment still rotates after idle speed adjustment,
contact your Hitachi dealer.
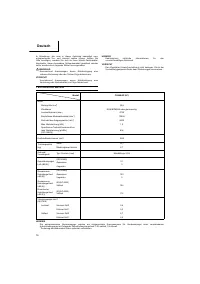
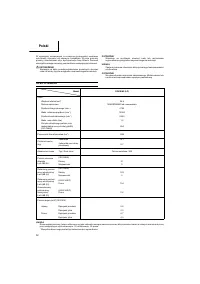
NOTE
Standard Idle rpm is 2500 – 3000 min
-1
.
WARNING
When the engine is idling the cutting attachment must under no
circumstances rotate.
Air
fi
lter
(
Fig.
27
)
The air
fi
lter must be cleaned from dust and dir t in order to avoid:
○
Carburetor
malfunctions
○
Star ting
problems
○
Engine power reduction
○
Unnecessar y wear on the engine par ts
○
Abnormal fuel consumption
Clean the air
fi
lter daily or more often if working in exceptionally
dusty areas.
Cleaning
the
air
fi
lter
Remove the air
fi
lter cover and the
fi
lter (21). Rinse it in warm soap
suds. Check that the
fi
lter is dr y before reassembly. An air
fi
lter
that has been used for some time cannot be cleaned completely.
Therefore, it must regularly be replaced with a new one. A damaged
fi
lter must always be replaced.
Fuel
fi
lter
(
Fig.
28
)
Drain all fuel from fuel tank and pull fuel
fi
lter line from tank. Pull
fi
lter element out of holder assembly and rinse element in warm
water with detergent.
Rinse thoroughly until all traces of detergent are eliminated.
Squeeze, do not wring, away excess water and allow element to air
dr y.
NOTE
If element is hard due to excessive dir t buildup, replace it.
Spark
plug
(
Fig.
29
)
The spark plug condition is in
fl
uenced by:
○
An incorrect carburetor setting
○
Wrong fuel mixture (too much oil in the gasoline)
○
A dir ty air
fi
lter
○
Hard running conditions (such as cold weather)
000Book̲CG40EAF̲EE.indb 11
000Book̲CG40EAF̲EE.indb 11
2010/04/19 18:51:41
2010/04/19 18:51:41


