
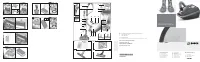
Пылесос Bosch BGL8SIL59D - инструкция пользователя по применению, эксплуатации и установке на русском языке. Мы надеемся, она поможет вам решить возникшие у вас вопросы при эксплуатации техники.
Если остались вопросы, задайте их в комментариях после инструкции.
"Загружаем инструкцию", означает, что нужно подождать пока файл загрузится и можно будет его читать онлайн. Некоторые инструкции очень большие и время их появления зависит от вашей скорости интернета.


43
V
a
cuu
m
ing
!
C
a
ution:
Floor nozzl
e
s ar
e
subj
e
ct to a c
e
r tain a
m
ount of
w
e
ar
,
d
e
p
e
nding on th
e
typ
e
of hard floors you hav
e
(
e
.g. rough
,
rustic til
e
s). You
m
ust th
e
r
e
for
e
ch
e
ck
th
e
und
e
rsid
e
of th
e
floor nozzl
e
at r
e
gular int
e
r vals.
Worn und
e
rsid
e
s of floor nozzl
e
s
m
ay hav
e
sharp
e
dg
e
s that can da
m
ag
e
s
e
nsitiv
e
hard floors
,
such as
parqu
e
t or linol
e
u
m
. Th
e
m
anufactur
e
r do
e
s not ac-
c
e
pt any r
e
sponsibility for da
m
ag
e
caus
e
d by worn
floor nozzl
e
s.
Fig.
10
Se
t th
e
adjustabl
e
floor nozzl
e
:
R
ugs and carp
e
ts
=>
Hard floors/parqu
e
t
=>
Fig.
11*
V
a
cuu
m
ing with
a
cce
ss
orie
s
Attach th
e
nozzl
e
s to th
e
suction pip
e
or handl
e
as r
e
-
quir
e
d:
a
)
C
r
e
vic
e
nozzl
e
for vacuu
m
ing cr
e
vic
e
s and corn
e
rs
,
e
tc.
b)
Upholst
e
r y nozzl
e
for vacuu
m
ing upholst
e
r
e
d furni-
tur
e,
cur tains
,
e
tc.
c)
Upholst
e
r y nozzl
e
with attachabl
e
hard furnishings
brush for vacuu
m
ing window fra
me
s
,
cupboards
,
cornicing
,
e
tc.
Aft
e
r us
e,
r
e
ins
e
r t th
e
cr
e
vic
e
nozzl
e
and upholst
e
r y
nozzl
e
into th
e
acc
e
ssori
e
s hold
e
r.
d)
Floor tool for d
e
licat
e
hard floors
,
e
.g. parqu
e
t
e)
"pow
e
r
C
l
e
an
S
ton
e
&
C
o" floor tool for hard floors
with joints and gaps
,
e
.g. til
e
s and floorboards
Fig.
12
You can us
e
th
e
parking aid on th
e
back of th
e
vacu-
u
m
cl
e
an
e
r if you want to stop vacuu
m
ing for a shor t
ti
me
.
Aft
e
r switching off th
e
applianc
e,
slid
e
th
e
hook on
th
e
floor nozzl
e
into th
e
r
e
c
e
ss on th
e
back of th
e
applianc
e
.
Fig.
13
To ov
e
rco
me
obstacl
e
s
,
e
.g. st
e
ps
,
th
e
applianc
e
can
also b
e
carri
e
d by th
e
handl
e
on th
e
applianc
e
body.
After u
s
ing the
a
ppli
a
nce
Fig.
14
P
ull out th
e
m
ains plug.
Bri
e
fly pull on th
e
pow
e
r cord and r
e
l
e
as
e
it (th
e
cabl
e
r
e
tracts auto
m
atically).
Fig.
15
To stor
e
or transpor t th
e
applianc
e,
you can us
e
th
e
storag
e
aid on th
e
und
e
rsid
e
of th
e
applianc
e
.
S
tand th
e
applianc
e
upright on its
e
nd.
S
lid
e
th
e
hook on th
e
floor nozzl
e
into th
e
r
e
c
e
ss on th
e
un-
d
e
rsid
e
of th
e
applianc
e
.
Ch
a
nging the filter
!
C
a
ution: Alw
a
y
s
s
witch off the
a
ppli
a
nce before
ch
a
nging the filter.
R
epl
a
cing the du
s
t b
a
g
Fig.
16
If th
e
dust bag chang
e
indicator lights up conti-
nuously wh
e
n th
e
nozzl
e
is lift
e
d fro
m
th
e
floor and
th
e
high
e
st pow
e
r s
e
tting has b
ee
n s
e
l
e
ct
e
d
,
th
e
dust bag
m
ust b
e
chang
e
d
,
e
v
e
n though it
m
ay not
y
e
t b
e
full. In this cas
e,
it n
ee
ds to b
e
chang
e
d du
e
to th
e
typ
e
of dust which has b
ee
n vacuu
me
d.
Th
e
nozzl
e,
suction pip
e
and fl
e
xibl
e
hos
e
m
ust not
b
e
block
e
d
,
e
v
e
n if this do
e
s not trigg
e
r th
e
dust bag
chang
e
indicator.
Fig.
17
Opening the lid
Op
e
n th
e
lid by
m
oving th
e
locking l
e
v
e
r in th
e
dir
e
c-
tion of th
e
arrow.
Fig.
18
a
)
C
los
e
th
e
dust bag by pulling on th
e
locking tab
,
and
r
em
ov
e
th
e
bag.
b)
P
ush th
e
n
e
w dust bag into th
e
hold
e
r until it clicks
into plac
e
. Wh
e
n doing so
,
l
e
av
e
th
e
dust bag fold
e
d
as it was wh
e
n r
em
ov
e
d fro
m
th
e
packaging. Do not
cr
e
as
e
or kink th
e
dust bag
,
and
e
nsur
e
that it is not
pinch
e
d wh
e
n th
e
lid is clos
e
d.
!
C
a
ution: The lid will only clo
s
e if
a
du
s
t b
a
g h
as
been in
s
erted.
Motor protection filter
!
C
a
ution: The v
a
cuu
m
m
u
s
t not be oper
a
ted without
the
m
otor protection filter.
Cle
a
ning the
m
otor protection filter
Th
e
m
otor prot
e
ction filt
e
r should b
e
cl
e
an
e
d r
e
gularly
by tapping out th
e
dir t and rinsing.
Fig.
19*
Op
e
n th
e
dust bag co
m
par t
me
nt lid.
Fig.
17
Re
l
e
as
e
th
e
m
otor prot
e
ction filt
e
r by pulling on th
e
sid
e
tabs and pull it out in th
e
dir
e
ction of th
e
arrow.
C
l
e
an th
e
m
otor prot
e
ction filt
e
r by tapping out th
e
dir t.
If it is v
e
r y dir ty
,
th
e
m
otor prot
e
ction filt
e
r should
b
e
rins
e
d.
Th
e
filt
e
r
m
ust th
e
n b
e
l
e
ft to dr y for at l
e
ast
24 hours.
Aft
e
r cl
e
aning
,
r
e
fit th
e
m
otor prot
e
ction filt
e
r into
th
e
applianc
e
and lock it in plac
e
at th
e
top.
C
los
e
th
e
dust bag co
m
par t
me
nt lid.
* D
e
p
e
nding on
m
od
e
l


