
Пылесос Dyson Cinetic Big Ball Animal Pro 2 - инструкция пользователя по применению, эксплуатации и установке на русском языке. Мы надеемся, она поможет вам решить возникшие у вас вопросы при эксплуатации техники.
Если остались вопросы, задайте их в комментариях после инструкции.
"Загружаем инструкцию", означает, что нужно подождать пока файл загрузится и можно будет его читать онлайн. Некоторые инструкции очень большие и время их появления зависит от вашей скорости интернета.


32
33
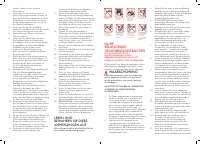
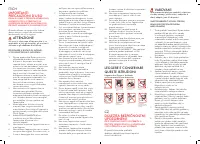
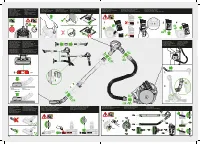
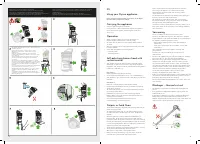
Looking for blockages
• Switch ‘OFF’ and unplug before looking for blockages. Failure to
do so could result in personal injury.
• Leave to cool down for 1-2 hours before looking for blockages.
• Beware of sharp objects when checking for blockages.
• Clear any blockage before restarting.
• Refit all parts securely before using.
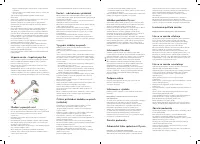
• Please refer to 'Looking for blockages' illustrations or 'Online
support' section for additional guidance.
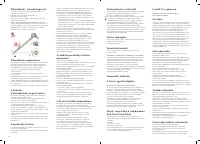
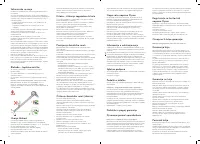
• To gain access to blockages behind the brush bar, remove the base
plate by using a coin to loosen the fastener marked with a padlock.
• Clearing blockages is not covered by your guarantee.
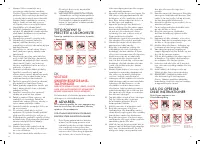
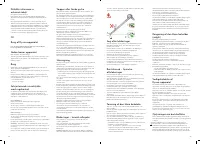
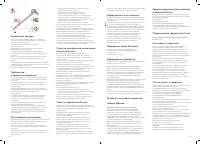
Brush bar – clearing obstructions
• If your brush bar is obstructed, it may shut ‘OFF’. If this happens
you will need to remove the brush bar as shown.
• Switch ‘OFF’ and unplug before proceeding. Failure to do so could
result in personal injury.
• Remove the brush bar by using a coin to loosen the fastener
marked with a padlock until it clicks.
• Beware of sharp objects when clearing obstructions.
• Replace the brush bar and secure it by tightening the fastener until
it clicks. Ensure it is fixed firmly before operating.
• Clearing brush bar obstructions is not covered by your guarantee.
• This product has carbon fibre brushes. Take care if coming
into contact with them, as they may cause minor skin irritation.
Wash your hands after handling the brushes.
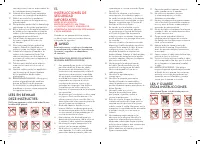
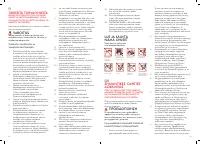
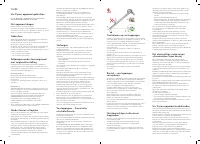
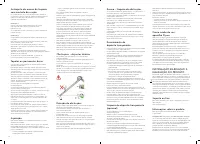
Emptying the clear bin
• Empty as soon as the dirt reaches the level of the MA X mark – do
not overfill.
• Switch ‘OFF’ and unplug before emptying the clear bin.
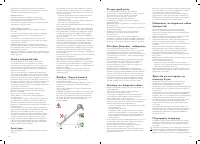
• To remove the cyclone and clear bin unit, push the red button on
the top of the carrying handle, as shown.
• To release the dirt, ensure the cyclone and clear bin unit is kept
vertical then firmly push the red button once more.
– The bin will slide down, cleaning the shroud as it goes.
– The bin base will then open.
– For stubborn dirt trapped in the cylinder, move mechanism up
and down until clear (please refer to 'Emptying the clear bin and
optional bin removal' illustrations).
• To minimise dust/allergen contact when emptying, encase the
clear bin tightly in a plastic bag and empty.
• Remove the clear bin carefully from the bag.
• Seal the bag tightly, dispose as normal.
• Close the clear bin by pushing the bin base upwards. Ensure that
the bin base clicks and the clip is securely in place.
• Locate the base of the clear bin onto the front of the main body and
lower the cyclone down until it clicks into place.
• In the event the clear bin unit does not open automatically, use the
small, silver release catch located towards the base of the clear bin
unit (see 'Emptying the clear bin' illustrations).
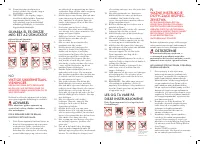
Cleaning the clear bin (optional)
In the event that it is necessary to clean the clear bin:
• Remove the cyclone and clear bin (see 'Emptying the clear bin') and
push the red cyclone release button.
• Pull the silver bin release button and slide the clear bin off the spine
of the cyclone.
• Please refer to 'Emptying the clear bin and optional bin removal'
illustrations for additional bin removal and replacing guidance.
• Clean the clear bin with a damp cloth only.
• Do not use detergents, polishes or air fresheners to clean the
clear bin.
• Do not put the clear bin in a dishwasher.
• Do not immerse the cyclone in water or pour water into
the cyclones.
• Ensure the clear bin is completely dry before replacing.
• To refit the clear bin:
– Insert the spine into the bin runner
– Push upwards until it clicks and then continue pushing until it
slides home.
• Close the clear bin by pushing the bin base upwards. Ensure that
the bin base clicks and the clip is securely in place.
Looking after your
Dyson appliance
• Do not carry out any maintenance or repair work other than
that shown in this Dyson Operating Manual, or advised by the
Dyson Helpline.
• Only use parts recommended by Dyson. If you do not this could
invalidate your guarantee.
• Store the appliance indoors. Do not use or store it below
3°C (37.4°F). Ensure the appliance is at room temperature
before operating.
• Clean the appliance only with a dry cloth. Do not use any
lubricants, cleaning agents, polishes or air fresheners on any part
of the appliance.
• If used in a garage, always wipe the base of the floor tool and base
of the appliance with a dry cloth after vacuuming to clean off any
sand, dirt or pebbles that could damage delicate floors.
Disposal information
• Dyson products are made from high grade recyclable materials.
Recycle where possible.
• This marking indicates that this product should not be disposed
with other household wastes throughout the EU. To prevent possible
harm to the environment or human health from uncontrolled
waste disposal, recycle it responsibly to promote the sustainable
reuse of material resources. To return your used device, please
use the return and collection systems or contact the retailer
where the product was purchased. They can take this product for
environmentally safe recycling.
Online support
• For online help, general tips, videos and useful information
about Dyson.
UK - www.dyson.co.uk/support
ROI - www.dyson.ie/support
Product information
Please note: Small details may vary from those shown.
Compatibility with previous Dyson tools and accessories
• Your new machine comes with the latest Dyson technology. As
such it is equipped with the latest Quick release catches that allow
quick and easy tool or accessory changes. However, this makes it
incompatible with previous generations of Dyson products.
• An adaptor which makes your new machine compatible with older
Dyson tools and accessories is available by contacting your local
Dyson helpline (see ‘Dyson Customer Care’ section for contact
details).
• Availability varies from country to country.
Guarantee terms and conditions
Dyson customer care
Thank you for choosing to buy a Dyson appliance.
After registering your 5 year guarantee, your Dyson appliance
will be covered for parts and labour for 5 years from the
date of purchase, subject to the terms of the guarantee.
If you have any queries regarding your Dyson appliance, visit
www.dyson.co.uk/support (UK) or www.dyson.ie/support (ROI) for
online help, general tips and useful information about Dyson.
Alternatively, you can call the Dyson Helpline with your serial
number and details of where/when you bought the appliance.
If your Dyson appliance needs a repair, call the Dyson Helpline so
we can discuss the available options. If your Dyson appliance is
under guarantee, and the repair is covered, it will be repaired at
no cost.
Please register as a Dyson
appliance owner
To help us ensure you receive prompt and efficient service, please
register as a Dyson appliance owner. There are two ways to do this:
• Online at:
www.dyson.com/register
• Telephone the Dyson Helpline.
This will confirm ownership of your Dyson appliance in the event of
an insurance loss, and enable us to contact you if necessary.
Limited 5 year guarantee
Terms and conditions of the Dyson 5 year limited guarantee
What is covered
• The repair or replacement of your Dyson machine (at Dyson’s
discretion) if it is found to be defective due to faulty materials,
workmanship or function within 5 years of purchase or delivery (if
any part is no longer available or out of manufacture Dyson will
replace it with a functional replacement part).
• Where this machine is sold outside of the EU, this warranty will only
be valid if the appliance is used in the country in which it was sold.
• Where this machine is sold within the EU, this warranty will only be
valid (i) if the appliance is used in the country in which it was sold
or (ii) if the appliance is used in Austria, Belgium, France, Germany,
Ireland, Italy, Netherlands, Spain or the United Kingdom and the
same model as this appliance is sold at the same voltage rating in
the relevant country.
What is not covered
Dyson does not guarantee the repair or replacement of a product
where a defect is the result of:
• Accidental damage, faults caused by negligent use or care, misuse,
neglect, carelessness or operation or handling of the appliance
which is not in accordance with the Dyson Operating Manual.
• Use of the appliance for anything other than normal domestic
household purposes.
• Use of parts not assembled or installed in accordance with the
instructions of Dyson.
• Use of parts and accessories which are not genuine
Dyson components.
• Faulty installation (except where installed by Dyson).
• Repairs or alterations carried out by parties other than Dyson or its
authorised agents.
• Blockages – please refer to the Dyson Operating Manual for details
of how to look for and clear blockages.
• Normal wear and tear (e.g. fuse, brush bar etc.).
• Use of this appliance on rubble, ash, plaster.
If you are in any doubt as to what is covered by your guarantee,
please contact the Dyson helpline.
Summary of cover
• The guarantee becomes effective at the date of purchase (or the
date of delivery if this is later).
• You must provide proof of (both the original and any subsequent)
delivery/purchase before any work can be carried out on your
Dyson appliance. Without this proof, any work carried out will be
chargeable. Keep your receipt or delivery note.
• All work will be carried out by Dyson or its authorised agents.
• Any parts which are replaced by Dyson will become the property
of Dyson.
• The repair or replacement of your Dyson appliance under
guarantee will not extend the period of guarantee.
• The guarantee provides benefits which are additional to and do not
affect your statutory rights as a consumer.
Important data
protection information
When registering your Dyson product:
• You will need to provide us with basic contact information to
register your product and enable us to support your guarantee.
• When you register, you will have the opportunity to choose whether
you would like to receive communications from us. If you opt-in to
communications from Dyson, we will send you details of special
offers and news of our latest innovations. We never sell your
information to third parties and only use information that you share
with us as defined by our privacy policies which are available on
our website. privacy.dyson.com
FR/BE/CH
Utilisation de votre appareil Dyson
Veuillez lire attentivement les consignes de sécurité importantes
de ce manuel Dyson avant de continuer.
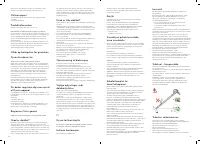
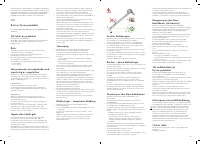
Transport de l’appareil
• Portez l’appareil par la poignée principale.
• Ne pas appuyer sur le bouton de libération du cyclone ni secouer
l’appareil pendant le transport, car le cyclone pourrait se déloger,
tomber et occasionner des blessures.
Fonctionnement
• Toujours étendre complètement le câble jusqu’à la bande rouge
avant de l’utiliser.
• Brancher l’appareil sur le réseau électrique.
• Pour éteindre ou allumer l’appareil, appuyer sur le bouton de
marche/arrêt, situé comme indiqué.
• Après utilisation : Débrancher, appuyer fermement sur le bouton
jusqu'à ce que le câble soit complètement rétracté.
• Éteindre l'appareil et le débrancher avant d'effectuer les actions
suivantes :
– Changement d'accessoires.
– Retrait du flexible.
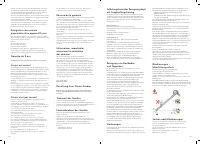
Brosse qui s’ajuste
automatiquement avec contrôle de
l’aspiration
• Votre appareil est équipé d’une brosse qui s’ajuste
automatiquement avec contrôle de l’aspiration. Elle est utilisée pour
les tests conformément aux Règlements européens n° 665/2013 et
666/2013. Les tests doivent être effectués en mode Max (+).
Mode Facile (-)
Force de poussée réduite pour un nettoyage sans effort.
• Pour l’aspiration des moquettes, tapis et sols durs légèrement salis.
• Votre appareil est préréglé sur ce niveau d’aspiration lorsque vous
le sortez du carton d’emballage.


