Массажеры Beurer EM49 - инструкция пользователя по применению, эксплуатации и установке на русском языке. Мы надеемся, она поможет вам решить возникшие у вас вопросы при эксплуатации техники.
Если остались вопросы, задайте их в комментариях после инструкции.
"Загружаем инструкцию", означает, что нужно подождать пока файл загрузится и можно будет его читать онлайн. Некоторые инструкции очень большие и время их появления зависит от вашей скорости интернета.

26
•
Choking hazard! Small children may swallow and choke on
batteries. Store the batteries out of the reach of small children.
• Observe the plus (+) and minus (-) polarity signs.
• If a battery has leaked, put on protective gloves and clean the
battery compartment with a dry cloth.
• Protect batteries from excessive heat.
•
Risk of explosion! Never throw batteries into a fire.
• Do not charge or short-circuit batteries.
• If the device is not to be used for a relatively long period, take the
batteries out of the battery compartment.
• Use identical or equivalent battery types only.
• Always replace all batteries at the same time.
• Do not use rechargeable batteries.
• Do not disassemble, open or crush the batteries.
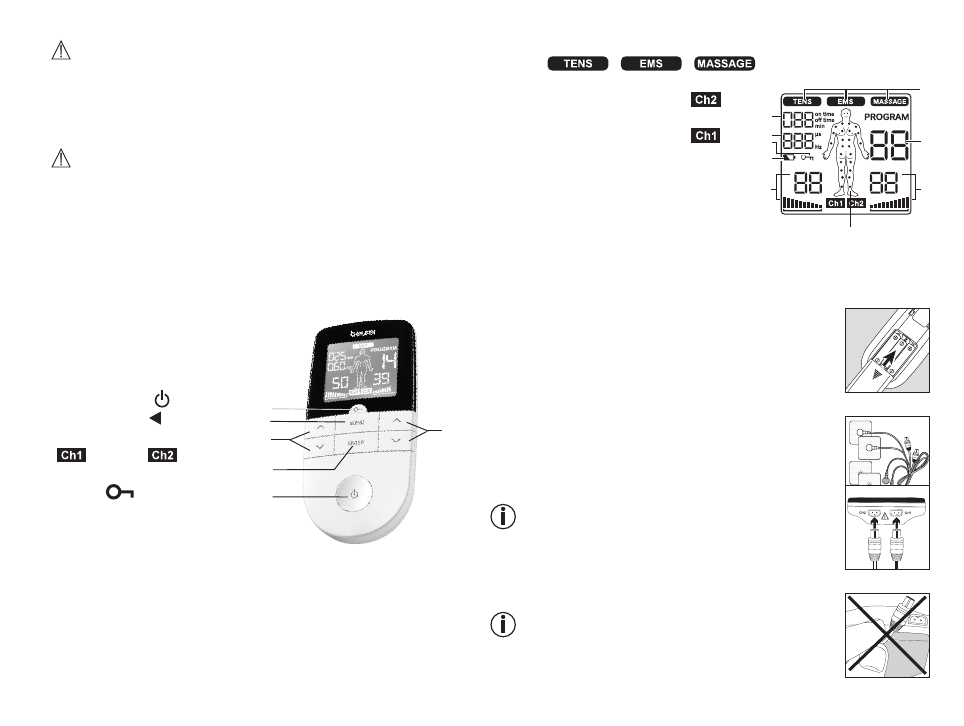
3. Device description
Buttons:
1 ON/OFF button
2
ENTER
button
3 Setting buttons
(
˄/˅
left,
˄/˅
right)
4
MENU
button
5 Keylock
Display (full screen):
1 Menu
/
/
2 Program number
3 Impulse intensity channel 2 (
)
4 Electrode positioning indicator
5 Impulse intensity channel 1 (
)
6 Low battery
7 Keylock
8 Display for frequency (Hz) and pulse
width (µs)
9 Timer function (remaining time display)
or working time
4. Initial use
1. Remove the belt clip from the unit (if attached).
2. Press the battery compartment cover on the rear
of the device and slide it downwards.
3. Insert the three alkaline AAA 1.5 V batteries. Make
sure that the batteries are inserted the correct
way round.
4. Close the battery compartment lid again carefully
(Fig. 1).
5. Reattach the belt clip, if required.
6. Connect the connection cables with the
electrodes (Fig. 2).
The electrodes feature clip closures to make
connection particularly easy.
7. Guide the connection cable plugs into the socket
on the top of the device (Fig. 3).
8. Do not pull, twist or make sharp bends in the
cables (Fig. 4).
Please note that when the battery is replaced
or removed, all settings are restored to the
factory default settings.
1
2
3
4
5
3
2
5
3
6
7
9
8
1
4
Fig. 2
Fig. 1
Fig. 3
Fig. 4
Содержание
- 115 МЕРЫ ПРЕДОСТОРОЖНОСТИ
- 117 Подготовка к работе; Указания к применению
- 118 Таблица программ TENS
- 119 Таблица программ EMS; Программы EMS 33–35 могут настраиваться индивиду-
- 120 Таблица массажных программ; Указание. Правильное расположение электродов приведено
- 122 Человечек на дисплее показывает пример размещения; Программы для индивидуальной настройки; Программа TENS 13
- 125 Интенсивность импульса
- 126 Самоклеящиеся электроды
Характеристики
Остались вопросы?Не нашли свой ответ в руководстве или возникли другие проблемы? Задайте свой вопрос в форме ниже с подробным описанием вашей ситуации, чтобы другие люди и специалисты смогли дать на него ответ. Если вы знаете как решить проблему другого человека, пожалуйста, подскажите ему :)


