
Электропилы Ryobi RCS36X3550HI 5133002180 - инструкция пользователя по применению, эксплуатации и установке на русском языке. Мы надеемся, она поможет вам решить возникшие у вас вопросы при эксплуатации техники.
Если остались вопросы, задайте их в комментариях после инструкции.
"Загружаем инструкцию", означает, что нужно подождать пока файл загрузится и можно будет его читать онлайн. Некоторые инструкции очень большие и время их появления зависит от вашей скорости интернета.


6
| English
QXPEQHVV DQG EODQFKLQJ RI WKH ¿QJHUV XVXDOO\ DSSDUHQW
upon exposure to cold. Hereditary factors, exposure to
FROG DQG GDPSQHVV GLHW VPRNLQJ DQG ZRUN SUDFWLFHV
are all thought to contribute to the development of these
V\PSWRPV 7KHUH DUH PHDVXUHV WKDW FDQ EH WDNHQ E\ WKH
RSHUDWRUWRSRVVLEO\UHGXFHWKHHIIHFWVRIYLEUDWLRQ
Ŷ
Keep your body warm in cold weather. When operating
WKH XQLW ZHDU JORYHV WR NHHS WKH KDQGV DQG ZULVWV
warm. It is reported that cold weather is a major factor
contributing to Raynaud’s Syndrome.
Ŷ
After each period of operation, exercise to increase
blood circulation.
Ŷ
7DNH IUHTXHQW ZRUN EUHDNV /LPLW WKH DPRXQW RI
exposure per day.
Ŷ
3URWHFWLYHJORYHVDYDLODEOHIURPSURIHVVLRQDOFKDLQVDZ
retailers are designed specifically for chainsaw use
which give protection, good grip and also reduce the
effect of handle vibration. These gloves should comply
ZLWK(1DQGPXVWEH&(PDUNHG
If you experience any of the symptoms of this condition,
immediately discontinue use and see your doctor about
these symptoms.
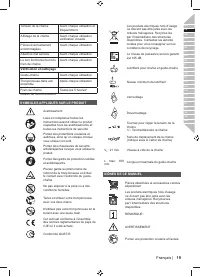
WARNING
Injuries may be caused, or aggravated, by prolonged
use of a tool. When using any tool for prolonged periods,
HQVXUH\RXWDNHUHJXODUEUHDNV
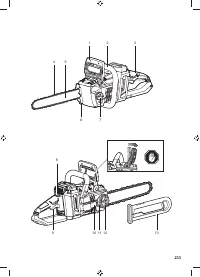
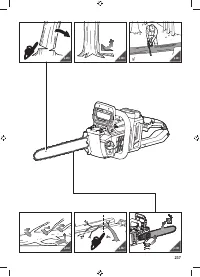
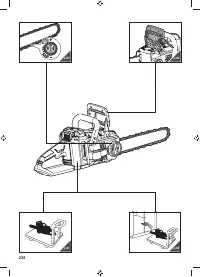
KNOW YOUR PRODUCT
See page 233.
1.
)URQWKDQGJXDUG&KDLQEUDNH
2. Front handle
3. Rear handle
4. Chain
5. Guide bar
6SLNHGEXPSHU
7. Chain lubricant cap
8. Trigger release
9. Throttle trigger
10.
6SURFNHWFRYHU
11. Chain tensioner adjustment ring
12.
&KDLQWHQVLRQHUNQRE
13. Guide bar cover
SAFETY DEVICES
Low kick-back saw chain
$ ORZNLFNEDFN VDZ FKDLQ KHOSV WR UHGXFH WKH SRVVLELOLW\
RIDNLFNEDFNHYHQW
7KH UDNHUV GHSWK JDXJHV DKHDG RI HDFK FXWWHU FDQ
PLQLPL]HWKHIRUFHRIDNLFNEDFNUHDFWLRQE\SUHYHQWLQJWKH
cutters from digging in too deeply. Only use replacement
guide bar and chain combinations recommended by the
manufacturer.
As saw chains are sharpened, they lose some of the low
NLFNEDFN TXDOLWLHV DQG H[WUD FDXWLRQ LV UHTXLUHG )RU \RXU
safety, replace saw chains when cutting performance
decreases.
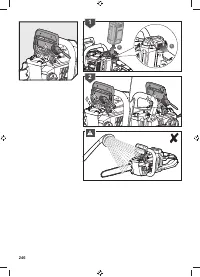
Spiked bumper
7KH LQWHJUDO EXPSHU VSLNH PD\ EH XVHG DV D SLYRW ZKHQ
PDNLQJ D FXW ,W KHOSV WR NHHS WKH ERG\ RI WKH FKDLQVDZ
steady while cutting. When cutting, push the machine
IRUZDUGXQWLOWKHVSLNHVGLJLQWRWKHHGJHRIWKHZRRGWKHQ
by moving the rear handle up or down in the direction of the
cutting line it can help ease the physical strain of cutting
Guide bars
Generally, guide bars with small radius tips have somewhat
ORZHU SRWHQWLDO IRU NLFNEDFN <RX VKRXOG XVH D JXLGH EDU
and matching chain which is just long enough for the job.
/RQJHU EDUV LQFUHDVH WKH ULVN RI ORVV RI FRQWURO GXULQJ
VDZLQJ 5HJXODUO\ FKHFN WKH FKDLQ WHQVLRQ :KHQ FXWWLQJ
VPDOOHUEUDQFKHVOHVVWKDQWKHIXOOOHQJWKRIWKHJXLGHEDU
WKH FKDLQ LV PRUH OLNHO\ WR EH WKURZQ RII LI WKH WHQVLRQ LV
not correct.
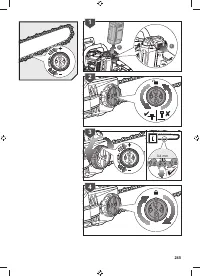
Chain brake
&KDLQ EUDNHV DUH GHVLJQHG WR TXLFNO\ VWRS WKH FKDLQ
URWDWLQJ:KHQWKHFKDLQEUDNHOHYHUKDQGJXDUGLVSXVKHG
towards the bar, the chain should stop immediately. A
FKDLQ EUDNH GRHV QRW SUHYHQW NLFNEDFN ,WRQO\ ORZHUV WKH
ULVN RI LQMXU\ VKRXOG WKH FKDLQ EDU FRQWDFW WKH RSHUDWRU¶V
ERG\GXULQJDNLFNEDFNHYHQW7KHFKDLQEUDNHVKRXOGEH
tested before each use for correct operation in both the run
DQGEUDNHSRVLWLRQV
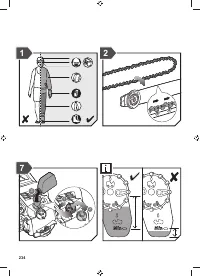
ASSEMBLY
WARNING
If any parts are damaged or missing do not operate this
product until the parts are replaced. Failure to heed this
warning could result in serious personal injury.
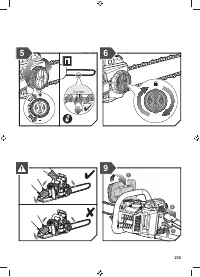
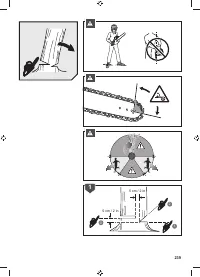
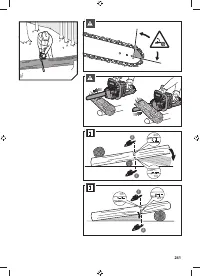
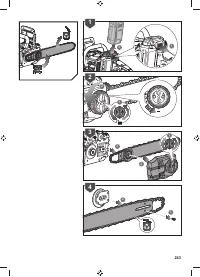
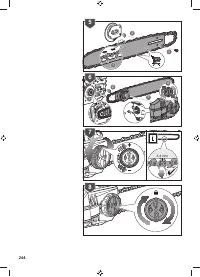
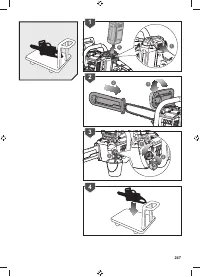
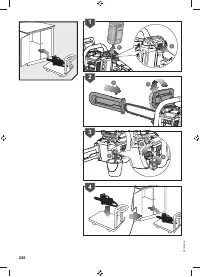
ASSEMBLING SAW CHAIN AND GUIDE BAR
See page 243 - 244.
1.
0DNH VXUH WR UHPRYH WKH EDWWHU\ SDFN IURP WKH XQLW
Wear protective gloves.
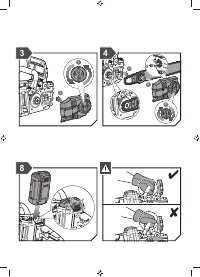
2.
8QVFUHZ WKH FKDLQ WHQVLRQHU NQRE DQG UHPRYH WKH
VSURFNHWFRYHU
3. The saw chain should face in the direction of chain
URWDWLRQ,IWKH\IDFHEDFNZDUGVWXUQWKHORRSRYHU
4.
3ODFHWKHFKDLQGULYHOLQNVLQWRWKHEDUJURRYH
5.
3RVLWLRQWKHFKDLQVRWKHUHLVDORRSDWWKHEDFNRIWKH
bar.
Hold the chain in position on the bar and place the loop
DURXQG WKH GULYH VSURFNHW /RZHU WKH EDU VR WKDW WKH
bolt goes through the hole in the attached chain tension
assembly. You may need to rotate this assembly so the
bolt and hole align. You may rotate this assembly again
WRDSSO\VRPHWHQVLRQWRWKHFKDLQZKLFKZLOOKHOSNHHS
it in place.
7.
5HSODFHWKHVSURFNHWFRYHUDQGWXUQWKHFKDLQWHQVLRQHU
NQREXQWLOQHDUO\WLJKWWXUQWKHFKDLQWHQVLRQDGMXVWPHQW
ring until the saw chain is properly tensioned. The guide
EDUPXVWWKHQEHSXVKHGXSZDUGVFKHFNFKDLQWHQVLRQ
again, do not tension the chain too tight.
8.
$IWHUWKHFKDLQLVZHOOWHQVLRQHGWLJKWHQWKHNQREDJDLQ


