Мясорубки VITEK VT-3601 BW - инструкция пользователя по применению, эксплуатации и установке на русском языке. Мы надеемся, она поможет вам решить возникшие у вас вопросы при эксплуатации техники.
Если остались вопросы, задайте их в комментариях после инструкции.
"Загружаем инструкцию", означает, что нужно подождать пока файл загрузится и можно будет его читать онлайн. Некоторые инструкции очень большие и время их появления зависит от вашей скорости интернета.


8
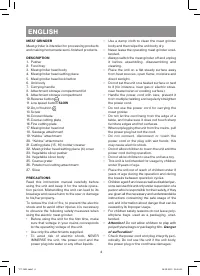
ENGLISH
•
Insert the power plug into the mains socket,
the button (12) «
» illumination will light up.
•
Switch the unit on by pressing the button (12)
«
».
•
During the operation use only the pusher (23)
supplied with the unit; do not use any other
objects, never push vegetables with your
hands.
•
Use low screw rotation speed for processing
soft vegetables, for instance, tomatoes, to do
this press the low speed button (11), the but-
ton (11) illumination will light up.
•
After you finish operating, switch the unit off,
pressing the button (12) «
», unplug the
meat grinder and only after that you can dis-
assemble it.
•
To remove the vegetable slicer attachment
(24) press the lock button (5), turn the attach-
ment clockwise and remove it.
•
Wash the vegetable slicer (24) parts right after
the use.
MEAT GRINDER CARE
•
After you finish operating, switch the meat
grinder off, pressing the button (12) «
»,
unplug the unit and only after that you can dis-
assemble the meat grinder.
•
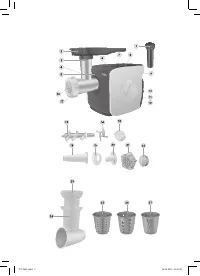
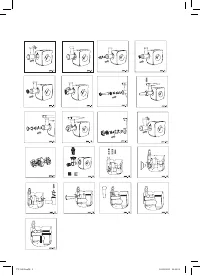
Unscrew the nut (17), remove the installed
attachments (18, 19, 20), the cutting plates
(15 or 16) and the blade (14) from the screw
(13) (pic. 11).
•
Press the lock button (5), turn the meat
grinder head clockwise and remove it (pic.
12).
•
Remove the screw (13) from the meat grinder
head (3).
•
Remove the remains of the products from the
screw (13).
•
Wash all the used parts and attachments of
the meat grinder with warm soapy water and
a neutral detergent, then rinse and dry thor-
oughly.
•
Use the cutting plate holder (21) to remove
the remaining meat from the cutting plates
(15, 16) openings (pic. 13).
•
Cover the meat grinder head setting place (4)
with the cover (22).
•
Clean the meat grinder body (6) with a slightly
damp cloth and then wipe dry.
•
Do not use solvents or abrasives to clean the
meat grinder body (6).
•
Provide that no water gets inside the meat
grinder body.
•
Before you put the accessories away for stor-
age, make sure that they are dry.
•
For easy storage of the attachments, the stor-
age compartment (9) is provided in the unit.
•
Put the attachments into the compartment
according to pictures 15-21. Store the cut-
ting plates (15 and 16) and the nut (17) in the
pusher (21) body (pic. 13).
•
Close the compartment with the lid (8).
•
Put the power cord into special compartment
on the meat grinder body bottom.
DELIVERY SET
Meat grinder with the attachments set inside - 1
pc.
Food tray – 1 pc.
Vegetable slicer attachments set - 1 pc.
Cover – 1 pc.
Instruction manual – 1 pc.
TECHNICAL SPECIFICATIONS
Power supply: 220-240 V ~ 50/60Hz
Rated power: 500 W
Maximal power: 2000 W
The manufacturer preserves the right to change
design and specifications of the unit without a
preliminary notification.
Unit operating life is 3 years
Guarantee
Details regarding guarantee conditions can be
obtained from the dealer from whom the appli-
ance was purchased. The bill of sale or receipt
must be produced when making any claim under
the terms of this guarantee.
This product conforms to the EMC-Requirements as
laid down by the Council Directive 2004/108/ЕС and
to the Low Voltage Regulation (2006/95/ЕС)
VT-3601.indd 8
16.09.2013 16:44:52
Содержание
- 16 Не разрешайте детям играть с
- 17 при этом загорится подсветка этой кнопки.; ПЕРЕРАБОТК А МЯСА; Как только вы закончите работу, выключите; НАБИВК А КОЛБАСОК
- 18 ИСПОЛЬЗОВАНИЕ НАСАДКИ «КЕББЕ»; Приготовьте основу для оболочки.; РЕЦЕПТ
- 19 Готовятся трубочки во фритюре.; ОВОЩЕРЕЗК А; УХОД ЗА МЯСОРУБКОЙ; Как только вы закончите работу, выклю-; КОМПЛЕКТ ПОСТАВКИ; Срок службы устройства - 3 года


