Усилители Onkyo TX-NR656 - инструкция пользователя по применению, эксплуатации и установке на русском языке. Мы надеемся, она поможет вам решить возникшие у вас вопросы при эксплуатации техники.
Если остались вопросы, задайте их в комментариях после инструкции.
"Загружаем инструкцию", означает, что нужно подождать пока файл загрузится и можно будет его читать онлайн. Некоторые инструкции очень большие и время их появления зависит от вашей скорости интернета.


5
> Перед тем, как начать
эксплуатацию
> Подсоединение
> Настройка > Воспроизведение > Наименования органов
управления и отображения
5
> Before start
> Hookup
> Setup > Playback > Part Names
> Advanced Manual
Troubleshooting | Appendix
3´ (0.9 m)
or more
1
6
(
Ä
P3)
7 8
Height Speakers
Choose one of the following:
$
$
Front High Speakers
Rear High Speakers
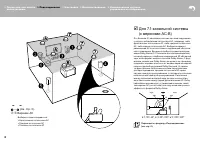
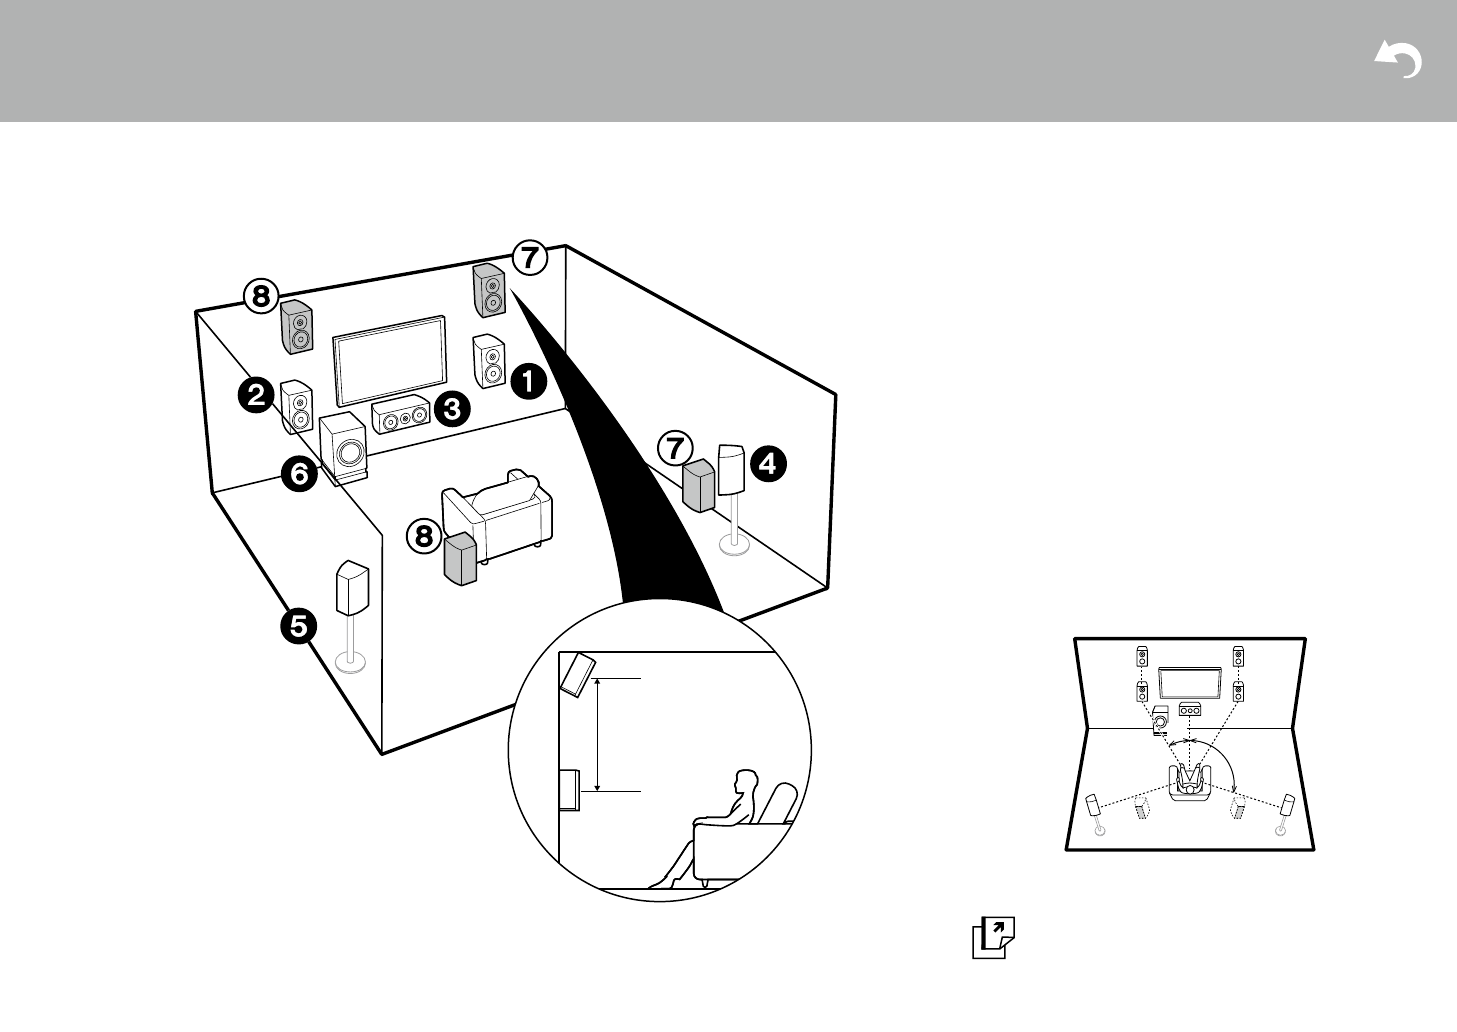
For 7.1-Channel System
(with Height Speakers-A)
This is a basic 5.1-channel system with the addition of
height speakers, either as front high speakers or rear high
speakers. Select which speakers to setup according to
the environment of the room. You can select the Dolby
Atmos listening mode (5.1.2 channel playback), which
realizes the most up-to-date 3D surround sound including
overhead sounds, when the input format is Dolby Atmos.
With formats other than Dolby Atmos, you can still create
a sound field by outputting sound from the height
speakers when you select the Dolby Surround listening
mode. Front high speakers or rear high speakers should
be situated at least 0.9 m higher than the front speakers.
Front high speakers should be situated directly above the
front speakers and the distance between the rear high
speakers should match the distance between the front
speakers. Both should be set up facing the listening
position.
*
1: 22
e
to 30
e
,
*
2: 120
e
Go To "Hookup" (
Ä
P9)
*
1
*
2
SN29402164_TX-NR656_BAS_En.book 5 ページ 2016年3月8日 火曜日 午後4時32分
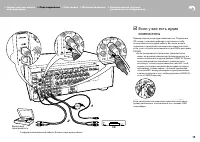
➊
–
➏
(см. стр. 3).
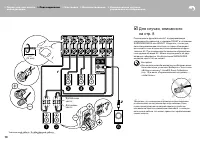
⑦ ⑧
верхние Ас
выберите один из вариантов:
•
Фронтальные верхние Ас
•
Тыловые верхние Ас
или больше
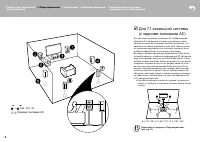
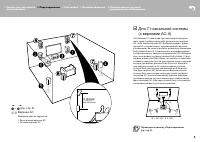
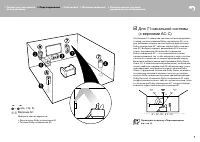
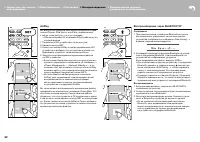
Для 7.1-канальной системы
(с верхними Ас-А)
Это базовая 5.1-канальная системе система окружаю
-
щего звука с добавлением либо фронтальных верхних
Ас, либо задних верхних Ас. выберите вариант разме
-
щения Ас в соответствии с окружающей обстановкой
в помещении. вы можете выбрать режим прослушивания
Dolby Atmos Атмос (5.1.2 каналов для воспроизведения),
который реализует наиболее современный 3D объемный
звук, если формат входного сигнала Dolby Atmos. с фор
-
матами, иными чем Dolby Atmos, вы можете по-прежнему
создавать звуковое поле за счет выдачи звука из верхних
колонок при выборе режима Dolby Surround. Фронталь
-
ные верхние колонки или тыловые верхние колонки
должны быть расположен как минимум на 0,9 м выше,
чем фронтальные Ас. Фронтальных верхние колонки
должны быть расположен непосредственно над фрон
-
тальными Ас, а расстояние между задними верхними
колонками должны соответствовать расстоянию между
фронтальными Ас. Обе пары должны быть установлены
в направлении места для прослушивания.
5
> Before start
> Hookup
> Setup > Playback > Part Names
> Advanced Manual
Troubleshooting | Appendix
3´ (0.9 m)
or more
1
6
(
Ä
P3)
7 8
Height Speakers
Choose one of the following:
$
$
Front High Speakers
Rear High Speakers
For 7.1-Channel System
(with Height Speakers-A)
This is a basic 5.1-channel system with the addition of
height speakers, either as front high speakers or rear high
speakers. Select which speakers to setup according to
the environment of the room. You can select the Dolby
Atmos listening mode (5.1.2 channel playback), which
realizes the most up-to-date 3D surround sound including
overhead sounds, when the input format is Dolby Atmos.
With formats other than Dolby Atmos, you can still create
a sound field by outputting sound from the height
speakers when you select the Dolby Surround listening
mode. Front high speakers or rear high speakers should
be situated at least 0.9 m higher than the front speakers.
Front high speakers should be situated directly above the
front speakers and the distance between the rear high
speakers should match the distance between the front
speakers. Both should be set up facing the listening
position.
*
1: 22
e
to 30
e
,
*
2: 120
e
Go To "Hookup" (
Ä
P9)
*
1
*
2
SN29402164_TX-NR656_BAS_En.book 5 ページ 2016年3月8日 火曜日 午後4時32分
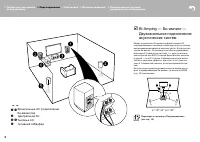
1: 22º–30°,
2: 120°
Переходите к разделу «Подсоединение»
(см. стр. 9).
Содержание
- 2 Перед тем, как начать эксплуатацию; Main features
- 3 Шаг 1: выберите размещение акустических систем; Фронтальные Ас; Step1: Choose your Speaker Layout
- 4 Surround Back Speakers); Surround Back Speakers; Surround Back Speakers)
- 5 or more
- 8 Фронтальные Ас (подключение; Двухканальное подключение; Speakers
- 9 Для случаев, описанных; Step2: Connect the Speakers
- 10 Для случая, описанного
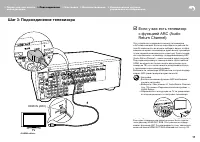
- 11 Шаг 3: Подсоединение телевизора; если у вас есть телевизор; Step3: Connect the TV; ARC TV
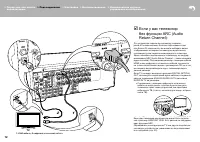
- 12 если у вас телевизор
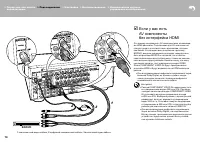
- 13 Step4: Connect the AV Components; HDMI AV Components
- 14 OR; Non-HDMI AV Components; если у вас есть
- 15 Audio Components; если у вас есть аудио; Audio Components
- 16 MAIN ROOM; Multi-zone Connection; Мультизонные соединения
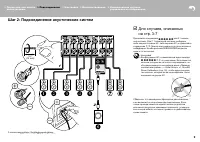
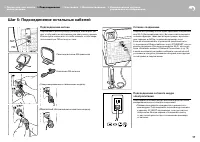
- 17 Шаг 5: Подсоединение остальных кабелей; Сетевое соединение; Step5: Connect Other Cables; Step5: Connect Other Cables
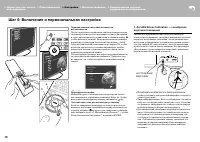
- 18 Шаг 6: Включение и первоначальная настройка; AccuEQ Room Calibration; SETUP MIC; AccuEQ Room Calibration; SETUP MIC
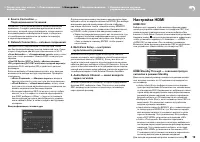
- 19 HDMI Setup; HDMI Setup
- 20 Воспроизведение с AV-компонентов; Listening Mode —; AV Component Playback; AV Component Playback; Стандартное воспроизведение
- 21 Network Services; Network Functions; Network Services; Сетевые функции
- 22 Воспроизведение через BLUETOOTH; AirPlay
- 23 Прослушивание радио; Мультизонные режимы; Listening To the Radio; Прочее; Listening To the Radio; Others; Listening To the Radio
- 24 Прочие функции; When the unit is operating erratically; Если ресивер работает с ошибками
- 25 Front Panel; Передняя панель
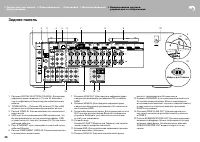
- 26 Rear Panel; Задняя панель
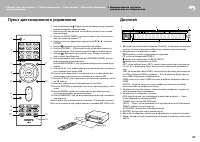
- 27 Пульт дистанционного управления
- 28 Информация о лицензиях и торговых марках

