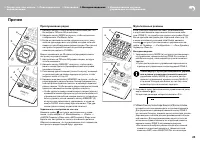
Усилители Onkyo TX-NR656 - инструкция пользователя по применению, эксплуатации и установке на русском языке. Мы надеемся, она поможет вам решить возникшие у вас вопросы при эксплуатации техники.
Если остались вопросы, задайте их в комментариях после инструкции.
"Загружаем инструкцию", означает, что нужно подождать пока файл загрузится и можно будет его читать онлайн. Некоторые инструкции очень большие и время их появления зависит от вашей скорости интернета.


27
> Перед тем, как начать
эксплуатацию
> Подсоединение > Настройка > Воспроизведение
> Наименования органов
управления и отображения
27
> Before start > Hookup > Setup > Playback
> Part Names
> Advanced Manual
Troubleshooting | Appendix
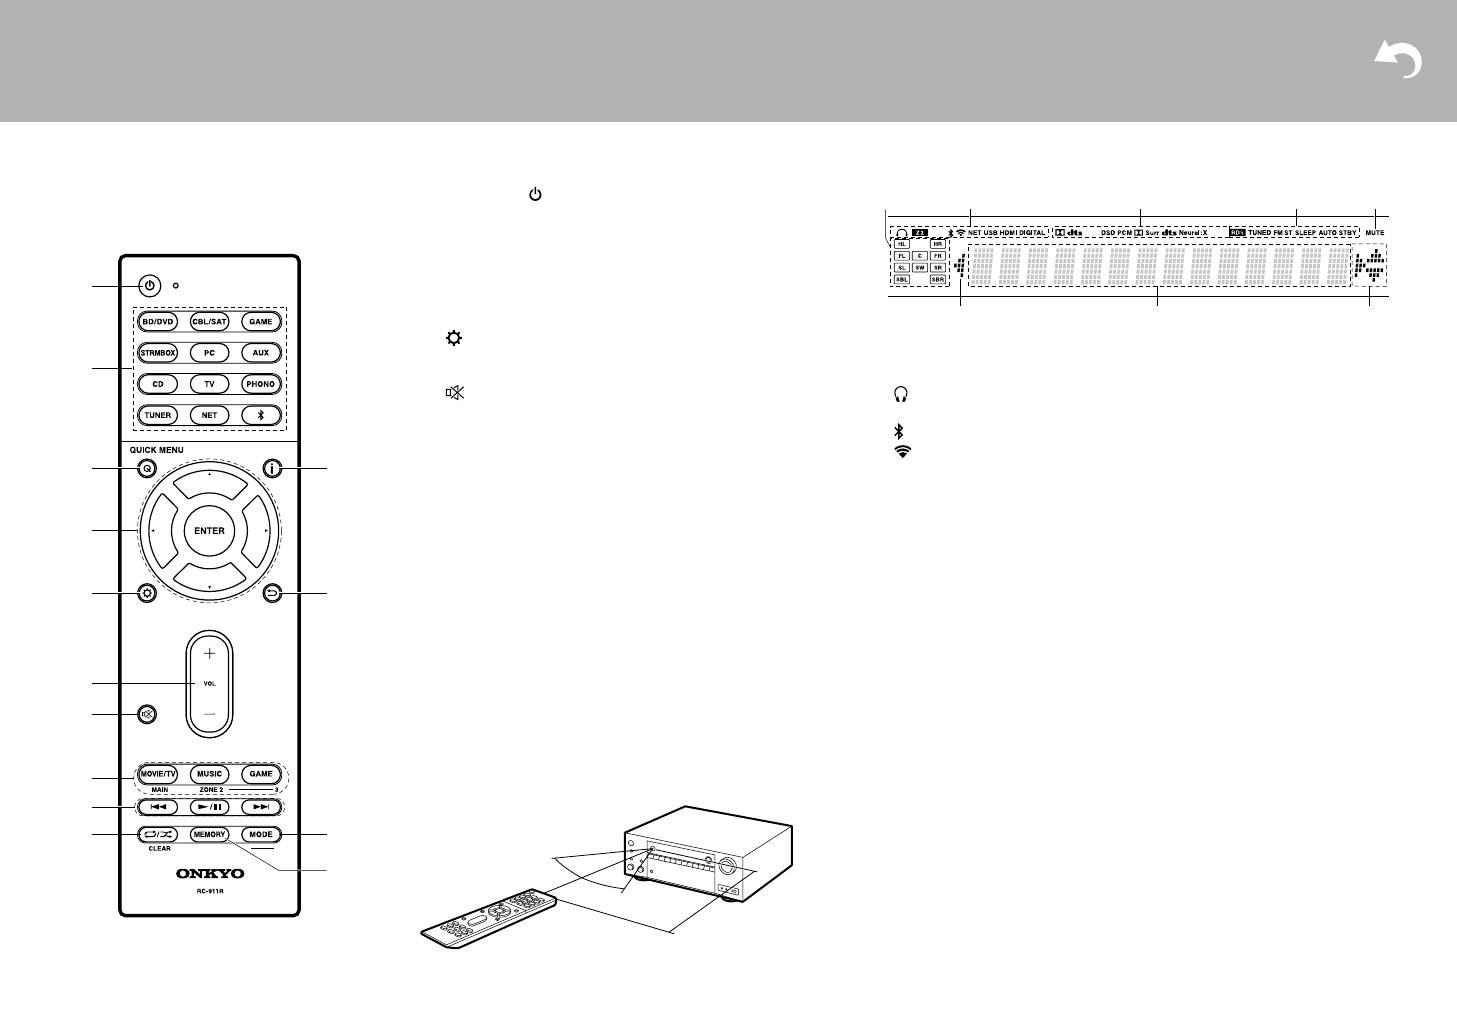
Remote Controller
1.
Í
button: Turns the unit on or into standby mode.
2. Input selector buttons: Switches the input to be played.
3. Q (QUICK MENU) button: You can perform common settings on
the TV screen.
4. Cursor buttons and ENTER button: Select the item with the
cursors and press ENTER to confirm your selection.
5.
button: Displays the Setup menu.
6. Volume buttons: Allows you to adjust the volume. This button
also cancels the muting.
7.
button: Temporarily mutes audio. Press again to cancel
muting.
8. LISTENING MODE buttons: Allows you to select the listening
mode.
MAIN/ZONE 2 buttons: Controls the multi-zone function.
9. Play button: Used for play operations when playing Music Server
or USB.
10.
button: Used for repeat or random play operations when
playing Music Server or USB.
CLEAR button: Deletes all characters you have entered when
entering text on the TV screen.
11.
button: Switches the information on the display.
12.
button: Returns the display to the previous state.
13. MODE button: Switches tuning to a station between automatic
tuning and manual tuning.
14. MEMORY button: Registers a radio station.
8
9
1
2
3
5
7
6
4
11
10
13
12
14
30°
30°
Approx.5 m
Display
1. Speaker/Channel display: Displays the output channel that
corresponds to the selected listening mode.
2. Lights in the following conditions.
Ë
: When headphones are connected.
Z2: When ZONE 2 is on.
: When connected by BLUETOOTH.
: When connected by Wi-Fi.
NET: When "NET" is selected with the input selector and the unit is
connected to the network. It will flash if the connection to the network
is not correct.
USB: When "NET" is selected with the input selector and the unit is
connected by USB and the USB device is selected. Flashes if the
USB is not properly connected.
HDMI: When HDMI signals are input and the HDMI input is selected.
DIGITAL: When digital signals are input and the digital input is
selected.
3. Lights according to the type of input digital audio signals and the
listening mode.
4. Lights in the following conditions.
RDS (European, Australian and Asian models): Receiving RDS
broadcasting.
TUNED: Receiving AM/FM radio.
FM ST: Receiving FM stereo.
SLEEP: When the sleep timer is set.
AUTO STBY: Auto Standby is on.
5. Flashes when muting is on.
6. Displays various information of the input signals.
7. This may light when performing operations with the "NET" input
selector.
1
4
6
2
3
5
7
7
SN29402164_TX-NR656_BAS_En.book 27 ページ 2016年3月8日 火曜日 午後4時32分
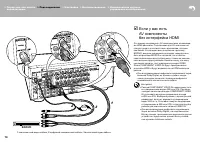
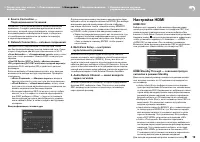
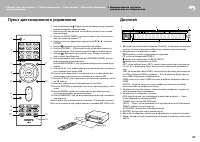
1. Кнопка включения : Переключает ресивер между ждущим
режимом standby и включением.
2. Кнопки селектора входов: для выбора входного источника
для ресивера
3.
Кнопка Q (QUICK MENU): для выполнения часто используе
-
мых настроек на экране TV
4. Кнопки стрелок управления курсором ▲ / ▼ / ► / ◄, и кнопка
ENTER
5. Кнопка : выводит на дисплей меню настройки
6. Кнопки VOLUME
+ / –
используйте для установки громкости
прослушивания. Они так же отменяют приглушение звука.
7. Кнопка : временно приглушает звук. Нажмите еще раз
для отмены приглушения.
8. Кнопки режимов прослушивания LISTENING MODE: для вы
-
бора режимов прослушивания.
Кнопка MAIN / ZONE 2: для управления мультизонными функ
-
циями.
9.
Кнопка PLAY: для управления воспроизведением с музыкаль
-
ного сервера или через USB
10. Кнопка: для управления повторным или случайным воспро
-
изведением с музыкального сервера или через USB
11. Кнопка CLEAR: для стирания всех символов при вводе текста
на Тв экране.
12. Кнопка i: переключает информацию на дисплее.
13. Кнопка RETURN: возвращает дисплей к предыдущему состо
-
янию.
14. Кнопка MODE: позволяет переключать автоматическую
и ручную настройки на радиостанции.
15. Кнопка MEMORY: для регистрации радиостанции (запомина
-
ния пресета)
используйте для управления источником. Эта кнопка не может
быть использована для управления источниками BD, DVD и CD.
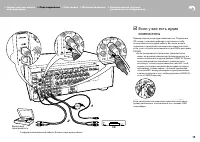
1. Дисплей колонок / каналов (Speaker / Channel): отображает выходные
каналы, соответствующие выбранному режиму прослушивания.
2. Загорается в следующих случаях.
:Загорается, когда подсоединены наушники.
Z2: когда активирована ZONE 2.
:Когда есть соединение по BLUETOOTH.
:Когда есть соединение по Wi-Fi.
NET: когда выбран вход «NET» селектором и ресивер подсоединен
к сети. Этот индикатор будет мигать если соединение неправиль
-
ное.
USB: когда выбран вход «NET» селектором и ресивер подсоединен
по USB и выбрано USB устройство. " Этот индикатор будет мигать
если USB соединение неправильное.
HDMI: когда поступают HDMI сигналы и выбран входной селектор
HDMI.
DIGITAL: когда на вход поступают цифровые сигналы и выбран
входной селектор цифрового входа
3.
Загорается в соответствии с типом входного цифрового аудио сиг
-
нала и режима прослушивания
4. Загорается в следующих случаях.
RDS (европейская, австралийская и азиатские модели) — Горит,
когда принимается вещание RDS
TUNED: идет прием AM / FM радио.
FM ST — Горит, когда принимается стереофоническое FM вещание
SLEEP: таймер сна установлен.
AUTO STBY: режим Auto Standby включен.
5. MUTING: мигает при приглушении звука.
6. Дисплей: отображает различную информацию о входных сигналах.
7. Может загораться при проведении операций с входным селектором
«NET».
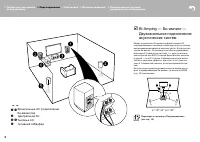
Пульт дистанционного управления
Дисплей
27
> Before start > Hookup > Setup > Playback
> Part Names
> Advanced Manual
Troubleshooting | Appendix
Remote Controller
1.
Í
button: Turns the unit on or into standby mode.
2. Input selector buttons: Switches the input to be played.
3. Q (QUICK MENU) button: You can perform common settings on
the TV screen.
4. Cursor buttons and ENTER button: Select the item with the
cursors and press ENTER to confirm your selection.
5.
button: Displays the Setup menu.
6. Volume buttons: Allows you to adjust the volume. This button
also cancels the muting.
7.
button: Temporarily mutes audio. Press again to cancel
muting.
8. LISTENING MODE buttons: Allows you to select the listening
mode.
MAIN/ZONE 2 buttons: Controls the multi-zone function.
9. Play button: Used for play operations when playing Music Server
or USB.
10.
button: Used for repeat or random play operations when
playing Music Server or USB.
CLEAR button: Deletes all characters you have entered when
entering text on the TV screen.
11.
button: Switches the information on the display.
12.
button: Returns the display to the previous state.
13. MODE button: Switches tuning to a station between automatic
tuning and manual tuning.
14. MEMORY button: Registers a radio station.
8
9
1
2
3
5
7
6
4
11
10
13
12
14
30°
30°
Approx.5 m
Display
1. Speaker/Channel display: Displays the output channel that
corresponds to the selected listening mode.
2. Lights in the following conditions.
Ë
: When headphones are connected.
Z2: When ZONE 2 is on.
: When connected by BLUETOOTH.
: When connected by Wi-Fi.
NET: When "NET" is selected with the input selector and the unit is
connected to the network. It will flash if the connection to the network
is not correct.
USB: When "NET" is selected with the input selector and the unit is
connected by USB and the USB device is selected. Flashes if the
USB is not properly connected.
HDMI: When HDMI signals are input and the HDMI input is selected.
DIGITAL: When digital signals are input and the digital input is
selected.
3. Lights according to the type of input digital audio signals and the
listening mode.
4. Lights in the following conditions.
RDS (European, Australian and Asian models): Receiving RDS
broadcasting.
TUNED: Receiving AM/FM radio.
FM ST: Receiving FM stereo.
SLEEP: When the sleep timer is set.
AUTO STBY: Auto Standby is on.
5. Flashes when muting is on.
6. Displays various information of the input signals.
7. This may light when performing operations with the "NET" input
selector.
1
4
6
2
3
5
7
7
SN29402164_TX-NR656_BAS_En.book 27 ページ 2016年3月8日 火曜日 午後4時32分
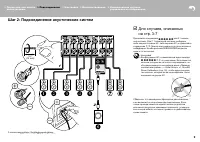
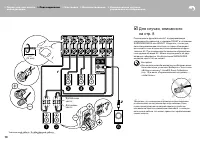
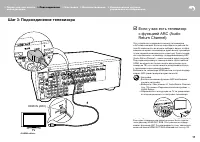
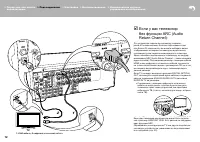
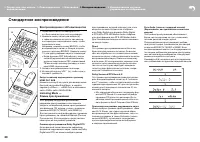
Содержание
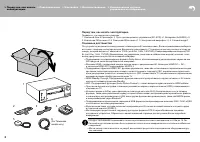
- 2 Перед тем, как начать эксплуатацию; Main features
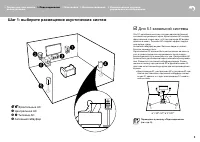
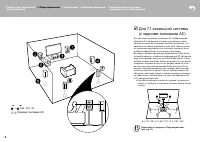
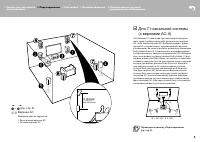
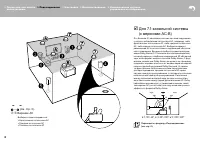
- 3 Шаг 1: выберите размещение акустических систем; Фронтальные Ас; Step1: Choose your Speaker Layout
- 4 Surround Back Speakers); Surround Back Speakers; Surround Back Speakers)
- 5 or more
- 8 Фронтальные Ас (подключение; Двухканальное подключение; Speakers
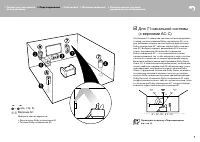
- 9 Для случаев, описанных; Step2: Connect the Speakers
- 10 Для случая, описанного
- 11 Шаг 3: Подсоединение телевизора; если у вас есть телевизор; Step3: Connect the TV; ARC TV
- 12 если у вас телевизор
- 13 Step4: Connect the AV Components; HDMI AV Components
- 14 OR; Non-HDMI AV Components; если у вас есть
- 15 Audio Components; если у вас есть аудио; Audio Components
- 16 MAIN ROOM; Multi-zone Connection; Мультизонные соединения
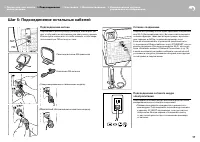
- 17 Шаг 5: Подсоединение остальных кабелей; Сетевое соединение; Step5: Connect Other Cables; Step5: Connect Other Cables
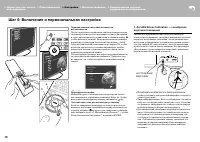
- 18 Шаг 6: Включение и первоначальная настройка; AccuEQ Room Calibration; SETUP MIC; AccuEQ Room Calibration; SETUP MIC
- 19 HDMI Setup; HDMI Setup
- 20 Воспроизведение с AV-компонентов; Listening Mode —; AV Component Playback; AV Component Playback; Стандартное воспроизведение
- 21 Network Services; Network Functions; Network Services; Сетевые функции
- 22 Воспроизведение через BLUETOOTH; AirPlay
- 23 Прослушивание радио; Мультизонные режимы; Listening To the Radio; Прочее; Listening To the Radio; Others; Listening To the Radio
- 24 Прочие функции; When the unit is operating erratically; Если ресивер работает с ошибками
- 25 Front Panel; Передняя панель
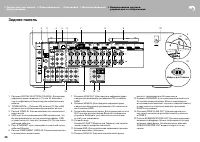
- 26 Rear Panel; Задняя панель
- 27 Пульт дистанционного управления
- 28 Информация о лицензиях и торговых марках

