Усилители Onkyo TX-NR656 - инструкция пользователя по применению, эксплуатации и установке на русском языке. Мы надеемся, она поможет вам решить возникшие у вас вопросы при эксплуатации техники.
Если остались вопросы, задайте их в комментариях после инструкции.
"Загружаем инструкцию", означает, что нужно подождать пока файл загрузится и можно будет его читать онлайн. Некоторые инструкции очень большие и время их появления зависит от вашей скорости интернета.


20
> Перед тем, как начать
эксплуатацию
> Подсоединение > Настройка
> Воспроизведение
> Наименования органов
управления и отображения
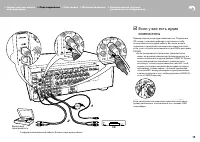
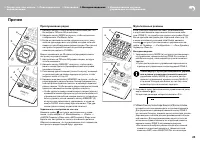
Воспроизведение с AV-компонентов
1. Переключите вход телевизора на тот,
что был назначен для него на ресивере.
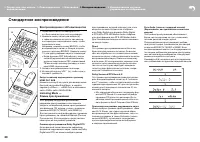
2. Нажмите кнопку селектора входов (а)
с таким же именем на пульте, как разъем,
к которому вы подсоединили плеер, чтобы
переключить вход.
Например, нажмите кнопку BD / DVD, чтобы
воспроизводить сигнал с плеера, подклю
-
ченного к разъему BD / DVD. Нажмите кнопку
TV для прослушивания звука с телевизора.
•
Когда функции CEC link работает, входы
сигнала переключаются автоматически,
когда вы подключаете CEC-совместимый
Тв или плеер к данному ресиверу с помо
-
щью HDMI-подключения.
3.
Начните воспроизведение на плеере.
4. используйте ручку VOL
+ / –
(b), чтобы отрегу
-
лировать громкость.
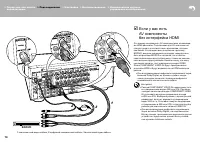
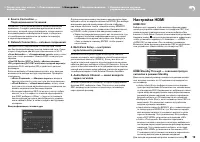
Когда телевизор подсоединен к разъему
HDMI OUT SUB
Нажмите кнопку Q на пульте для вывода меню
быстрой настройки Quick Menu, и задайте
параметр «Other» — «HDMI Out» в положение
либо «SUB», либо «MAIN+SUB».
Listening Mode —
Режим прослушивания
Этот ресрвер оборудован различными
режимами прослушивания, и вы сможете
выбрать оптимальный режим прослушивания
для фильмов, Тв, музыки, и игры с помощью
режимов MOVIE / TV, MUSIC, and GAME (с).
Для получения полной информации о режимах
прослушивания, см. Advanced Manual (Полное
руководство). в этом разделе представлены
некоторые из популярных режимов.
Режимы прослушивания Dolby Digital / DTS
Когда входной сигнал является цифровым
форматом окружающего звука, таким как Dolby
Digital или DTS, вы можете выбрать режим
прослушивания, который подходит для этого
входного сигнала. На дисплее отобража
-
ется Dolby Digital для формата Dolby Digital
и DTS-HD и DTS-HD Master Audio отобража
-
ется для формата для DTS-HD Master Audio.
Для 2-канальных входных сигналов назначает
-
ся выход стерео.
Direct
Этот режим прослушивания может быть вы
-
бран для всех входных сигналов. Он выклю
-
чает все обработки, что положительно влияет
на качество звука, чтобы реализовать качество
воспроизведения звука, близкое к исходному
в источнике. Ас воспроизводят звуковое поле
согласно числу каналов во входном сигнале,
так что в этом случае звук будет выведены
только из двух фронтальных колонок, напри
-
мер для 2-канального сигнала.
Dolby Surround / DTS Neural:X
Этот режим прослушивания позволяет расши
-
рить воспроизводимый сигнал до 5.1 каналов
или 7.1 каналов, чтобы соответствовать конфи
-
гурации подсоединенных Ас при поступлении
на вход для 2-канального сигнала или 5.1-ка
-
нального сигнала.
•
Мы планируем обеспечить поддержку фор
-
матов DTS Neural:X с помощью апгрейды
прошивки ПО для этого ресивера. До по
-
явления новой прошивки можно использо
-
вать форматы Neo:6 Cinema и Neo:6 Music.
Оригинальные режимы окружающего звука
Можно выбрать режимы прослушивания, такие
как All Ch Stereo, где стерео звуковой образ
воспроизводится как фронтальными, так и ты
-
ловыми колонками, а так же Orchestra (только
кнопкой MUSIC), лучше всего подходящий
для воспроизведения классической музыки
и оперных произведений.
Pure Audio (только с передней панели)
(Европейские, австралийские и азиатские
модели)
Этот режим прослушивания обеспечивает
более чистое звучание за счет отключения
питания дисплея и видео цепей.
Последний режим прослушивания, выбран
-
ный для источника, запоминается для каждой
из кнопок MOVIE / TV, MUSIC и GAME. если
воспроизводимый контент не поддерживается
последним выбранным режимом прослушива
-
ния, автоматически выбирается стандартный
режим для подобного контента.
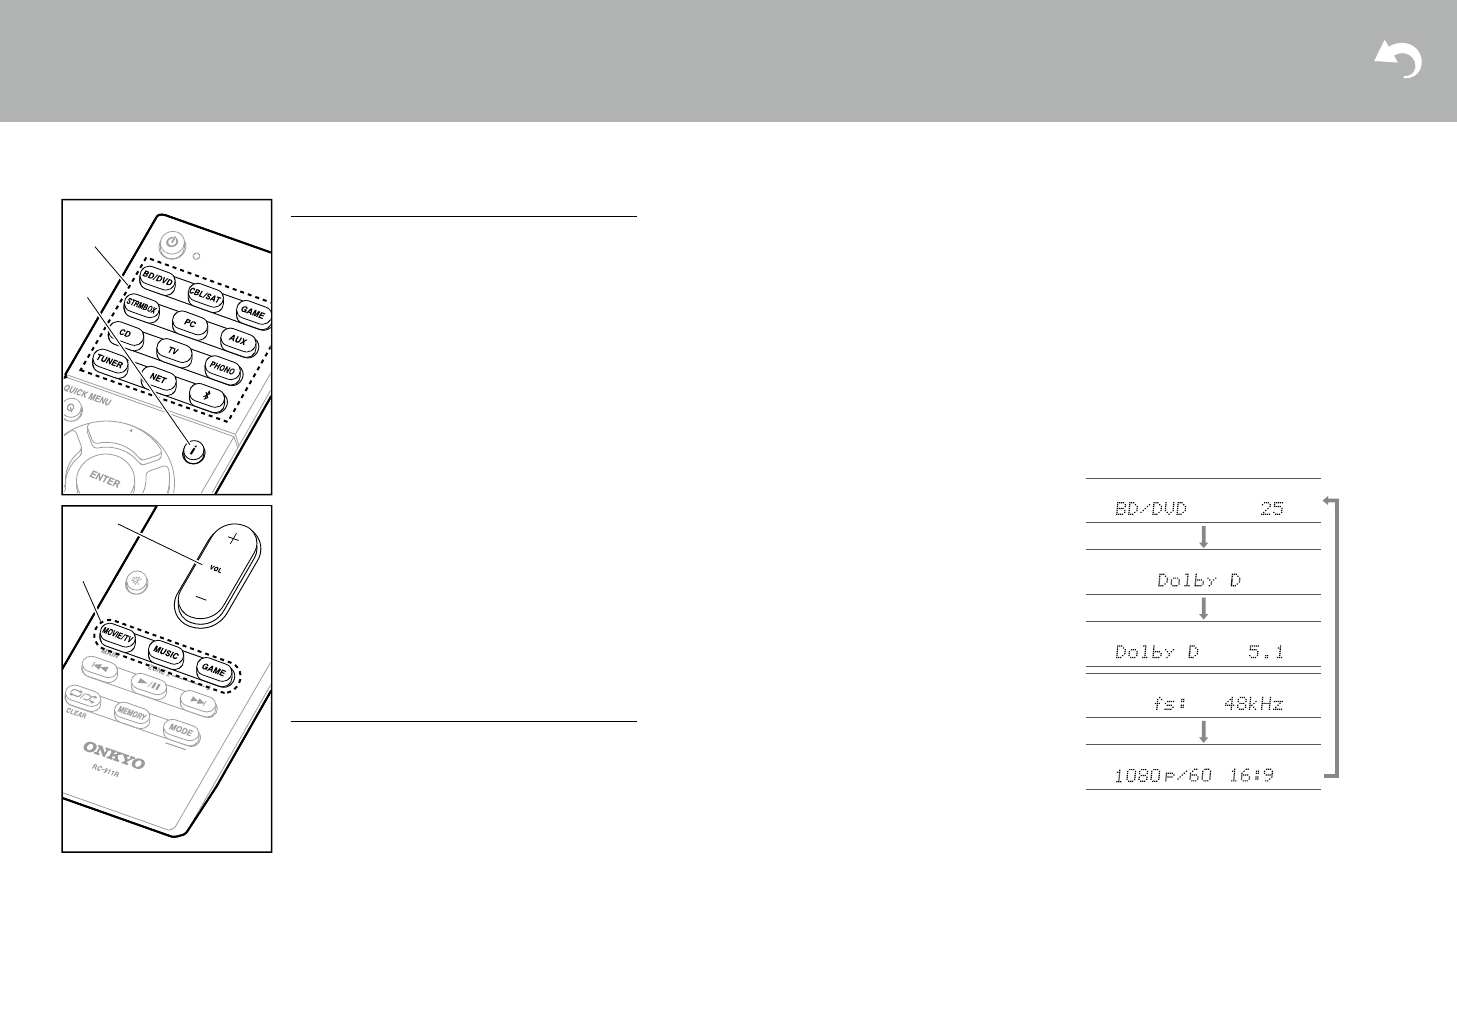
Нажимайте
i
(d) несколько раз для переключе
-
ния отображения на дисплее передней панели.
20
> Before start > Hookup > Setup
> Playback
> Part Names
> Advanced Manual
Troubleshooting | Appendix
Basic Playback
AV Component Playback
1. Switch the input on the TV to that assigned to
the unit.
2. Press the input selector (a) on the remote
controller with the same name as the jack to
which you connected the player to switch the
input.
For example, press BD/DVD to play the
player connected to the BD/DVD jack. Press
TV to listen the TV's sound.
0
When the CEC link function works, the
input switches automatically when you
have connected a CEC compliant TV and
player to this unit using HDMI connection.
3. Start play on the player.
4. Use VOL+/– (b) to adjust the volume.
When a TV is connected to the HDMI OUT
SUB jack
Press Q on the remote controller to display the
Quick Menu, and set "Other" – "HDMI Out" to
either "SUB" or "MAIN+SUB".
Listening Mode
This unit is equipped with a variety of listening
modes, and you can select the optimum
listening mode for movies, TV, music, and
games using MOVIE/TV, MUSIC, and GAME
(c). For details on the listening modes, see the
Advanced Manual. This section introduces
some of the popular modes.
Dolby Digital/DTS modes
When the input signal is a digital surround
format such as Dolby Digital or DTS, you can
select the listening mode that suits the input
signal. Dolby Digital is displayed for Dolby
Digital and DTS-HD Master Audio is displayed
for DTS-HD Master Audio. The output is stereo
for 2-channel input signals.
Direct
This listening mode can be selected for all input
signals. It shuts down processing that affects
sound quality to deliver a playback sound quality
closer to sources. Speakers play the sound field
according to the number of channels in the input
signal, so there would be output from only the
front speakers for a 2 ch signal, for example.
Dolby Surround/DTS Neural:X
These listening modes allow you to expand the
playback signal to 5.1 channels or 7.1 channels
to suit the connected speaker configuration
when the input signal is 2 channels or
5.1 channels.
0
We plan to provide support for the DTS
Neural:X a firmware update for this unit. You
can select Neo:6 Cinema and Neo:6 Music
until the update.
Original surround modes
You can select listening modes such as the All
Ch Stereo mode where a stereo image is played
from both the front and the rear, and Orchestra
(only with the MUSIC button) which is best for
playback of classical and opera pieces.
Pure Audio (on the main unit only)
(European, Australian and Asian models)
Listening mode that provides purer sound
quality by switching off the power of the display
and analog video circuits.
The listening mode last selected for the source
is remembered for each of the MOVIE/TV,
MUSIC, and GAME buttons. If content you play
is not supported by the listening mode you
selected last, the listening mode that is standard
for that content is selected automatically.
Press (d) repeatedly to switch the display of
the main unit in order of:
c
b
d
a
SN29402164_TX-NR656_BAS_En.book 20 ページ 2016年3月8日 火曜日 午後4時32分
Стандартное воспроизведение
Содержание
- 2 Перед тем, как начать эксплуатацию; Main features
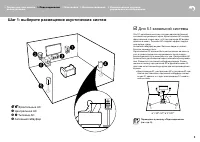
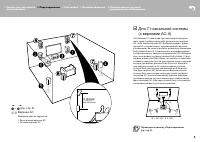
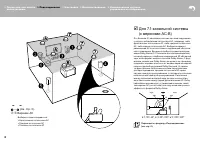
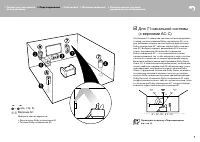
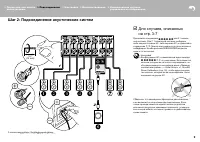
- 3 Шаг 1: выберите размещение акустических систем; Фронтальные Ас; Step1: Choose your Speaker Layout
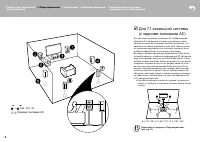
- 4 Surround Back Speakers); Surround Back Speakers; Surround Back Speakers)
- 5 or more
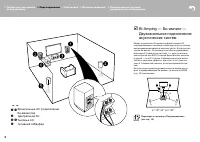
- 8 Фронтальные Ас (подключение; Двухканальное подключение; Speakers
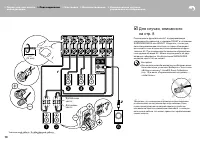
- 9 Для случаев, описанных; Step2: Connect the Speakers
- 10 Для случая, описанного
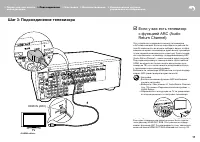
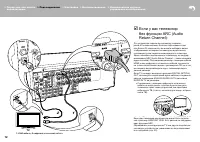
- 11 Шаг 3: Подсоединение телевизора; если у вас есть телевизор; Step3: Connect the TV; ARC TV
- 12 если у вас телевизор
- 13 Step4: Connect the AV Components; HDMI AV Components
- 14 OR; Non-HDMI AV Components; если у вас есть
- 15 Audio Components; если у вас есть аудио; Audio Components
- 16 MAIN ROOM; Multi-zone Connection; Мультизонные соединения
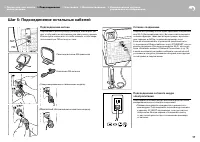
- 17 Шаг 5: Подсоединение остальных кабелей; Сетевое соединение; Step5: Connect Other Cables; Step5: Connect Other Cables
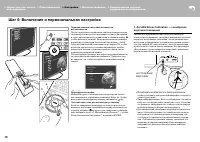
- 18 Шаг 6: Включение и первоначальная настройка; AccuEQ Room Calibration; SETUP MIC; AccuEQ Room Calibration; SETUP MIC
- 19 HDMI Setup; HDMI Setup
- 20 Воспроизведение с AV-компонентов; Listening Mode —; AV Component Playback; AV Component Playback; Стандартное воспроизведение
- 21 Network Services; Network Functions; Network Services; Сетевые функции
- 22 Воспроизведение через BLUETOOTH; AirPlay
- 23 Прослушивание радио; Мультизонные режимы; Listening To the Radio; Прочее; Listening To the Radio; Others; Listening To the Radio
- 24 Прочие функции; When the unit is operating erratically; Если ресивер работает с ошибками
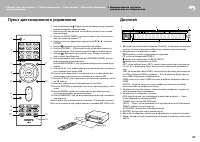
- 25 Front Panel; Передняя панель
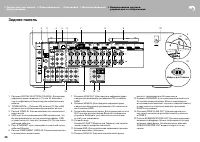
- 26 Rear Panel; Задняя панель
- 27 Пульт дистанционного управления
- 28 Информация о лицензиях и торговых марках

