Усилители Onkyo TX-NR656 - инструкция пользователя по применению, эксплуатации и установке на русском языке. Мы надеемся, она поможет вам решить возникшие у вас вопросы при эксплуатации техники.
Если остались вопросы, задайте их в комментариях после инструкции.
"Загружаем инструкцию", означает, что нужно подождать пока файл загрузится и можно будет его читать онлайн. Некоторые инструкции очень большие и время их появления зависит от вашей скорости интернета.


23
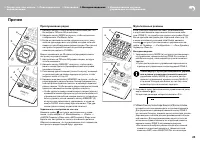
> Перед тем, как начать
эксплуатацию
> Подсоединение > Настройка
> Воспроизведение
> Наименования органов
управления и отображения
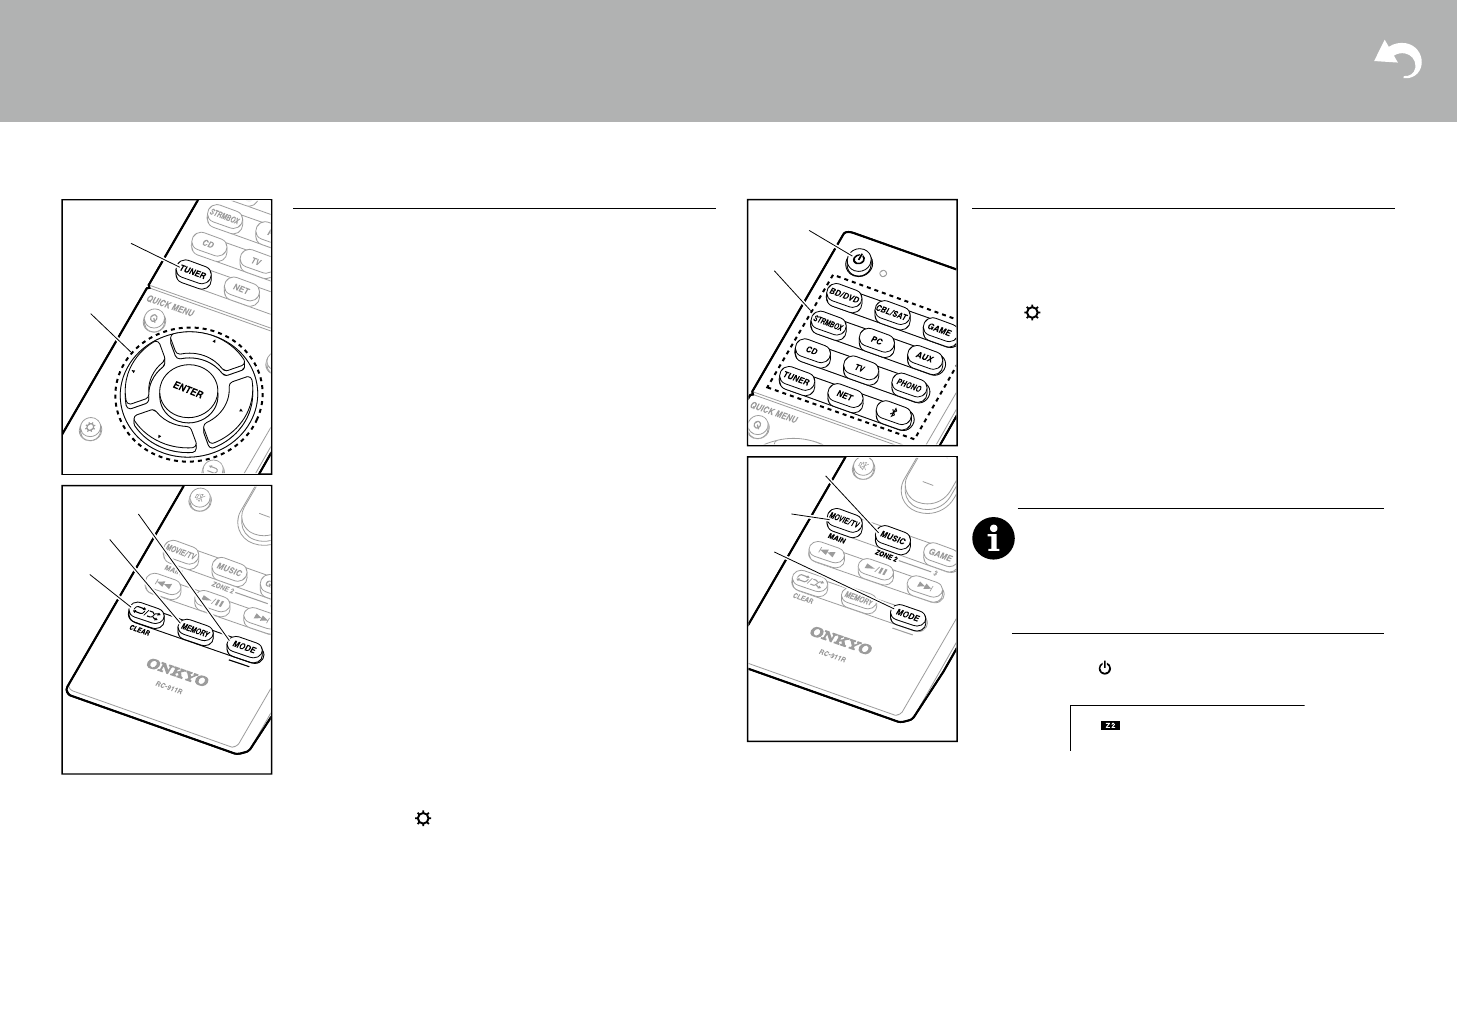
Прослушивание радио
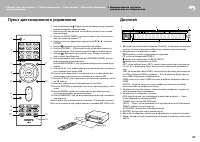
1. Нажмите кнопку TUNER на пульте несколько раз, что
-
бы выбрать FM или AM на дисплее.
2. Нажмите кнопку MODE на пульте, чтобы на дисплее
отобразилось «TunMode: Auto».
3.
Когда вы нажимаете кнопки курсора на пульте, запу
-
скается процедура авто настройки, которая останав
-
ливается при обнаружении радиостанции. При точной
настройке на радиостанцию на дисплее ресивера
появляется надпись «TUNED».
Можно запоминать до 40 пресетов (предварительных
настроек) на радиостанции.
1. Настройтесь на FM или AM радиостанцию, которую
хотите запомнить.
2. Нажмите кнопку MEMORY на пульте, чтобы начал
мигать номер пресета (предварительной настройки
на радиостанцию).
3.
Пока номер пресета мигает (около 8 секунд), нажимай
-
те несколько раз на кнопки курсора на пульте, чтобы
выбрать число от 0 до 40.
4. Нажмите еще раз кнопку MEMORY на пульте, чтобы за
-
регистрировать радиостанцию. Номер предваритель
-
ной настройки перестает мигать, и ресивер сохраняет
радиостанцию. Чтобы вызвать радиостанцию из списка
пресетов, нажимайте кнопки курсора на пульте.
•
Чтобы удалить предустановленную станцию (пресет),
нажимайте кнопки курсора на пульте дистанционного
управления для выбора номера пресета, который вы
хотите удалить, затем нажмите кнопку MEMORY (D)
на пульте дистанционного управления, а затем на
-
жмите CLEAR, пока номер пресета мигает. При уда
-
лении пресета номер на дисплей погаснет.
Задание шага настройки по частоте
Нажмите кнопку на пульте дистанционного управ
-
ления, чтобы выбрать «7. Miscellaneous» — «Tuner» —
«AM / FM Frequency Step» или «AM Frequency Step» и вы
-
берите шаг настройки по частоте для вашего региона.
Обратите внимание, что при изменении этого параметра,
все пресеты радиостанций будут удалены.
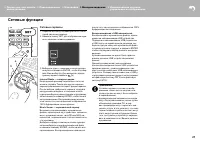
Мультизонные режимы
если у вас акустические системы, установленные
в отдельной комнате подключены колоночным кабе
-
лем (ZONE 2), то потребуется сделать настройки. если
вы не сделали настройки для отдельной зоны (стр. 19)
в меню начальной установки Initial Setup, нажмите
кнопку на пульте дистанционного управления и за
-
дайте «2. Speaker» — «Configuration» — «Zone Speaker»
параметр «Zone 2».
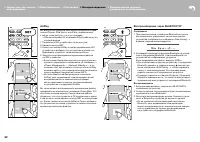
Воспроизведение
1. Удерживая кнопку MODE (a) на пульте дистанционно
-
го управления, нажмите кнопку ZONE 2 в течение 3
или более секунд, пока индикатор пульта не мигнет
дважды.
•
Пульт дистанционного управления переключится
в режим для управления контролируемой ZONE 2.
Чтобы вернуть пульт дистанционного управле-
ния в режим управления главной комнатой:
удерживая кнопку MODE (a) на пульте дистан
-
ционного управления, нажмите кнопку MAIN (C)
в течение 3 секунд или более, до тех пор, пока
индикатор пульта не мигнет один раз.
2. Направьте пульт дистанционного управления на реси
-
вер и нажмите (д).
На дисплее ресивера загорится надпись» Z2».
> Before start > Hookup > Setup
> Playback
> Part Names
> Advanced Manual
Troubleshooting | Appendix
23
Others
Listening To the Radio
1. Press TUNER (a) on the remote controller repeatedly to
select either "AM" or "FM" on the display.
2. Press MODE (c) on the remote controller, so that the
"TunMode: Auto" is displayed on the display.
3. When you press the
S
/
T
cursor (b) buttons on the
remote controller, automatic tuning starts, and searching
stops when a station is found. When tuned into a radio
station, the "TUNED" indicator on the display lights.
You can preset up to 40 stations.
1. Tune into the AM/FM radio station you want to register.
2. Press MEMORY (d) on the remote controller so that the
preset number on the display flashes.
3. While the preset number is flashing (about 8 seconds),
repeatedly press the
W
/
X
cursor (b) buttons on the
remote controller to select a number between 1 and 40.
4. Press MEMORY (d) again on the remote controller to
register the station. When registered, the preset number
stops flashing. To select a preset radio station, press the
W
/
X
cursor (b) buttons on the remote controller.
0
To delete a preset station, press the
W
/
X
cursor (b)
buttons on the remote controller to select the preset
number you want to delete, press MEMORY (d) on the
remote controller and then press CLEAR (e) while the
preset number is flashing. When deleted, the number on
the display goes off.
Frequency step setting
Press the button on the remote controller to select "7.
Miscellaneous" – "Tuner" – "AM/FM Frequency Step" or
"AM Frequency Step" and select the frequency step for
your area. For Taiwanese models, the setting is "10 kHz /
0.2 MHz" at the time of purchase. Please change it to
"9 kHz / 0.05 MHz". Note that when this setting is changed,
all radio presets are deleted.
a
b
c
d
e
Multi-zone
Settings are required if you have connected the speakers
in the separate room (ZONE 2) using speaker cables. If
you haven't made the Multi Zone settings (
Ä
P19) in Initial
Setup, press the button on the remote controller and
set "2. Speaker" – "Configuration" – "Zone Speaker" to
"Zone 2".
Play
1. While holding down MODE (a) on the remote controller,
press ZONE 2 (b) for 3 or more seconds until the remote
indicator blinks twice.
0
The remote controller switches to the mode for
controlling ZONE 2.
2. Point the remote controller at the main unit and press
Í
(d).
"Z2" lights on the main unit display.
3. Press the input selector button (e) of the input to be
played in the separate room. To control on the main unit,
press ZONE 2 and within 8 seconds, press the input
selector button of the input to be played in a separate
room. To play the same source in the main room and
separate room, press ZONE 2 on the main unit twice.
0
You cannot select different inputs for the main room
and separate room with the "NET" or "BLUETOOTH"
input selector. You cannot select different stations for
the main room and separate room with the AM/FM
radio. When you select an input or station for the
separate room, the main room also switches.
4. Volume adjustment is done on the pre-main amplifier for
To return the remote controller to main room control
mode:
While holding down MODE (a) on the remote
controller, press MAIN (c) for 3 seconds or more until the
remote indicator flashes once.
d
e
a
b
c
SN29402164_TX-NR656_BAS_En.book 23 ページ 2016年3月8日 火曜日 午後4時32分
3.
Нажмите кнопку селектора входов (е) для источника,
который хотите воспроизводить в отдельной комнате.
Для управления с ресивера нажмите кнопку ZONE 2
и в течение 8 секунд, нажмите кнопку селектора для вы
-
бора входного сигнала для воспроизведения в отдель
-
ной комнате. Для воспроизведения одного и того же
источника в главной комнате и в отдельной комнате,
нажмите кнопку ZONE 2 на ресивере два раза.
•
вы не можете выбрать разные входы для главной
комнаты и отдельной комнаты с такими источни
-
ками как «NET» или «BLUETOOTH» на селекторе
Прочее
> Before start > Hookup > Setup
> Playback
> Part Names
> Advanced Manual
Troubleshooting | Appendix
23
Others
Listening To the Radio
1. Press TUNER (a) on the remote controller repeatedly to
select either "AM" or "FM" on the display.
2. Press MODE (c) on the remote controller, so that the
"TunMode: Auto" is displayed on the display.
3. When you press the
S
/
T
cursor (b) buttons on the
remote controller, automatic tuning starts, and searching
stops when a station is found. When tuned into a radio
station, the "TUNED" indicator on the display lights.
You can preset up to 40 stations.
1. Tune into the AM/FM radio station you want to register.
2. Press MEMORY (d) on the remote controller so that the
preset number on the display flashes.
3. While the preset number is flashing (about 8 seconds),
repeatedly press the
W
/
X
cursor (b) buttons on the
remote controller to select a number between 1 and 40.
4. Press MEMORY (d) again on the remote controller to
register the station. When registered, the preset number
stops flashing. To select a preset radio station, press the
W
/
X
cursor (b) buttons on the remote controller.
0
To delete a preset station, press the
W
/
X
cursor (b)
buttons on the remote controller to select the preset
number you want to delete, press MEMORY (d) on the
remote controller and then press CLEAR (e) while the
preset number is flashing. When deleted, the number on
the display goes off.
Frequency step setting
Press the button on the remote controller to select "7.
Miscellaneous" – "Tuner" – "AM/FM Frequency Step" or
"AM Frequency Step" and select the frequency step for
your area. For Taiwanese models, the setting is "10 kHz /
0.2 MHz" at the time of purchase. Please change it to
"9 kHz / 0.05 MHz". Note that when this setting is changed,
all radio presets are deleted.
a
b
c
d
e
Multi-zone
Settings are required if you have connected the speakers
in the separate room (ZONE 2) using speaker cables. If
you haven't made the Multi Zone settings (
Ä
P19) in Initial
Setup, press the button on the remote controller and
set "2. Speaker" – "Configuration" – "Zone Speaker" to
"Zone 2".
Play
1. While holding down MODE (a) on the remote controller,
press ZONE 2 (b) for 3 or more seconds until the remote
indicator blinks twice.
0
The remote controller switches to the mode for
controlling ZONE 2.
2. Point the remote controller at the main unit and press
Í
(d).
"Z2" lights on the main unit display.
3. Press the input selector button (e) of the input to be
played in the separate room. To control on the main unit,
press ZONE 2 and within 8 seconds, press the input
selector button of the input to be played in a separate
room. To play the same source in the main room and
separate room, press ZONE 2 on the main unit twice.
0
You cannot select different inputs for the main room
and separate room with the "NET" or "BLUETOOTH"
input selector. You cannot select different stations for
the main room and separate room with the AM/FM
radio. When you select an input or station for the
separate room, the main room also switches.
4. Volume adjustment is done on the pre-main amplifier for
To return the remote controller to main room control
mode:
While holding down MODE (a) on the remote
controller, press MAIN (c) for 3 seconds or more until the
remote indicator flashes once.
d
e
a
b
c
SN29402164_TX-NR656_BAS_En.book 23 ページ 2016年3月8日 火曜日 午後4時32分
Содержание
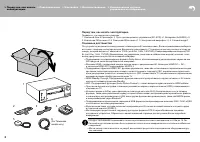
- 2 Перед тем, как начать эксплуатацию; Main features
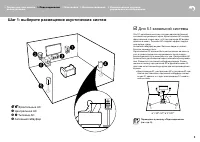
- 3 Шаг 1: выберите размещение акустических систем; Фронтальные Ас; Step1: Choose your Speaker Layout
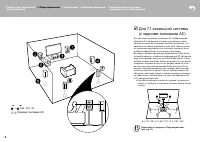
- 4 Surround Back Speakers); Surround Back Speakers; Surround Back Speakers)
- 5 or more
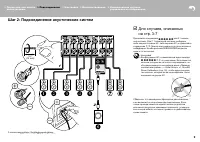
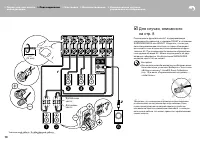
- 8 Фронтальные Ас (подключение; Двухканальное подключение; Speakers
- 9 Для случаев, описанных; Step2: Connect the Speakers
- 10 Для случая, описанного
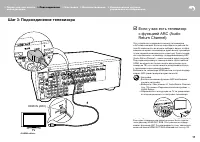
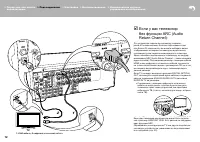
- 11 Шаг 3: Подсоединение телевизора; если у вас есть телевизор; Step3: Connect the TV; ARC TV
- 12 если у вас телевизор
- 13 Step4: Connect the AV Components; HDMI AV Components
- 14 OR; Non-HDMI AV Components; если у вас есть
- 15 Audio Components; если у вас есть аудио; Audio Components
- 16 MAIN ROOM; Multi-zone Connection; Мультизонные соединения
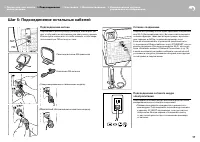
- 17 Шаг 5: Подсоединение остальных кабелей; Сетевое соединение; Step5: Connect Other Cables; Step5: Connect Other Cables
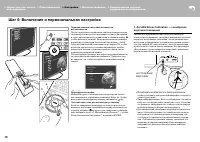
- 18 Шаг 6: Включение и первоначальная настройка; AccuEQ Room Calibration; SETUP MIC; AccuEQ Room Calibration; SETUP MIC
- 19 HDMI Setup; HDMI Setup
- 20 Воспроизведение с AV-компонентов; Listening Mode —; AV Component Playback; AV Component Playback; Стандартное воспроизведение
- 21 Network Services; Network Functions; Network Services; Сетевые функции
- 22 Воспроизведение через BLUETOOTH; AirPlay
- 23 Прослушивание радио; Мультизонные режимы; Listening To the Radio; Прочее; Listening To the Radio; Others; Listening To the Radio
- 24 Прочие функции; When the unit is operating erratically; Если ресивер работает с ошибками
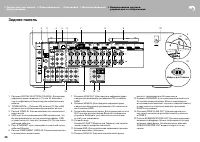
- 25 Front Panel; Передняя панель
- 26 Rear Panel; Задняя панель
- 27 Пульт дистанционного управления
- 28 Информация о лицензиях и торговых марках

