Усилители Onkyo TX-NR656 - инструкция пользователя по применению, эксплуатации и установке на русском языке. Мы надеемся, она поможет вам решить возникшие у вас вопросы при эксплуатации техники.
Если остались вопросы, задайте их в комментариях после инструкции.
"Загружаем инструкцию", означает, что нужно подождать пока файл загрузится и можно будет его читать онлайн. Некоторые инструкции очень большие и время их появления зависит от вашей скорости интернета.


17
> Перед тем, как начать
эксплуатацию
> Подсоединение
> Настройка > Воспроизведение > Наименования органов
управления и отображения
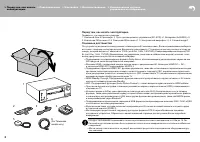
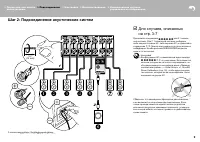
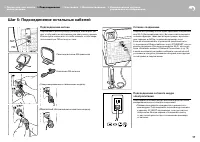
Шаг 5: Подсоединение остальных кабелей
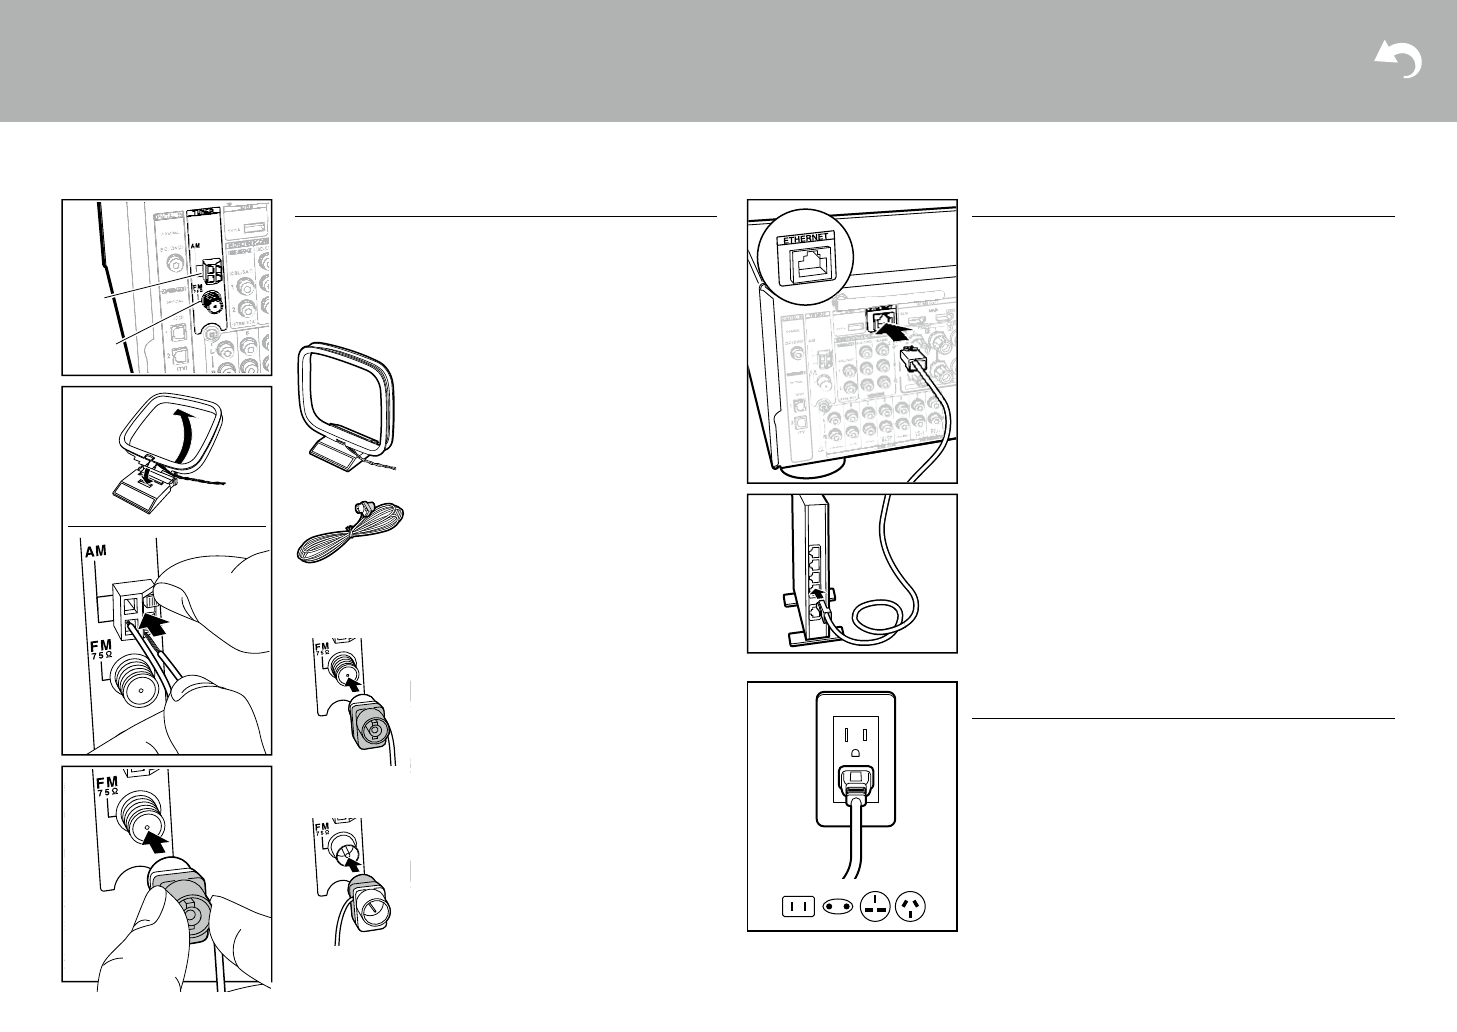
Сетевое соединение
Подключите ресивер к сети через проводное соединение
или Wi-Fi (беспроводная сеть). вы можете использовать
сетевые функции, такие как интернет-радио, музыкаль
-
ные серверы и AirPlay, подключив ресивер к сети.
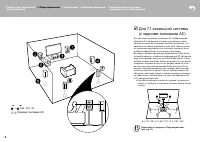
если вы подключаетесь к проводной локальной сети,
то подключите Ethernet кабель к порту ETHERNET, как по
-
казано на рисунке. Для подключения по Wi-Fi, после вы
-
бора «Wireless» в меню «3 Network Connection» (стр. 19)
в меню начальной настройки, выберите нужный способ
установки и следуйте указаниям на экране в инструкции
по настройке и подключению.
Подсоединение сетевого шнура
электропитания
Подсоедините сетевой шнур к настенной розетке после
заверешения всех остальных соединений.
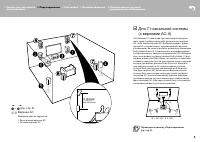
•
Тайваньские модели оснащаются съемным сете
-
вым шнуром. Подсоединяйте сетевой шнур сначала
к разъему AC INLET на ресивере, а потом к настен
-
ной розетке. всегда первым отсоединяйте вилку
от настенной розетки при отсоединении ресивера
от питания.
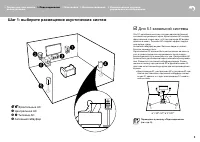
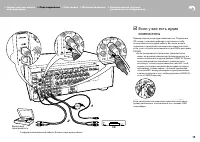
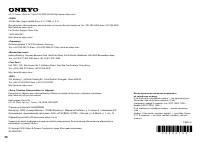
Подсоединение антенн
Перемещайте антенну вокруг ресивера, пока играет ра
-
дио, чтобы найти ее положение для наилучшего приема.
используйте кнопки или что-либо похожее, чтобы закре
-
пить комнатную FM-антенну к стене.
17
> Before start
> Hookup
> Setup > Playback > Part Names
> Advanced Manual
Troubleshooting | Appendix
Step5: Connect Other Cables
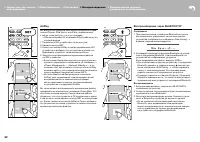
Antenna Hookup
Move the antenna around while playing the radio to find
the position with the best reception. Use a thumb tack or
similar to attach the indoor FM antenna to a wall.
(North American and Taiwanese models)
(European, Australian and Asian models)
AM loop antenna
Indoor FM antenna
AM
FM
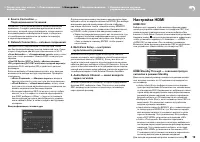
Network Hookup
Connect this unit to the network using wired LAN or Wi-Fi
(wireless LAN). You can enjoy network features such as
internet radio, Music Server, and AirPlay by connecting the
unit to the network.
If you connect by wired LAN, connect with an Ethernet
cable to the ETHERNET port as shown in the illustration.
To connect by Wi-Fi, then after selecting "Wireless" in "3.
Network Connection" (
Ä
P19) in Initial Setup, select the
desired setting method and follow the onscreen
instructions to configure the connection.
Power Cord Hookup
Connect the power cord to the power outlet after
completing all other connections.
0
Taiwanese models include removable power cords.
Connect the power cord to AC INLET of the unit and
then connect to the outlet. Always disconnect the outlet
side first when disconnecting the power cord.
SN29402164_TX-NR656_BAS_En.book 17 ページ 2016年3月8日 火曜日 午後4時32分
17
> Before start
> Hookup
> Setup > Playback > Part Names
> Advanced Manual
Troubleshooting | Appendix
Step5: Connect Other Cables
Antenna Hookup
Move the antenna around while playing the radio to find
the position with the best reception. Use a thumb tack or
similar to attach the indoor FM antenna to a wall.
(North American and Taiwanese models)
(European, Australian and Asian models)
AM loop antenna
Indoor FM antenna
AM
FM
Network Hookup
Connect this unit to the network using wired LAN or Wi-Fi
(wireless LAN). You can enjoy network features such as
internet radio, Music Server, and AirPlay by connecting the
unit to the network.
If you connect by wired LAN, connect with an Ethernet
cable to the ETHERNET port as shown in the illustration.
To connect by Wi-Fi, then after selecting "Wireless" in "3.
Network Connection" (
Ä
P19) in Initial Setup, select the
desired setting method and follow the onscreen
instructions to configure the connection.
Power Cord Hookup
Connect the power cord to the power outlet after
completing all other connections.
0
Taiwanese models include removable power cords.
Connect the power cord to AC INLET of the unit and
then connect to the outlet. Always disconnect the outlet
side first when disconnecting the power cord.
SN29402164_TX-NR656_BAS_En.book 17 ページ 2016年3月8日 火曜日 午後4時32分
рамочная антенна АМ диапазона
Комнатная FM-антенна
(североамериканские и тайваньские модели)
(европейские, австралийские и азиатские модели)
17
> Before start
> Hookup
> Setup > Playback > Part Names
> Advanced Manual
Troubleshooting | Appendix
Step5: Connect Other Cables
Antenna Hookup
Move the antenna around while playing the radio to find
the position with the best reception. Use a thumb tack or
similar to attach the indoor FM antenna to a wall.
(North American and Taiwanese models)
(European, Australian and Asian models)
AM loop antenna
Indoor FM antenna
AM
FM
Network Hookup
Connect this unit to the network using wired LAN or Wi-Fi
(wireless LAN). You can enjoy network features such as
internet radio, Music Server, and AirPlay by connecting the
unit to the network.
If you connect by wired LAN, connect with an Ethernet
cable to the ETHERNET port as shown in the illustration.
To connect by Wi-Fi, then after selecting "Wireless" in "3.
Network Connection" (
Ä
P19) in Initial Setup, select the
desired setting method and follow the onscreen
instructions to configure the connection.
Power Cord Hookup
Connect the power cord to the power outlet after
completing all other connections.
0
Taiwanese models include removable power cords.
Connect the power cord to AC INLET of the unit and
then connect to the outlet. Always disconnect the outlet
side first when disconnecting the power cord.
SN29402164_TX-NR656_BAS_En.book 17 ページ 2016年3月8日 火曜日 午後4時32分
Содержание
- 2 Перед тем, как начать эксплуатацию; Main features
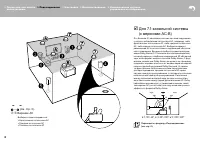
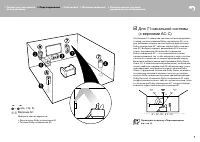
- 3 Шаг 1: выберите размещение акустических систем; Фронтальные Ас; Step1: Choose your Speaker Layout
- 4 Surround Back Speakers); Surround Back Speakers; Surround Back Speakers)
- 5 or more
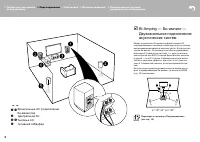
- 8 Фронтальные Ас (подключение; Двухканальное подключение; Speakers
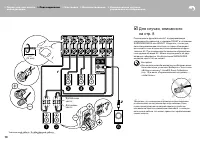
- 9 Для случаев, описанных; Step2: Connect the Speakers
- 10 Для случая, описанного
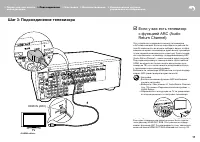
- 11 Шаг 3: Подсоединение телевизора; если у вас есть телевизор; Step3: Connect the TV; ARC TV
- 12 если у вас телевизор
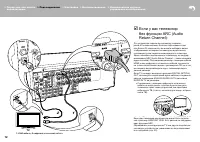
- 13 Step4: Connect the AV Components; HDMI AV Components
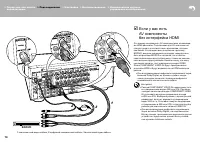
- 14 OR; Non-HDMI AV Components; если у вас есть
- 15 Audio Components; если у вас есть аудио; Audio Components
- 16 MAIN ROOM; Multi-zone Connection; Мультизонные соединения
- 17 Шаг 5: Подсоединение остальных кабелей; Сетевое соединение; Step5: Connect Other Cables; Step5: Connect Other Cables
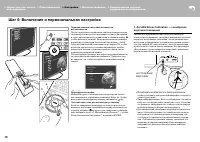
- 18 Шаг 6: Включение и первоначальная настройка; AccuEQ Room Calibration; SETUP MIC; AccuEQ Room Calibration; SETUP MIC
- 19 HDMI Setup; HDMI Setup
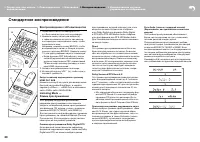
- 20 Воспроизведение с AV-компонентов; Listening Mode —; AV Component Playback; AV Component Playback; Стандартное воспроизведение
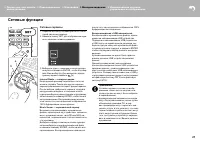
- 21 Network Services; Network Functions; Network Services; Сетевые функции
- 22 Воспроизведение через BLUETOOTH; AirPlay
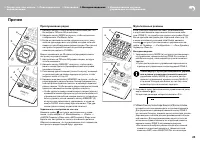
- 23 Прослушивание радио; Мультизонные режимы; Listening To the Radio; Прочее; Listening To the Radio; Others; Listening To the Radio
- 24 Прочие функции; When the unit is operating erratically; Если ресивер работает с ошибками
- 25 Front Panel; Передняя панель
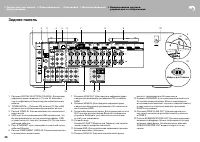
- 26 Rear Panel; Задняя панель
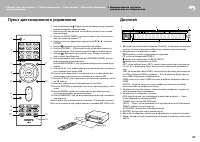
- 27 Пульт дистанционного управления
- 28 Информация о лицензиях и торговых марках

