Усилители Onkyo TX-NR656 - инструкция пользователя по применению, эксплуатации и установке на русском языке. Мы надеемся, она поможет вам решить возникшие у вас вопросы при эксплуатации техники.
Если остались вопросы, задайте их в комментариях после инструкции.
"Загружаем инструкцию", означает, что нужно подождать пока файл загрузится и можно будет его читать онлайн. Некоторые инструкции очень большие и время их появления зависит от вашей скорости интернета.


22
> Перед тем, как начать
эксплуатацию
> Подсоединение > Настройка
> Воспроизведение
> Наименования органов
управления и отображения
22
> Before start > Hookup > Setup
> Playback
> Part Names
> Advanced Manual
Troubleshooting | Appendix
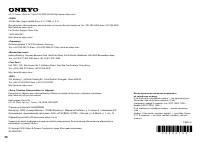
AirPlay
You can wirelessly enjoy the music files on an iPhone
®
,
iPod touch
®
, or iPad
®
connected to the same access point
as this unit.
0
Update the OS version on your iOS device to the latest
version.
1. Connect the iOS device to the access point.
2. Press NET.
3. Tap the AirPlay icon in the control center of the iOS
device and select this unit from the list of devices
displayed, and tap "Done".
4. Play the music files on the iOS device.
0
The default status is for the Network Standby feature to
be on, so when you do steps 3 and 4 above, this unit
automatically comes on and input switches to "NET". To
reduce the amount of power consumed in standby
mode, press the button on the remote controller,
then in the Setup menu displayed set "5. Hardware" –
"Power Management" – "Network Standby" to "Off".
0
Due to the characteristics of AirPlay wireless
technology, the sound produced on this unit may slightly
be behind the sound played on the AirPlay-enabled
device.
You can also play back music files on the computer with
iTunes (Ver. 10.2 or later). Before operation, make sure
this unit and the PC are connected to the same network,
then press NET on this unit. Next, click the AirPlay icon
in iTunes, select this unit from the list of devices displayed,
and start play of a music file.
TX-XXXXX
iPhone
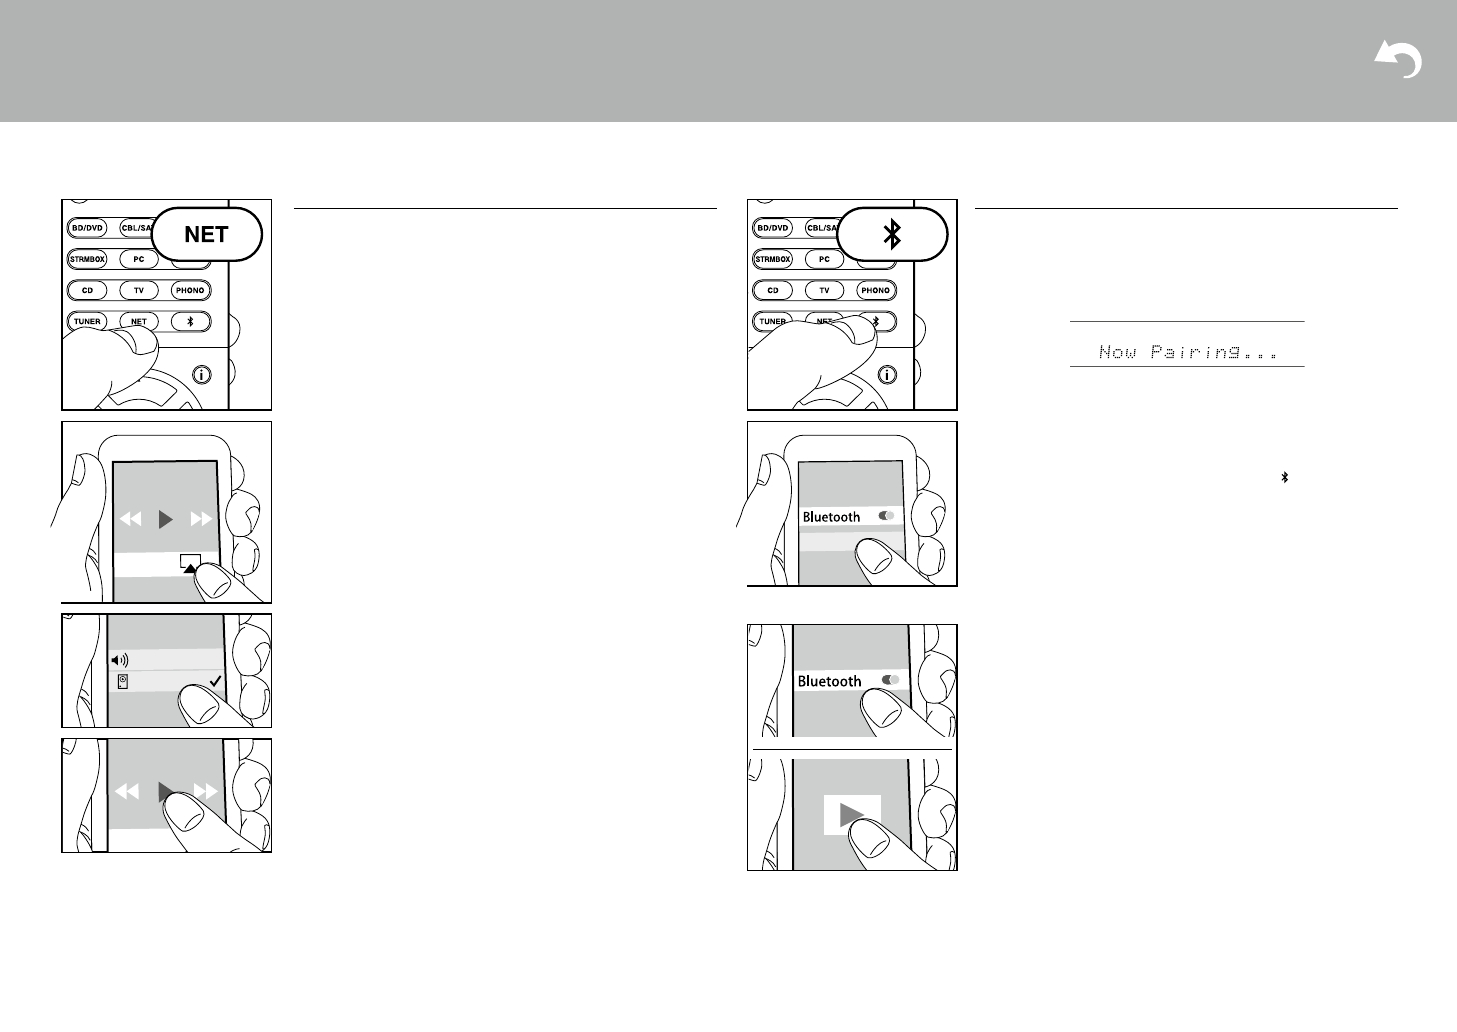
BLUETOOTH
®
Playback
Pairing
1. When you press the button on the remote controller,
"Now Pairing..." is displayed on this unit's display, and
the pairing mode is enabled.
2. Enable (turn on) the BLUETOOTH function of the
BLUETOOTH enabled device, then select this unit from
amongst the devices displayed.
If a password is requested, enter "0000".
0
To connect another BLUETOOTH enabled device, press
and hold the button until "Now Pairing..." is
displayed, then perform step 2 above. This unit can
store the data of up to 8 paired devices.
0
The coverage area is 48 feet (15 meters). Note that
connection is not always guaranteed with all
BLUETOOTH enabled devices.
Playing Back
1. When the unit is on, connect the BLUETOOTH enabled
device.
2. The input selector of this unit will be automatically
switched to "BLUETOOTH".
3. Play music. Increase the volume of the BLUETOOTH
enabled device to an appropriate level.
0
Due to the characteristics of BLUETOOTH wireless
technology, the sound produced on this unit may slightly
be behind the sound played on the BLUETOOTH
enabled device.
TX-XXXXX
SN29402164_TX-NR656_BAS_En.book 22 ページ 2016年3月8日 火曜日 午後4時32分
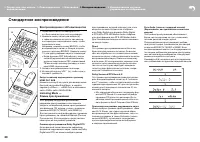
Воспроизведение через BLUETOOTH
®
Сопряжение
1. При нажатии кнопки с символом Bluetooth на пульте
дистанционного управления, на дисплее данного
устройства отображается сообщение «Now Pairing…»
и режим сопряжения активируется.
22
> Before start > Hookup > Setup
> Playback
> Part Names
> Advanced Manual
Troubleshooting | Appendix
AirPlay
You can wirelessly enjoy the music files on an iPhone
®
,
iPod touch
®
, or iPad
®
connected to the same access point
as this unit.
0
Update the OS version on your iOS device to the latest
version.
1. Connect the iOS device to the access point.
2. Press NET.
3. Tap the AirPlay icon in the control center of the iOS
device and select this unit from the list of devices
displayed, and tap "Done".
4. Play the music files on the iOS device.
0
The default status is for the Network Standby feature to
be on, so when you do steps 3 and 4 above, this unit
automatically comes on and input switches to "NET". To
reduce the amount of power consumed in standby
mode, press the button on the remote controller,
then in the Setup menu displayed set "5. Hardware" –
"Power Management" – "Network Standby" to "Off".
0
Due to the characteristics of AirPlay wireless
technology, the sound produced on this unit may slightly
be behind the sound played on the AirPlay-enabled
device.
You can also play back music files on the computer with
iTunes (Ver. 10.2 or later). Before operation, make sure
this unit and the PC are connected to the same network,
then press NET on this unit. Next, click the AirPlay icon
in iTunes, select this unit from the list of devices displayed,
and start play of a music file.
TX-XXXXX
iPhone
BLUETOOTH
®
Playback
Pairing
1. When you press the button on the remote controller,
"Now Pairing..." is displayed on this unit's display, and
the pairing mode is enabled.
2. Enable (turn on) the BLUETOOTH function of the
BLUETOOTH enabled device, then select this unit from
amongst the devices displayed.
If a password is requested, enter "0000".
0
To connect another BLUETOOTH enabled device, press
and hold the button until "Now Pairing..." is
displayed, then perform step 2 above. This unit can
store the data of up to 8 paired devices.
0
The coverage area is 48 feet (15 meters). Note that
connection is not always guaranteed with all
BLUETOOTH enabled devices.
Playing Back
1. When the unit is on, connect the BLUETOOTH enabled
device.
2. The input selector of this unit will be automatically
switched to "BLUETOOTH".
3. Play music. Increase the volume of the BLUETOOTH
enabled device to an appropriate level.
0
Due to the characteristics of BLUETOOTH wireless
technology, the sound produced on this unit may slightly
be behind the sound played on the BLUETOOTH
enabled device.
TX-XXXXX
SN29402164_TX-NR656_BAS_En.book 22 ページ 2016年3月8日 火曜日 午後4時32分
2. Активируйте (включите) функцию Bluetooth на устрой
-
стве с поддержкой Bluetooth, а затем выберите это
устройство из отображаемых устройств.
если запрашивается пароль, введите «0000».
•
Для подключения к другому устройству с поддержкой
Bluetooth, нажмите и удержите кнопку , пока не поя
-
вится сообщение «Now Pairing…», затем перейдите
к шагу 2, описанному выше. Этот ресивер может
хранить данные до 8 сопряженных устройств.
•
Площадь покрытия составляет 48 футов (15 метров).
Обратите внимание на то, что связь не всегда гаран
-
тирована для всех устройств с поддержкой Bluetooth.
Воспроизведение
1. Когда ресивер включен, подключите BLUETOOTH
оснащенное устройство.
2. селектор входов этого ресивера будет автоматически
переключаться на «Bluetooth».
3.
Запустите воспроизведение музыки. Увеличьте гром
-
кость в Bluetooth устройстве до должного уровня.
•
из-за особенностей беспроводной технологии
Bluetooth, звук, выдаваемый этим ресивером,
может воспроизводиться с незначительной задерж
-
кой по сравнению со звуком, воспроизводимым
на устройстве с поддержкой Bluetooth.
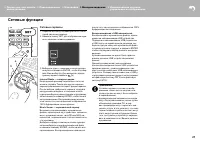
AirPlay
вы можете без проводов наслаждаться музыкой из фай
-
лов на iPhone
®
, iPod touch
®
, или iPad
®
, подключенных
к той же точке доступа, что и этот ресивер.
•
Обновите версию Ос на вашем iOS устройстве до по
-
следней версии.
1. Подключите iOS-устройство к точке доступа.
2. Нажмите кнопку NET.
3.
Коснитесь значка AirPlay в центре управления в iOS
устройстве и выберите это устройство в списке ото
-
бражаемых устройств, затем нажмите «Done».
4. Запустите воспроизведение музыкальных файлов
на iOS устройстве.
•
если в меню Настройки на кнопку на пульте дистан
-
ционного управления отображается «5. Hardware» —
«Power Management» — «Network Standby» — в по
-
ложении «On» при нажатии, тогда как только AirPlay
начинает работу, этот ресивер включается автомати
-
чески и выбирает входной источник «NET».
•
из-за особенностей беспроводной технологии
AirPlay, звук, выдаваемый этим ресивером, может
воспроизводиться с незначительной задерж
-
кой по сравнению со звуком, воспроизводимым
на устройстве с поддержкой AirPlay.
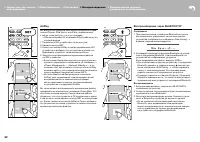
вы так же можете воспроизводить музыкальные файлы,
хранящиеся на компьютере с помощью iTunes (вер. 10.2
или более поздней версии). Перед началом работы,
убедитесь, что это устройство и ПК подключены к одной
и той же сети, затем нажмите кнопку NET на этом ресиве
-
ре. Далее, нажмите на значок AirPlay в iTunes, выберите
это устройство из списка устройств, и начните воспроиз
-
ведение музыкальных файлов.
22
> Before start > Hookup > Setup
> Playback
> Part Names
> Advanced Manual
Troubleshooting | Appendix
AirPlay
You can wirelessly enjoy the music files on an iPhone
®
,
iPod touch
®
, or iPad
®
connected to the same access point
as this unit.
0
Update the OS version on your iOS device to the latest
version.
1. Connect the iOS device to the access point.
2. Press NET.
3. Tap the AirPlay icon in the control center of the iOS
device and select this unit from the list of devices
displayed, and tap "Done".
4. Play the music files on the iOS device.
0
The default status is for the Network Standby feature to
be on, so when you do steps 3 and 4 above, this unit
automatically comes on and input switches to "NET". To
reduce the amount of power consumed in standby
mode, press the button on the remote controller,
then in the Setup menu displayed set "5. Hardware" –
"Power Management" – "Network Standby" to "Off".
0
Due to the characteristics of AirPlay wireless
technology, the sound produced on this unit may slightly
be behind the sound played on the AirPlay-enabled
device.
You can also play back music files on the computer with
iTunes (Ver. 10.2 or later). Before operation, make sure
this unit and the PC are connected to the same network,
then press NET on this unit. Next, click the AirPlay icon
in iTunes, select this unit from the list of devices displayed,
and start play of a music file.
TX-XXXXX
iPhone
BLUETOOTH
®
Playback
Pairing
1. When you press the button on the remote controller,
"Now Pairing..." is displayed on this unit's display, and
the pairing mode is enabled.
2. Enable (turn on) the BLUETOOTH function of the
BLUETOOTH enabled device, then select this unit from
amongst the devices displayed.
If a password is requested, enter "0000".
0
To connect another BLUETOOTH enabled device, press
and hold the button until "Now Pairing..." is
displayed, then perform step 2 above. This unit can
store the data of up to 8 paired devices.
0
The coverage area is 48 feet (15 meters). Note that
connection is not always guaranteed with all
BLUETOOTH enabled devices.
Playing Back
1. When the unit is on, connect the BLUETOOTH enabled
device.
2. The input selector of this unit will be automatically
switched to "BLUETOOTH".
3. Play music. Increase the volume of the BLUETOOTH
enabled device to an appropriate level.
0
Due to the characteristics of BLUETOOTH wireless
technology, the sound produced on this unit may slightly
be behind the sound played on the BLUETOOTH
enabled device.
TX-XXXXX
SN29402164_TX-NR656_BAS_En.book 22 ページ 2016年3月8日 火曜日 午後4時32分
Содержание
- 2 Перед тем, как начать эксплуатацию; Main features
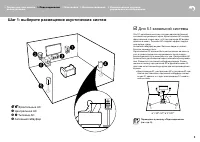
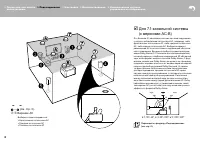
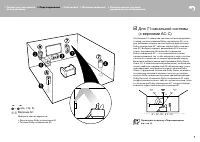
- 3 Шаг 1: выберите размещение акустических систем; Фронтальные Ас; Step1: Choose your Speaker Layout
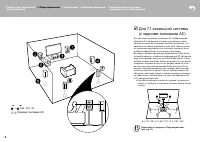
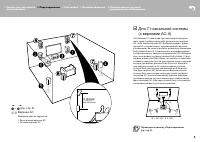
- 4 Surround Back Speakers); Surround Back Speakers; Surround Back Speakers)
- 5 or more
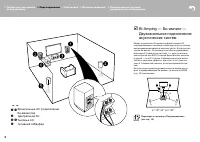
- 8 Фронтальные Ас (подключение; Двухканальное подключение; Speakers
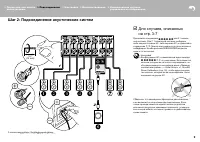
- 9 Для случаев, описанных; Step2: Connect the Speakers
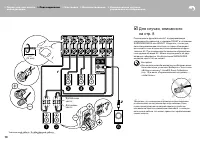
- 10 Для случая, описанного
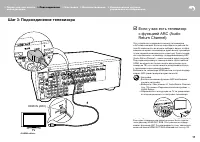
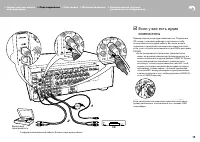
- 11 Шаг 3: Подсоединение телевизора; если у вас есть телевизор; Step3: Connect the TV; ARC TV
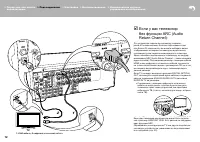
- 12 если у вас телевизор
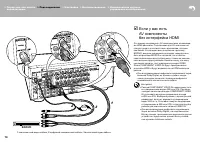
- 13 Step4: Connect the AV Components; HDMI AV Components
- 14 OR; Non-HDMI AV Components; если у вас есть
- 15 Audio Components; если у вас есть аудио; Audio Components
- 16 MAIN ROOM; Multi-zone Connection; Мультизонные соединения
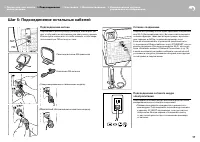
- 17 Шаг 5: Подсоединение остальных кабелей; Сетевое соединение; Step5: Connect Other Cables; Step5: Connect Other Cables
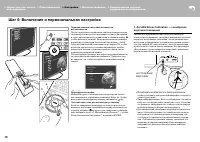
- 18 Шаг 6: Включение и первоначальная настройка; AccuEQ Room Calibration; SETUP MIC; AccuEQ Room Calibration; SETUP MIC
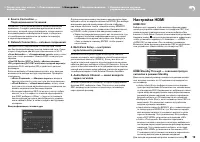
- 19 HDMI Setup; HDMI Setup
- 20 Воспроизведение с AV-компонентов; Listening Mode —; AV Component Playback; AV Component Playback; Стандартное воспроизведение
- 21 Network Services; Network Functions; Network Services; Сетевые функции
- 22 Воспроизведение через BLUETOOTH; AirPlay
- 23 Прослушивание радио; Мультизонные режимы; Listening To the Radio; Прочее; Listening To the Radio; Others; Listening To the Radio
- 24 Прочие функции; When the unit is operating erratically; Если ресивер работает с ошибками
- 25 Front Panel; Передняя панель
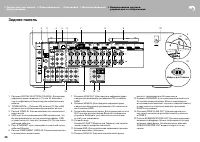
- 26 Rear Panel; Задняя панель
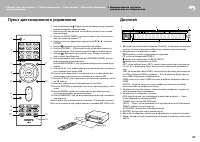
- 27 Пульт дистанционного управления
- 28 Информация о лицензиях и торговых марках

