Швейная машина Janome Jem Gold 2 - инструкция пользователя по применению, эксплуатации и установке на русском языке. Мы надеемся, она поможет вам решить возникшие у вас вопросы при эксплуатации техники.
Если остались вопросы, задайте их в комментариях после инструкции.
"Загружаем инструкцию", означает, что нужно подождать пока файл загрузится и можно будет его читать онлайн. Некоторые инструкции очень большие и время их появления зависит от вашей скорости интернета.


15
•
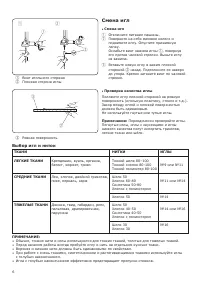
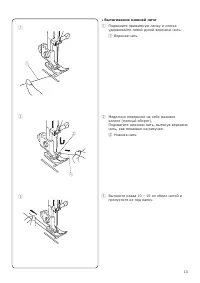
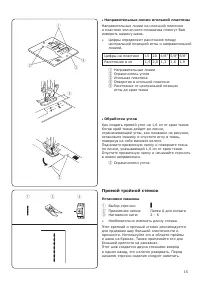
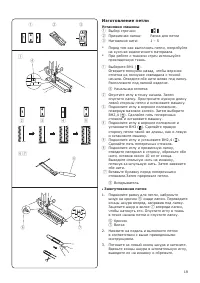
Направительные линии игольной пластины
Направительные линии на игольной пластине
и пластине челночного механизма помогут Вам
измерять ширину швов.
* Цифры определяют расстояние между
центральной позицией иглы и направительной
линией.
Цифры на пластине
15 20 4/8” 5/8” 6/8”
Расстояние в см
1,5 2,0 1,3 1,6 1,9
1
Направительные линии
2
Ограничитель углов
3
Игольная пластина
4
Отверстие в игольной пластине
5
Расстояние от центральной позиции
иглы до края ткани
•
Обработка углов
Как создать прямой угол на 1,6 см от края ткани:
Когда край ткани дойдет до линии,
ограничивающей углы, как показано на рисунке,
остановите машину и опустите иглу в ткань,
повернув на себя маховое колесо.
Поднимите прижимную лапку и поверните ткань
по линии, указывающей 1,6 см от края ткани.
Опустите прижимную лапку и начинайте строчить
в новом направлении.
2
Ограничители углов
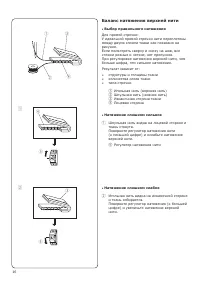
Прямой тройной стежок
Установки машины
1
Выбор строчки:
15
q
w
r
e
t
w
q
w
e
• Using the seam guides on the needle plate
The seam guides on the needle plate and hook cover plate
help you to measure seam width.
* The numbers indicate the distance between the
center needle position and the guide line.
Numbers on the needle plate 15 20 4/8
˝
5/8
˝
6/8
˝
Distance in centimeters
1.5 2.0 1.3 1.6 1.9
q
Guide lines
w
Cornering guide
e
Needle plate
r
Needle plate hole
t
Seam width from the center needle position
• Turning square corners
To turn a square corner 1.6 cm (5/8˝) from the fabric
edge:
When the fabric edge facing you lines up with the
cornering guide as illustrated, stop stitching and
lower the needle by turning the handwheel towards you.
Raise the presser foot and turn the fabric to line
the edge with the 1.6 cm (5/8˝) seam guide.
Lower the presser foot and begin stitching in the new
direction.
w
Cornering guides
Triple Straight Stitch
Machine setting:
q
Stitch selector:
w
Presser foot:
Zigzag foot (A)
e
Thread tension dial:
2-6
* It is not necessary to adjust the stitch length.
This strong, durable pattern is recommended where both
elasticity and strength are needed to insure comfort and
durability. Use it to reinforce areas such as crotch and
armhole seams. Also, use when constructing items such
as backpacks for extra strength.
The pattern is sewn with two stitches forward and one
stitch backward, forming a seam that does not rip easily.
Garments should be basted for fitting before seaming.
2
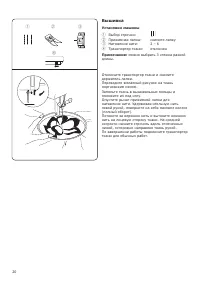
Прижимная лапка:
Лапка А для зигзага
3
Натяжение нити:
2 – 6
* Необязательно изменять длину стежка.
Этот крепкий и прочный стежок рекомендуется
для придания шву большей эластичности и
прочности. Используйте его в области проймы
и швов на брюках. Также применяйте его для
большей крепости на рюкзаках.
Этот шов создается двумя стежками вперёд
и одним назад, его нелегко разорвать. Перед
началом строчки изделие следует наметать.
15
q
w
r
e
t
w
q
w
e
• Using the seam guides on the needle plate
The seam guides on the needle plate and hook cover plate
help you to measure seam width.
* The numbers indicate the distance between the
center needle position and the guide line.
Numbers on the needle plate 15 20 4/8
˝
5/8
˝
6/8
˝
Distance in centimeters
1.5 2.0 1.3 1.6 1.9
q
Guide lines
w
Cornering guide
e
Needle plate
r
Needle plate hole
t
Seam width from the center needle position
• Turning square corners
To turn a square corner 1.6 cm (5/8˝) from the fabric
edge:
When the fabric edge facing you lines up with the
cornering guide as illustrated, stop stitching and
lower the needle by turning the handwheel towards you.
Raise the presser foot and turn the fabric to line
the edge with the 1.6 cm (5/8˝) seam guide.
Lower the presser foot and begin stitching in the new
direction.
w
Cornering guides
Triple Straight Stitch
Machine setting:
q
Stitch selector:
w
Presser foot:
Zigzag foot (A)
e
Thread tension dial:
2-6
* It is not necessary to adjust the stitch length.
This strong, durable pattern is recommended where both
elasticity and strength are needed to insure comfort and
durability. Use it to reinforce areas such as crotch and
armhole seams. Also, use when constructing items such
as backpacks for extra strength.
The pattern is sewn with two stitches forward and one
stitch backward, forming a seam that does not rip easily.
Garments should be basted for fitting before seaming.
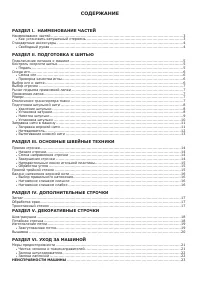
Содержание
- 3 СОДЕРЖАНИЕ; ll; НЕИСПРАВНОСТИ МАШИНЫ; Names of Parts; How to attach the spool pin; SECTION I NAME OF PARTS
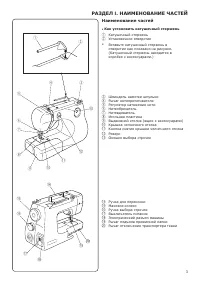
- 4 Наименование частей; Как установить катушечный стержень; РАЗДЕЛ
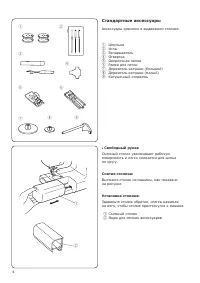
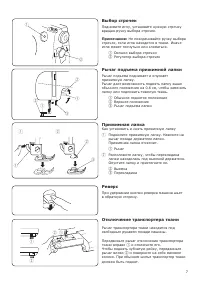
- 5 Стандартные аксессуары; Свободный рукав; Standard Accessories and Storage Place; • Free arm; Connecting Machine to Power Supply; • Foot control; SECTION II GETTING READY TO SEW; Operating Instructions:
- 6 Педаль
- 7 Смена игл; Выбор игл и ниток
- 8 The feed dog must be up for normal sewing.
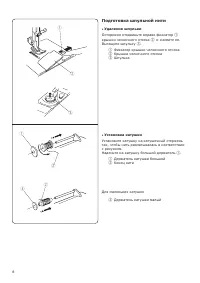
- 9 Подготовка шпульной нити; Удаление шпульки; Preparation of the Bobbin Thread; • Removing the bobbin; c v; • Winding the bobbin
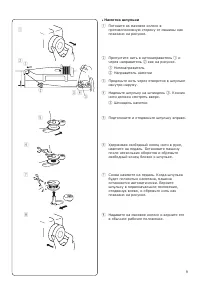
- 10 Намотка шпульки; Thread guide
- 11 Установка шпульки; • Inserting the bobbin; Threading the Machine; • To set the needle thread; Raise the presser foot with the presser foot lifter; Then, down around the thread guide plate; and down into the take-up lever; Use the needle threader to thread the needle.
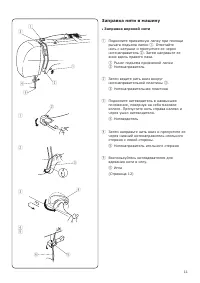
- 12 Заправка нити в машину; Заправка верхней нити
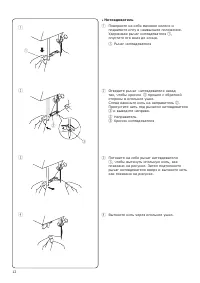
- 13 Нитевдеватель; • Using the needle threader; Needle threader knob; • Drawing up the bobbin thread; Needle thread
- 14 Вытягивание нижней нити
- 15 Прямая строчка; Установки машины; Начало строчки; SECTION III BASIC SEWING; • Using the seam guides on the needle plate; Triple Straight Stitch; lll; . ОСНОВНЫЕ ШВЕЙНЫЕ ТЕХНИКИ
- 16 Прямой тройной стежок
- 17 Баланс натяжения верхней нити; Выбор правильного натяжения; Balancing Needle Thread Tension; • Choose the correct tension; Wrong side of fabric; • Tension is too tight; Thread tension dial; • Tension is too loose; Zigzag Stitching; Overcasting; Overedge foot C; Tricot Stitch; Zigzag foot A; SECTION IV UTILITY STITCHES; or
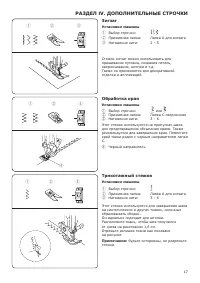
- 18 Зигзаг; Обработка края; Трикотажный стежок
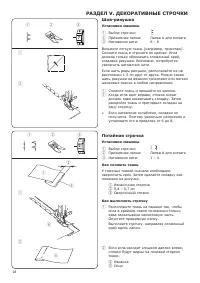
- 19 How to fold the fabric; Потайная строчка; How to fold the fabric; SECTION V DECORATIVE STITCHING; Как сложить ткань; Shell Tuck; How to fold the fabric; SECTION V DECORATIVE STITCHING; n m; Buttonhole; • Corded buttonhole; РАЗДЕЛ V. ДЕКОРАТИВНЫЕ СТРОЧКИ
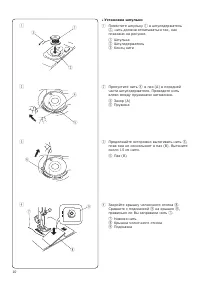
- 20 Изготовление петли
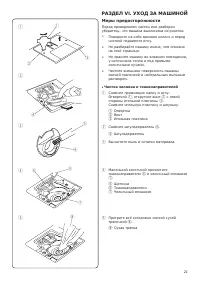
- 21 Вышивка; Machine setting; Machine setting; Caution; • Cleaning the hook race and feed dogs; SECTION VI CARE OF YOUR MACHINE
- 22 Меры предосторожности; Чистка челнока и тканенаправителей; РАЗДЕЛ V
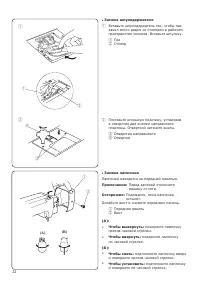
- 23 Replacing the Light Bulb; The sewing light is located behind the face plate.; • Replacing the bobbin holder
- 24 расположены под лапкой в начале шитья.; Примечание; Страница 9; Неисправности машины


