Швейная машина Janome Jem Gold 2 - инструкция пользователя по применению, эксплуатации и установке на русском языке. Мы надеемся, она поможет вам решить возникшие у вас вопросы при эксплуатации техники.
Если остались вопросы, задайте их в комментариях после инструкции.
"Загружаем инструкцию", означает, что нужно подождать пока файл загрузится и можно будет его читать онлайн. Некоторые инструкции очень большие и время их появления зависит от вашей скорости интернета.


18
Шов-ракушка
Установки машины
1
Выбор строчки:
18
q
w
e
q
w
e
q
w
e
r
t
z
x
z
x
Shell Tuck
Machine setting:
q
Stitch selector:
w
Presser foot:
Zigzag foot A
e
Thread tension dial:
6-8
Use a lightweight fabric (tricot, for example). Fold the
fabric on the bias and stitch on the fold. Allow the needle
to just clear the folded edge to create a shelled edge. You
may need to increase the needle thread tension slightly.
If you sew rows of shell stitches, space the rows at least
5/8˝ (1.5 cm) apart. You can also sew shell stitches on
knits or soft silky woven fabrics, in any direction.
z
Fold and stitch on the bias.
x
When the needle swings to the right, allow the
needle to just clear the folded edge of the fabric
when it zigzags. After stitching, open the fabric
and iron to press the tacks flat to one side.
* If thread tension is too loose, tuck will not be
formed. Therefore, increase the tension and set it
between 6 to 8.
Blind Stitch Hemming
Machine setting:
q
Stitch selector:
w
Presser foot:
Zigzag foot A
e
Thread tension dial:
1-4
How to fold the fabric
On heavyweight fabrics that ravel, the raw edge should be
overcast first. Then fold the hem as illustrated.
q
Wrong side of fabric
w
0.4-0.7 cm (1/4˝-7/16˝)
e
Overcasting stitch
How to sew
z
Position the fabric on the machine so that the
needle just pierces the folded part of the fabric
when the needle comes over to the extreme left
side. Lower the presser foot.
Sew, while guiding the fabric so that the needle
catches the folded edge.
x
If the needle drops on the left side too far, the
stitches appear on the right side of the fabric.
r
Wrong side of fabric
t
Right side of fabric
SECTION V DECORATIVE STITCHING
3
2
1
2
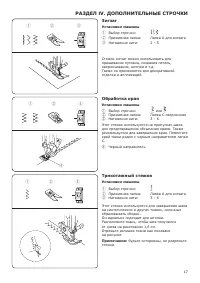
Прижимная лапка:
Лапка А для зигзага
3
Натяжение нити:
6 – 8
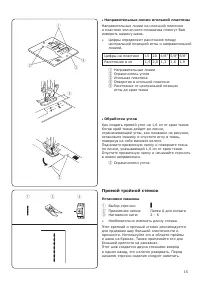
Возьмите легкую ткань (например, трикотаж).
Сложите ткань и строчите по кромке. Игла
должна только обозначать сложенный край,
создавая ракушки. Возможно, потребуется
увеличить натяжение нити.
Если шить ряды ракушек, располагайте их на
расстоянии 1.5 см друг от друга. Можно также
шить ракушки на вязаном трикотаже или мягких
шелковых тканях в любом направлении.
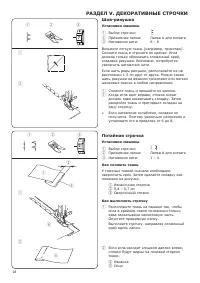
1
Сложите ткань и прошейте по кромке.
2
Когда игла идет вправо, стежок зигзаг
должен едва захватывать складку. Затем
раскройте ткань и пригладьте складки на
одну сторону.
* Если натяжение ослаблено, складки не
получатся. Поэтому увеличьте натяжение и
установите его в пределах от 6 до 8.
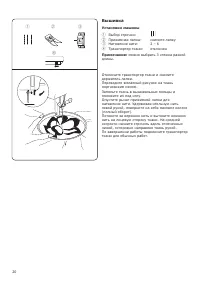
Потайная строчка
Установки машины
1
Выбор строчки:
18
q
w
e
q
w
e
q
w
e
r
t
z
x
z
x
Shell Tuck
Machine setting:
q
Stitch selector:
w
Presser foot:
Zigzag foot A
e
Thread tension dial:
6-8
Use a lightweight fabric (tricot, for example). Fold the
fabric on the bias and stitch on the fold. Allow the needle
to just clear the folded edge to create a shelled edge. You
may need to increase the needle thread tension slightly.
If you sew rows of shell stitches, space the rows at least
5/8˝ (1.5 cm) apart. You can also sew shell stitches on
knits or soft silky woven fabrics, in any direction.
z
Fold and stitch on the bias.
x
When the needle swings to the right, allow the
needle to just clear the folded edge of the fabric
when it zigzags. After stitching, open the fabric
and iron to press the tacks flat to one side.
* If thread tension is too loose, tuck will not be
formed. Therefore, increase the tension and set it
between 6 to 8.
Blind Stitch Hemming
Machine setting:
q
Stitch selector:
w
Presser foot:
Zigzag foot A
e
Thread tension dial:
1-4
How to fold the fabric
On heavyweight fabrics that ravel, the raw edge should be
overcast first. Then fold the hem as illustrated.
q
Wrong side of fabric
w
0.4-0.7 cm (1/4˝-7/16˝)
e
Overcasting stitch
How to sew
z
Position the fabric on the machine so that the
needle just pierces the folded part of the fabric
when the needle comes over to the extreme left
side. Lower the presser foot.
Sew, while guiding the fabric so that the needle
catches the folded edge.
x
If the needle drops on the left side too far, the
stitches appear on the right side of the fabric.
r
Wrong side of fabric
t
Right side of fabric
SECTION V DECORATIVE STITCHING
3
2
1
2
Прижимная лапка:
Лапка А для зигзага
3
Натяжение нити:
1 – 4
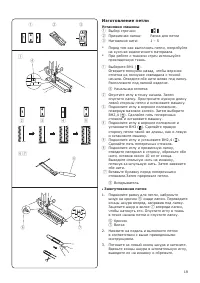
Как сложить ткань
У тяжелых тканей сначала необходимо
оверлочить срез. Затем сделайте складку как
показано на рисунке.
1
Изнаночная сторона
2
0,4 – 0,7 см
3
Оверлочный стежок
Как выполнить строчку
1
Расположите ткань на машине так, чтобы
игла в крайнем левом положении только
едва захватывала заложенную часть.
Опустите прижимную лапку.
Выполните строчку, направляя сложенный
край вдоль лапки.
2
Если игла заходит слишком далеко влево,
стежки будут видны на лицевой стороне
ткани.
4
Изнанка
5
Лицо
18
q
w
e
q
w
e
q
w
e
r
t
z
x
z
x
Shell Tuck
Machine setting:
q
Stitch selector:
w
Presser foot:
Zigzag foot A
e
Thread tension dial:
6-8
Use a lightweight fabric (tricot, for example). Fold the
fabric on the bias and stitch on the fold. Allow the needle
to just clear the folded edge to create a shelled edge. You
may need to increase the needle thread tension slightly.
If you sew rows of shell stitches, space the rows at least
5/8˝ (1.5 cm) apart. You can also sew shell stitches on
knits or soft silky woven fabrics, in any direction.
z
Fold and stitch on the bias.
x
When the needle swings to the right, allow the
needle to just clear the folded edge of the fabric
when it zigzags. After stitching, open the fabric
and iron to press the tacks flat to one side.
* If thread tension is too loose, tuck will not be
formed. Therefore, increase the tension and set it
between 6 to 8.
Blind Stitch Hemming
Machine setting:
q
Stitch selector:
w
Presser foot:
Zigzag foot A
e
Thread tension dial:
1-4
How to fold the fabric
On heavyweight fabrics that ravel, the raw edge should be
overcast first. Then fold the hem as illustrated.
q
Wrong side of fabric
w
0.4-0.7 cm (1/4˝-7/16˝)
e
Overcasting stitch
How to sew
z
Position the fabric on the machine so that the
needle just pierces the folded part of the fabric
when the needle comes over to the extreme left
side. Lower the presser foot.
Sew, while guiding the fabric so that the needle
catches the folded edge.
x
If the needle drops on the left side too far, the
stitches appear on the right side of the fabric.
r
Wrong side of fabric
t
Right side of fabric
SECTION V DECORATIVE STITCHING
3
2
1
19
q
w
e
r
t
y
u
z
x
c
v
b
n m
Buttonhole
Machine setting:
q
Stitch selector:
w
Presser foot:
Buttonhole foot
e
Thread tension dial:
1-5
* Before you sew the actual buttonholes on the
actual garment, make several trial buttonholes on
a fabric sample.
* Use interfacing on stretch fabrics.
z
Select BH 1( ). Pull the slider so the top mark on
the slider aligns with the start mark. Draw both
threads to the left under the foot.
Insert the garment under the foot.
r
Start mark
x
Lower the needle at the starting point. Then
lower the buttonhole foot.
Sew the required length of the left side of the button-
hole and stop the machine.
c
Raise the needle to its highest position by turning
the handwheel, then select the BH 2,4( ).
Sew five bartack stitches and stop the machine.
v
Raise the needle to its highest position and select
BH 3( ), sew the right side of buttonhole the
same length as the left side and stop the machine.
b
Raise the needle and select the BH 2,4( ), and
sew five bartack stitches.
n
Raise the needle and presser foot. Remove the fabric
from the machine. Cut both needle and bobbin threads
leaving approximately 10 cm (4˝) of thread ends
loose.
Draw the needle thread to the wrong side of the
fabric by pulling the bobbin thread. Then, knot the
threads.
m
Place a pin just before the bartack to prevent cutting
bartack. Cut the opening with the seam ripper.
t
Seam ripper
• Corded buttonhole
1. With the buttonhole foot raised, hook the filler
cord on the spur
y
at the back of the buttonhole
foot. Bring the ends toward you under the
buttonhole foot, clearing the front end.
Hook the filler cord into the forks
u
on the front of
the buttonhole foot to hold them tight. Lower the
needle into the garment where the buttonhole
will start and lower the foot.
y
Spur
u
Forks
2. Depress the foot control and sew the buttonhole over
the filler cord in the same way as described above.
3. Pull the left end of the filler cord to tighten it.
Thread the end of the cord through a darning
needle, draw it to the wrong side of the fabric and
cut.
РАЗДЕЛ V. ДЕКОРАТИВНЫЕ СТРОЧКИ
Содержание
- 3 СОДЕРЖАНИЕ; ll; НЕИСПРАВНОСТИ МАШИНЫ; Names of Parts; How to attach the spool pin; SECTION I NAME OF PARTS
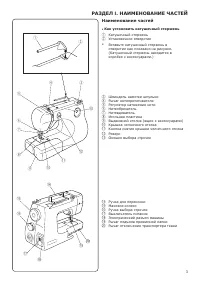
- 4 Наименование частей; Как установить катушечный стержень; РАЗДЕЛ
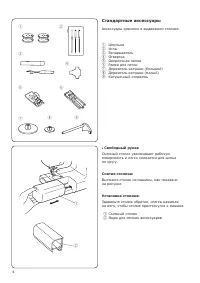
- 5 Стандартные аксессуары; Свободный рукав; Standard Accessories and Storage Place; • Free arm; Connecting Machine to Power Supply; • Foot control; SECTION II GETTING READY TO SEW; Operating Instructions:
- 6 Педаль
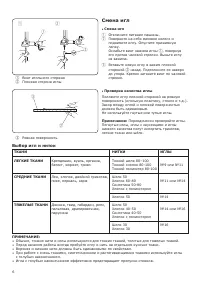
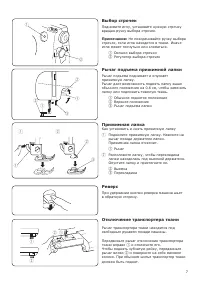
- 7 Смена игл; Выбор игл и ниток
- 8 The feed dog must be up for normal sewing.
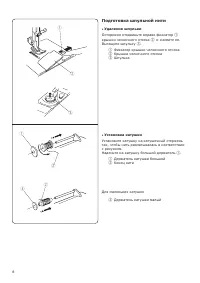
- 9 Подготовка шпульной нити; Удаление шпульки; Preparation of the Bobbin Thread; • Removing the bobbin; c v; • Winding the bobbin
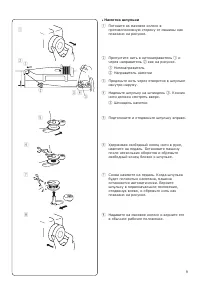
- 10 Намотка шпульки; Thread guide
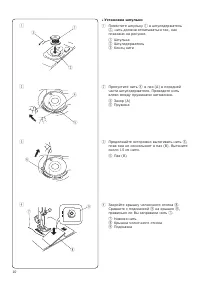
- 11 Установка шпульки; • Inserting the bobbin; Threading the Machine; • To set the needle thread; Raise the presser foot with the presser foot lifter; Then, down around the thread guide plate; and down into the take-up lever; Use the needle threader to thread the needle.
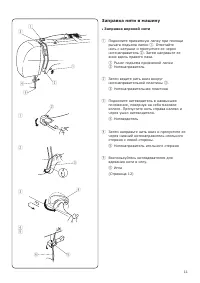
- 12 Заправка нити в машину; Заправка верхней нити
- 13 Нитевдеватель; • Using the needle threader; Needle threader knob; • Drawing up the bobbin thread; Needle thread
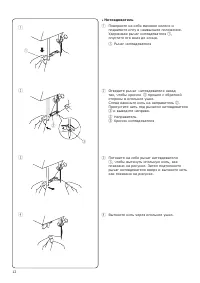
- 14 Вытягивание нижней нити
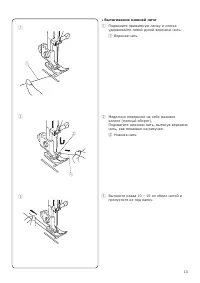
- 15 Прямая строчка; Установки машины; Начало строчки; SECTION III BASIC SEWING; • Using the seam guides on the needle plate; Triple Straight Stitch; lll; . ОСНОВНЫЕ ШВЕЙНЫЕ ТЕХНИКИ
- 16 Прямой тройной стежок
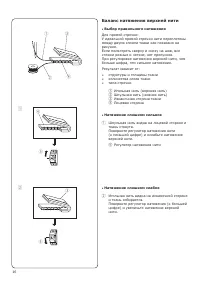
- 17 Баланс натяжения верхней нити; Выбор правильного натяжения; Balancing Needle Thread Tension; • Choose the correct tension; Wrong side of fabric; • Tension is too tight; Thread tension dial; • Tension is too loose; Zigzag Stitching; Overcasting; Overedge foot C; Tricot Stitch; Zigzag foot A; SECTION IV UTILITY STITCHES; or
- 18 Зигзаг; Обработка края; Трикотажный стежок
- 19 How to fold the fabric; Потайная строчка; How to fold the fabric; SECTION V DECORATIVE STITCHING; Как сложить ткань; Shell Tuck; How to fold the fabric; SECTION V DECORATIVE STITCHING; n m; Buttonhole; • Corded buttonhole; РАЗДЕЛ V. ДЕКОРАТИВНЫЕ СТРОЧКИ
- 20 Изготовление петли
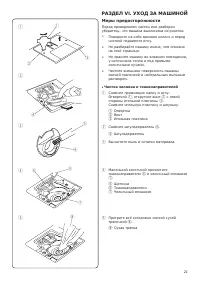
- 21 Вышивка; Machine setting; Machine setting; Caution; • Cleaning the hook race and feed dogs; SECTION VI CARE OF YOUR MACHINE
- 22 Меры предосторожности; Чистка челнока и тканенаправителей; РАЗДЕЛ V
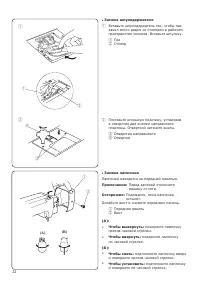
- 23 Replacing the Light Bulb; The sewing light is located behind the face plate.; • Replacing the bobbin holder
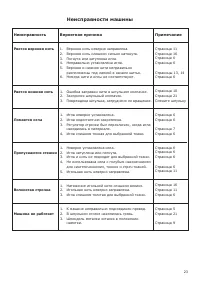
- 24 расположены под лапкой в начале шитья.; Примечание; Страница 9; Неисправности машины


