Швейная машина Janome Jem Gold 2 - инструкция пользователя по применению, эксплуатации и установке на русском языке. Мы надеемся, она поможет вам решить возникшие у вас вопросы при эксплуатации техники.
Если остались вопросы, задайте их в комментариях после инструкции.
"Загружаем инструкцию", означает, что нужно подождать пока файл загрузится и можно будет его читать онлайн. Некоторые инструкции очень большие и время их появления зависит от вашей скорости интернета.


20
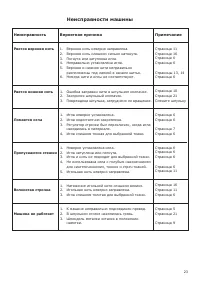
Вышивка
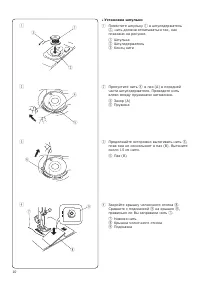
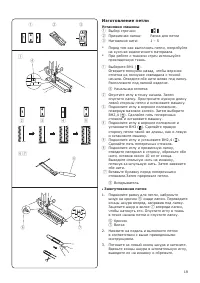
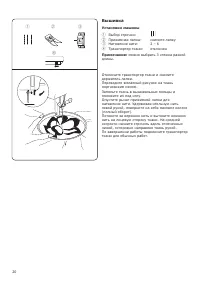
Установки машины
1
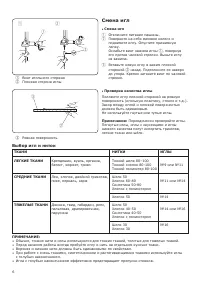
Выбор строчки:
20
q
w
e
Embroidery
Machine setting
q
Stitch selector:
w
Presser foot:
Remove
e
Thread tension dial:
2-6
r
Feed dogs
Dropped
Note:
There are 3 types of stitch length selection.
Drop the feed dogs and remove the foot holder.
Draw a design on the fabric with tailor's chalk.
Stretch the fabric between embroidery hoops, and place
the hoops under the needle.
Lower the presser foot lifter to engage the needle thread
tension. Holding the needle thread in your left hand,
rotate the handwheel towards you one complete turn.
Pull the needle thread to draw the bobbin thread to the
right side of the fabric. At medium speed, stitch along the
marked outline, guiding the fabric carefully by hand.
After embroidery is completed, raise the feed dogs for
normal sewing.
r
2
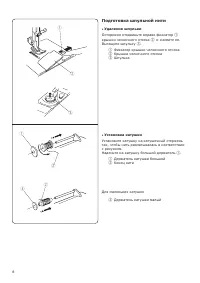
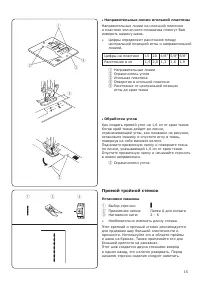
Прижимная лапка:
снимите лапку
3
Натяжение нити:
2 – 6
4
Транспортер ткани:
отключен
Примечание:
можно выбрать 3 стежка разной
длины.
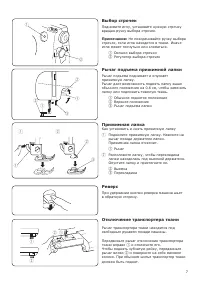
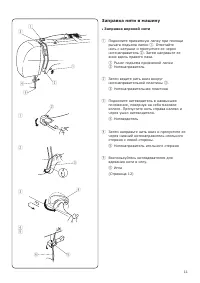
Отключите транспортер ткани и снимите
держатель лапки.
Переведите желаемый рисунок на ткань
портновским мелом.
Запяльте ткань в вышивальные пяльцы и
положите их под иглу.
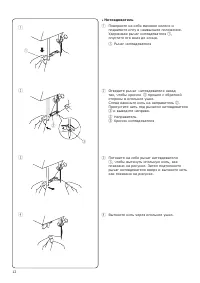
Опустите рычаг прижимной лапки для
натяжения нити. Удерживая игольную нить
левой рукой, поверните на себя маховое колесо
(полный оборот).
Потяните за верхнюю нить и вытяните нижнюю
нить на лицевую сторону ткани. На средней
скорости начните строчить вдоль отмеченных
линий, осторожно направляя ткань рукой.
По завершении работы подключите транспортер
ткани для обычных работ.
20
q
w
e
Embroidery
Machine setting
q
Stitch selector:
w
Presser foot:
Remove
e
Thread tension dial:
2-6
r
Feed dogs
Dropped
Note:
There are 3 types of stitch length selection.
Drop the feed dogs and remove the foot holder.
Draw a design on the fabric with tailor's chalk.
Stretch the fabric between embroidery hoops, and place
the hoops under the needle.
Lower the presser foot lifter to engage the needle thread
tension. Holding the needle thread in your left hand,
rotate the handwheel towards you one complete turn.
Pull the needle thread to draw the bobbin thread to the
right side of the fabric. At medium speed, stitch along the
marked outline, guiding the fabric carefully by hand.
After embroidery is completed, raise the feed dogs for
normal sewing.
r
21
z
x
c
v
b
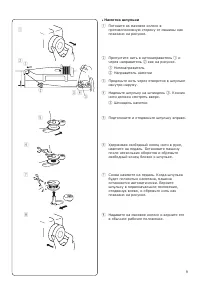
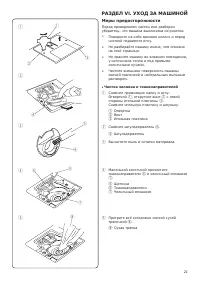
Caution
Before performing cleaning or maintenance, make sure
that the sewing machine is unplugged from the power
source.
* Turn the handwheel towards you to raise the
needle before cleaning.
* Do not dismantle the machine other than
explained on this page.
* Do not store the machine in a high-humidity area,
near a heat radiator or in direct sunlight.
* Clean the outside of the machine with a soft cloth
and neutral soap.
• Cleaning the hook race and feed dogs
z
Remove the presser foot and needle. Remove
screw
w
on the left side of the needle plate
e
with
the screwdriver
q
supplied with the machine.
Remove the needle plate and take out the bobbin.
q
Screw driver
w
Screw
e
Needle plate
x
Lift up the bobbin holder
r
and remove it.
r
Bobbin holder
c
Brush out dust and lint.
v
Clean the feed dogs
y
and hook race
u
with a small
brush
t
.
t
Brush
y
Feed dogs
u
Hook race
b
Wipe the hook race gently with a soft, dry cloth
i
.
i
Dry cloth
* You may also use a vacuum cleaner.
SECTION VI CARE OF YOUR MACHINE
q
w
e
r
t
r
y
t
u
q
i
Содержание
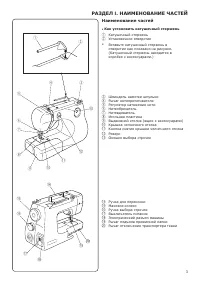
- 3 СОДЕРЖАНИЕ; ll; НЕИСПРАВНОСТИ МАШИНЫ; Names of Parts; How to attach the spool pin; SECTION I NAME OF PARTS
- 4 Наименование частей; Как установить катушечный стержень; РАЗДЕЛ
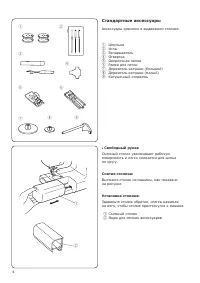
- 5 Стандартные аксессуары; Свободный рукав; Standard Accessories and Storage Place; • Free arm; Connecting Machine to Power Supply; • Foot control; SECTION II GETTING READY TO SEW; Operating Instructions:
- 6 Педаль
- 7 Смена игл; Выбор игл и ниток
- 8 The feed dog must be up for normal sewing.
- 9 Подготовка шпульной нити; Удаление шпульки; Preparation of the Bobbin Thread; • Removing the bobbin; c v; • Winding the bobbin
- 10 Намотка шпульки; Thread guide
- 11 Установка шпульки; • Inserting the bobbin; Threading the Machine; • To set the needle thread; Raise the presser foot with the presser foot lifter; Then, down around the thread guide plate; and down into the take-up lever; Use the needle threader to thread the needle.
- 12 Заправка нити в машину; Заправка верхней нити
- 13 Нитевдеватель; • Using the needle threader; Needle threader knob; • Drawing up the bobbin thread; Needle thread
- 14 Вытягивание нижней нити
- 15 Прямая строчка; Установки машины; Начало строчки; SECTION III BASIC SEWING; • Using the seam guides on the needle plate; Triple Straight Stitch; lll; . ОСНОВНЫЕ ШВЕЙНЫЕ ТЕХНИКИ
- 16 Прямой тройной стежок
- 17 Баланс натяжения верхней нити; Выбор правильного натяжения; Balancing Needle Thread Tension; • Choose the correct tension; Wrong side of fabric; • Tension is too tight; Thread tension dial; • Tension is too loose; Zigzag Stitching; Overcasting; Overedge foot C; Tricot Stitch; Zigzag foot A; SECTION IV UTILITY STITCHES; or
- 18 Зигзаг; Обработка края; Трикотажный стежок
- 19 How to fold the fabric; Потайная строчка; How to fold the fabric; SECTION V DECORATIVE STITCHING; Как сложить ткань; Shell Tuck; How to fold the fabric; SECTION V DECORATIVE STITCHING; n m; Buttonhole; • Corded buttonhole; РАЗДЕЛ V. ДЕКОРАТИВНЫЕ СТРОЧКИ
- 20 Изготовление петли
- 21 Вышивка; Machine setting; Machine setting; Caution; • Cleaning the hook race and feed dogs; SECTION VI CARE OF YOUR MACHINE
- 22 Меры предосторожности; Чистка челнока и тканенаправителей; РАЗДЕЛ V
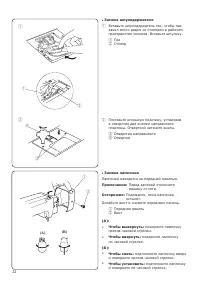
- 23 Replacing the Light Bulb; The sewing light is located behind the face plate.; • Replacing the bobbin holder
- 24 расположены под лапкой в начале шитья.; Примечание; Страница 9; Неисправности машины


