Швейная машина Janome Jem Gold 2 - инструкция пользователя по применению, эксплуатации и установке на русском языке. Мы надеемся, она поможет вам решить возникшие у вас вопросы при эксплуатации техники.
Если остались вопросы, задайте их в комментариях после инструкции.
"Загружаем инструкцию", означает, что нужно подождать пока файл загрузится и можно будет его читать онлайн. Некоторые инструкции очень большие и время их появления зависит от вашей скорости интернета.


16
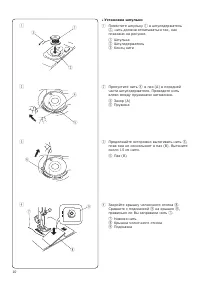
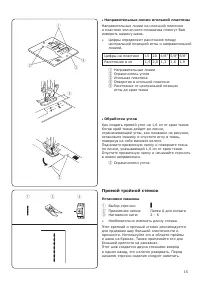
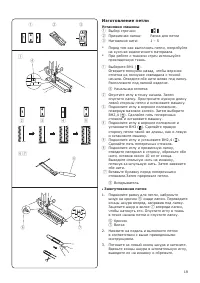
Баланс натяжения верхней нити
•
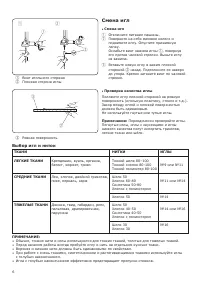
Выбор правильного натяжения
Для прямой строчки:
У идеальной прямой строчки нити переплетены
между двумя слоями ткани как показано на
рисунке.
Если посмотреть сверху и снизу на шов, все
стежки ровные и четкие, нет пропусков.
При регулировке натяжения верхней нити, чем
больше цифра, тем сильнее натяжение.
Результат зависит от:
* структуры и толщины ткани
* количества слоев ткани
* типа строчки
1
Игольная нить (верхняя нить)
2
Шпульная нить (нижняя нить)
3
Изнаночная сторона ткани
4
Лицевая сторона
•
Натяжение слишком сильное
1
Шпульная нить видна на лицевой стороне и
ткань стянута.
Поверните регулятор натяжения нити
(к меньшей цифре) и ослабьте натяжение
верхней нити.
5
Регулятор натяжения нити
•
Натяжение слишком слабое
2
Игольная нить видна на изнаночной стороне
и ткань собирается.
Поверните регулятор натяжения (к большей
цифре) и увеличьте натяжение верхней
нити.
16
z
x
q
e
w
r
r
t
e
t
Balancing Needle Thread Tension
• Choose the correct tension
For straight stitch:
The ideal straight stitch will have threads locked between
the two layers of the fabric, as illustrated (magnified to
show detail).
If you look at the top and bottom of the seam, you will
notice that there are no gaps. Each stitch is smooth and
even.
Turn the dial to alter the needle thread tension. The higher
the number, the tighter the tension.
Results depend on:
* stiffness and thickness of the fabric
* number of fabric layers
* type of stitch
q
Needle thread (Top thread)
w
Bobbin thread (Bottom thread)
e
Wrong side of fabric
r
Right side of fabric
• Tension is too tight
z
The bobbin thread shows through on the right
side of the fabric and it feels bumpy.
Turn the thread tension dial upwards (to a smaller
number) to loosen the needle thread tension.
t
Thread tension dial
• Tension is too loose
x
The needle thread shows through on the wrong side
of the fabric and it feels bumpy.
Turn the thread tension dial downwards (to a
larger number) to tighten the needle thread tension.
17
r
q
w
e
q
w
e
q
w
e
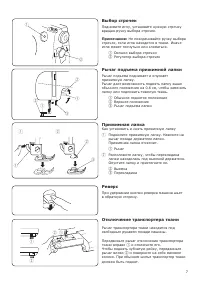
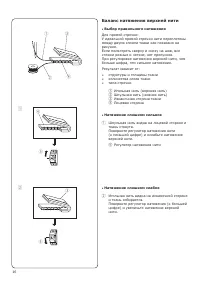
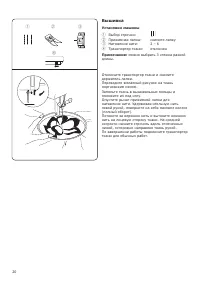
Zigzag Stitching
Machine setting:
q
Stitch selector:
w
Presser foot:
Zigzag foot A
e
Thread tension dial:
2-5
The zigzag stitch is one of the most versatile stitches on
your machine. It can be a utility stitch for sewing on
buttons, buttonholing, hemming, overcasting, mending
and darning.
It can also be used to decorate with trims, appliques and
cutwork or as a decorative stitch.
Overcasting
Machine setting:
q
Stitch selector:
w
Presser foot:
Overedge foot C
e
Thread tension dial:
3-6
Overcasting is used on the seam allowance to prevent
fabrics from raveling at raw edges. It can be used to
finish a hem edge. Place the edge of the fabric next to the
black ridge of foot C.
r
Black ridge
Tricot Stitch
Machine setting:
q
Stitch selector:
w
Presser foot:
Zigzag foot A
e
Thread tension dial:
3-6
This stitch is used to finish the seam allowance on
synthetics and other fabrics that tend to pucker.
The stitch is excellent for darning and mending tears.
Place your fabric to allow a 1.6 cm (5/8˝) seam.
Trim the extra seam allowance after sewing as illustrated.
Note:
Be careful not to cut the stitches.
SECTION IV UTILITY STITCHES
or
Содержание
- 3 СОДЕРЖАНИЕ; ll; НЕИСПРАВНОСТИ МАШИНЫ; Names of Parts; How to attach the spool pin; SECTION I NAME OF PARTS
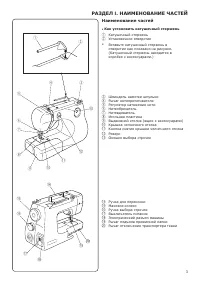
- 4 Наименование частей; Как установить катушечный стержень; РАЗДЕЛ
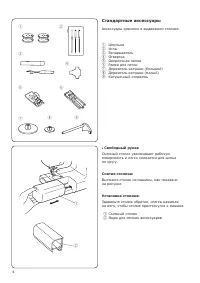
- 5 Стандартные аксессуары; Свободный рукав; Standard Accessories and Storage Place; • Free arm; Connecting Machine to Power Supply; • Foot control; SECTION II GETTING READY TO SEW; Operating Instructions:
- 6 Педаль
- 7 Смена игл; Выбор игл и ниток
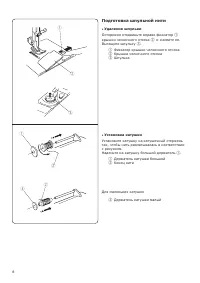
- 8 The feed dog must be up for normal sewing.
- 9 Подготовка шпульной нити; Удаление шпульки; Preparation of the Bobbin Thread; • Removing the bobbin; c v; • Winding the bobbin
- 10 Намотка шпульки; Thread guide
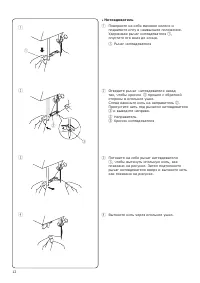
- 11 Установка шпульки; • Inserting the bobbin; Threading the Machine; • To set the needle thread; Raise the presser foot with the presser foot lifter; Then, down around the thread guide plate; and down into the take-up lever; Use the needle threader to thread the needle.
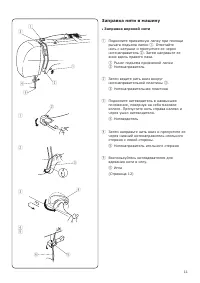
- 12 Заправка нити в машину; Заправка верхней нити
- 13 Нитевдеватель; • Using the needle threader; Needle threader knob; • Drawing up the bobbin thread; Needle thread
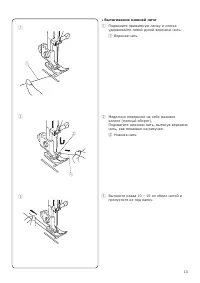
- 14 Вытягивание нижней нити
- 15 Прямая строчка; Установки машины; Начало строчки; SECTION III BASIC SEWING; • Using the seam guides on the needle plate; Triple Straight Stitch; lll; . ОСНОВНЫЕ ШВЕЙНЫЕ ТЕХНИКИ
- 16 Прямой тройной стежок
- 17 Баланс натяжения верхней нити; Выбор правильного натяжения; Balancing Needle Thread Tension; • Choose the correct tension; Wrong side of fabric; • Tension is too tight; Thread tension dial; • Tension is too loose; Zigzag Stitching; Overcasting; Overedge foot C; Tricot Stitch; Zigzag foot A; SECTION IV UTILITY STITCHES; or
- 18 Зигзаг; Обработка края; Трикотажный стежок
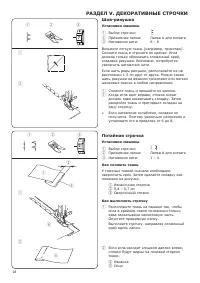
- 19 How to fold the fabric; Потайная строчка; How to fold the fabric; SECTION V DECORATIVE STITCHING; Как сложить ткань; Shell Tuck; How to fold the fabric; SECTION V DECORATIVE STITCHING; n m; Buttonhole; • Corded buttonhole; РАЗДЕЛ V. ДЕКОРАТИВНЫЕ СТРОЧКИ
- 20 Изготовление петли
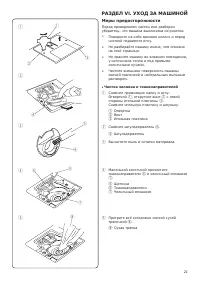
- 21 Вышивка; Machine setting; Machine setting; Caution; • Cleaning the hook race and feed dogs; SECTION VI CARE OF YOUR MACHINE
- 22 Меры предосторожности; Чистка челнока и тканенаправителей; РАЗДЕЛ V
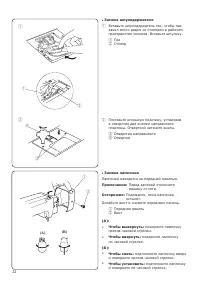
- 23 Replacing the Light Bulb; The sewing light is located behind the face plate.; • Replacing the bobbin holder
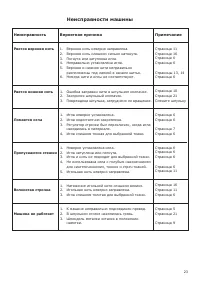
- 24 расположены под лапкой в начале шитья.; Примечание; Страница 9; Неисправности машины


