
Шуруповерты Bosch PDR 18 LI 0.603.980.301 - инструкция пользователя по применению, эксплуатации и установке на русском языке. Мы надеемся, она поможет вам решить возникшие у вас вопросы при эксплуатации техники.
Если остались вопросы, задайте их в комментариях после инструкции.
"Загружаем инструкцию", означает, что нужно подождать пока файл загрузится и можно будет его читать онлайн. Некоторые инструкции очень большие и время их появления зависит от вашей скорости интернета.


English |
13
Bosch Power Tools
1 609 92A 2SX | (28.6.16)
applications, with different accessories or insertion tools or is
poorly maintained, the vibration emission may differ. This
may significantly increase the exposure level over the total
working period.
An estimation of the level of exposure to vibration should also
take into account the times when the tool is switched off or
when it is running but not actually doing the job. This may sig-
nificantly reduce the exposure level over the total working
period.
Identify additional safety measures to protect the operator
from the effects of vibration such as: maintain the tool and the
accessories, keep the hands warm, organisation of work pat-
terns.
Declaration of Conformity
We declare under our sole responsibility that the product de-
scribed under “Technical Data” is in conformity with all rele-
vant provisions of the directives 2011/65/EU, until
19 April 2016: 2004/108/EC, from 20 April 2016 on:
2014/30/EU, 2006/42/EC including their amendments and
complies with the following standards: EN 60745-1,
EN 60745-2-2, EN 50581.
Technical file (2006/42/EC) at:
Robert Bosch Power Tools GmbH, PT/ETM9,
70538 Stuttgart, GERMANY
Robert Bosch Power Tools GmbH
70538 Stuttgart, GERMANY
Stuttgart, 01.01.2017
Assembly
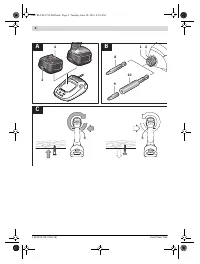
Battery Charging (see figure A)
Note:
The battery supplied is partially charged. To ensure full
capacity of the battery, completely charge the battery in the
battery charger before using your power tool for the first time.
The lithium-ion battery can be charged at any time without re-
ducing its service life. Interrupting the charging procedure
does not damage the battery.
The lithium-ion battery is protected against deep discharging
by the “Electronic Cell Protection (ECP)”. When the battery is
empty, the machine is switched off by means of a protective
circuit: The inserted tool no longer rotates.
Do not continue to press the On/Off switch after the
machine has been automatically switched off.
The bat-
tery can be damaged.
– To remove the battery
4
, press the battery unlocking but-
ton
3
and pull the battery out of the power tool toward the
rear.
Do not exert any force.
For charging, the battery
4
can also remain in the power tool.
During the charging procedure, the power tool cannot be
switched on.
Observe the notes for disposal.
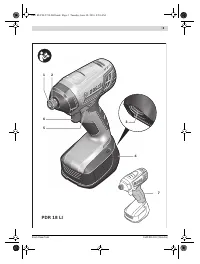
Changing the Tool (see figure B)
Before any work on the machine itself (e. g. mainte-
nance, tool change, etc.) as well as during transport
and storage, remove the battery from the power tool.
There is danger of injury when unintentionally actuating
the On/Off switch.
Inserting
– Pull the locking sleeve
2
forward, push the insert tool to the
stop into the tool holder
1
and release the locking sleeve
2
to lock the insert tool.
– Use only screwdriver bits with ball catch
8
(DIN 3126-E6.3). Other screwdriver bits
9
can be used
with a universal bit holder with ball catch
10
.
Removing
– Pull the locking sleeve
2
forward and remove the insert
tool.
Operation
Method of Operation
The tool holder
1
with the tool is driven by an electric motor
via a gear and impact mechanism.
The working procedure is divided into two phases:
Screwing in
and
tightening
(impact mechanism in action).
The impact mechanism is activated as soon as the screwed
connection runs tight and thus load is put on the motor. In this
instance, the impact mechanism converts the power of the
motor to steady rotary impacts. When loosening screws or
nuts, the process is reversed.
Starting Operation
Inserting the battery
– Set the rotational direction switch
5
to the centre position
in order to avoid unintentional starting. Insert the charged
battery
4
into the handle so that it can be felt to engage and
faces flush against the handle.
Reversing the rotational direction (see figure C)
The rotational direction switch
5
is used to reverse the rota-
tional direction of the machine. However, this is not possible
with the On/Off switch
6
actuated.
–
Right rotation:
For driving in screws and tightening nuts,
press the rotational direction switch
5
through to the left
stop.
–
Left Rotation:
For loosening and unscrewing screws and
nuts, press the rotational direction switch
5
through to the
right stop.
Switching On and Off
– To
start
the machine, press the On/Off switch
6
and keep
it pressed.
– To
switch off
the machine, release the On/Off switch
6
.
Henk Becker
Executive Vice President
Engineering
Helmut Heinzelmann
Head of Product Certification
PT/ETM9
OBJ_BUCH-2739-002.book Page 13 Tuesday, June 28, 2016 8:54 AM
Содержание
- 97 Безопасность рабочего места
- 98 Сервис
- 99 Описание продукта и услуг; Применение по назначению
- 100 Сборка; Принцип действия
- 101 Работа с жесткими материалами; Работа с мягкими материалами; Советы; Техобслуживание и сервис; Техобслуживание и очистка; Стандартные винты
- 102 Россия; Беларусь; Транспортировка


