
Роботы-пылесосы COOLFORT CF-3201 - инструкция пользователя по применению, эксплуатации и установке на русском языке. Мы надеемся, она поможет вам решить возникшие у вас вопросы при эксплуатации техники.
Если остались вопросы, задайте их в комментариях после инструкции.
"Загружаем инструкцию", означает, что нужно подождать пока файл загрузится и можно будет его читать онлайн. Некоторые инструкции очень большие и время их появления зависит от вашей скорости интернета.


8
ENGLISH
•
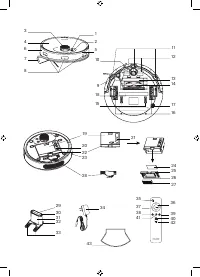
Install the central brush back to its place by first
inserting the brush support bearing, then insert the
right side of the brush into the drive unit and lower
the left side with the support bearing into the cor-
responding slot on the left side. After that install the
fixing frame (13).
•
Clean the contact points for battery charging (12) on
the vacuum cleaner and the contact points (33) on the
charging station (29) from dust.
•
Clean and wipe the anti-drop sensors (11) on the bot-
tom part on the vacuum cleaner body.
•
Clean and wipe the infrared sensors (8) and the damp-
ing strip (7) on the front bumper (6).
•
Wipe the vacuum cleaner body with a slightly damp
cloth and then wipe it dry.
•
Wipe the infrared sensors area (31) on the charging
station (29).
•
Do not immerse the vacuum cleaner body, the power
adapter (34), the connecting cord of the power adapt-
er and the charging station (29) into water or any other
liquids. Provide that no liquid gets inside the vacuum
cleaner body.
•
Do not use solvents or abrasives for cleaning the vac-
uum cleaner body, the charging station (29) and the
power adapter (34).
STORAGE
•
Before putting the vacuum cleaner away for long stor-
age, clean the vacuum cleaner in accordance with the
chapter «Cleaning and maintenance».
•
Remove the batteries from the remote control.
•
Use the original package for storage.
•
Keep the vacuum cleaner in a dry cool place out of
reach of children and disabled persons.
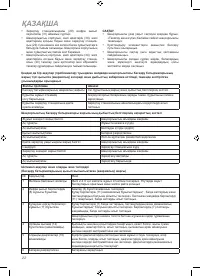
In case of any malfunctions (problems), the illumination of the control buttons on the vacuum cleaner changes
to red (hazard) and you will hear a sound message. Follow the recommendations below
General problem
Solution
Hazard lighting of the control buttons
See The table of sound and light signals of the unit
The unit does not work when switched on
Low batteries Charge the unit manually.
The unit cannot return
to the charging station
Remove the obstacles around the charging station.
Information table of the light signals of the control buttons illumination
Light signal during operation
Current state of the vacuum cleaner
Constant white
In standby or operating
Flashing white
Waiting to start (pause)
Flashing red
The battery is off
Flashing white
Wi-fi connection mode is activated
Light signal during recharging
Current state of the vacuum cleaner
Switched off
Going to the charging station
Light signal during charging
Current state of the vacuum cleaner
Constant white
Charging is finished
Flashing white
Charging is on
Possible troubles and troubleshooting (Flashing red (hazard) illumination of the control buttons)
№ Malfunction
Solution
1
Network connection is lost
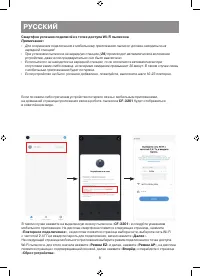
Check if the network is working at 2.4GHz 2. Reset your router to factory
settings and reconnect the network
2
Infrared sensors (8) are
malfunctioning
Make sure that the bumper (6) is not blocked.
Check the anti-drop sensors (11) for mechanical damage*, foreign objects and
dirt. If they are dirty, clean the sensors (11), remove foreign objects.
3
Anti-drop sensors (11) are
malfunctioning
Check the anti-drop sensors (7) for mechanical damage*, foreign objects and
dirt. If they are dirty, clean the sensors (7), remove foreign objects.
Check if the vacuum cleaner is hanging or torn off the surface.
4
The central brush (14) is
blocked (not rotating)
Clean the brush from dust and garbage, and if necessary, rinse under warm
water, if hair is present, remove it, make sure that nothing interferes with the
free rotation of the brush
5
The driving wheels (16) do not
rotate
Check whether the side wheels are dirty or damaged, if there is hair, remove it,
make sure that nothing interferes with the free rotation of the wheels. Check the
wheels for mechanical damage*.
6
The battery is off
Charge the battery
Содержание
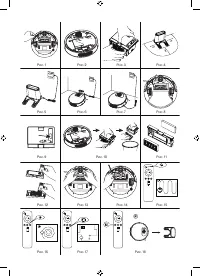
- 11 Не разрешайте детям играть с полиэ-; ПЕРЕД ПЕРВЫМ ИСПОЛЬЗОВАНИЕМ; Сохраните заводскую упаковку.
- 12 Не устанавливайте зарядную станцию; ПЕРЕД ИСПОЛЬЗОВАНИЕМ ПЫЛЕСОСА; При установке пылесоса на зарядную
- 13 Пылесос отключается автоматически; если вам нужно убрать только одну
- 14 Отсрочка старта 24 часа; - в режиме “отсрочка старта 24 часа”; ЧИСТКА И УХОД; в специальном углублении.; ХРАНЕНИЕ
- 15 Световой сигнал во время работы
- 16 УТИЛИЗАЦИЯ; Срок службы устройства – 3 года
- 44 înseamnă că produsul dat a fost fabricat în iunie (luna a asea) 2006.
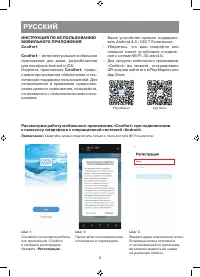
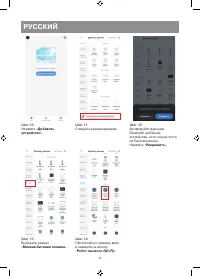
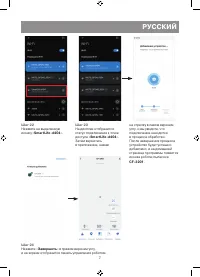
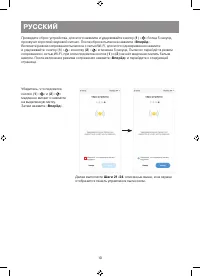
- 46 – Ваше устройство должно поддержи-; Play Маркет
- 48 Следуйте рекомендациям.
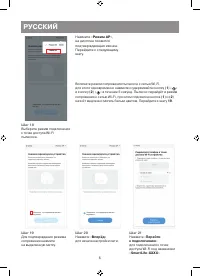
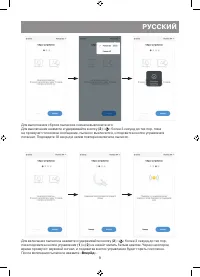
- 50 » в течение 5 секунд. Пылесос перейдёт в режим
- 53 » более 3 секунд до тех пор, пока; Для включения пылесоса нажмите и удерживайте кнопку (2) «; » более 3 секунд до тех пор,


