
Роботы-пылесосы COOLFORT CF-3201 - инструкция пользователя по применению, эксплуатации и установке на русском языке. Мы надеемся, она поможет вам решить возникшие у вас вопросы при эксплуатации техники.
Если остались вопросы, задайте их в комментариях после инструкции.
"Загружаем инструкцию", означает, что нужно подождать пока файл загрузится и можно будет его читать онлайн. Некоторые инструкции очень большие и время их появления зависит от вашей скорости интернета.


7
ENGLISH
“Spot cleaning” mode
•
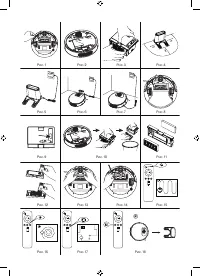
In this mode the vacuum cleaner will clean the room,
moving in a spiral around one point.
•
Place the vacuum cleaner in the necessary place
(at the point with maximal amount of garbage) and
press the “Spot cleaning” mode on button (41) «
»
on the remote control, you will hear a corresponding
sound message and the vacuum cleaner will start
cleaning (pic. 16).
•
After finishing the cleaning the vacuum cleaner will
stop and automatically return to the charging station.
“Along the wall” cleaning mode
•
In this mode the vacuum cleaner will clean the room
along the walls.
•
To switch “Along the wall” cleaning mode, press the
button (40) «
» on the RC, you will hear a corre-
sponding sound message. After finishing the cleaning
the vacuum cleaner will stop and automatically return
to the charging station (pic. 17).
Wet floor cleaning mode
•
In this mode, the vacuum cleaner performs wet clean-
ing of the floor in the room with a microfiber cloth (43).
•
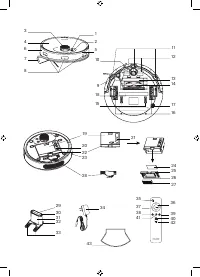
Remove the lid (4) and remove the dust bin (19) (pic. 2).
•
Turn over the vacuum cleaner and attach the microfi-
ber cloth (43) to the fastening band (18), smooth out
the cloth and press it for proper fixation (pic. 8).
•
Open the plug (20) of the water inlet (21) and pour a
sufficient amount of clean water into the water tank of
the dust container (19), close the plug (20) (pic. 9).
•
Turn over the vacuum cleaner, install the dust bin (19)
back to its place and close the lid (4).
•
Place the vacuum cleaner on the floor and press the
button (42) «
» on the remote control to start wet
cleaning in the automatic mode, you will hear a corre-
sponding sound message.
•
After finishing the cleaning the vacuum cleaner will
stop and automatically return to the charging station.
Returning the vacuum cleaner to the charging station
•
When the battery of the vacuum cleaner is discharged,
the vacuum cleaner will notify you with a voice mes-
sage, after which it will automatically return to the
charging station.
•
You can also force the vacuum cleaner to return to
the charging station by pressing the button (38) «
»
on the RC or the return button (1) «
» on the control
panel of the vacuum cleaner. You will hear a sound
message, and the vacuum cleaner will perform the set
command (pic. 19).
Notes:
•
It is recommended to switch the vacuum cleaner on
for the first time from the charging station. It allows to
decrease the time necessary to find the charging sta-
tion after cleaning.
•
Do not switch off the power to the charging station of
the robotic vacuum cleaner during the operation, as
the algorithm provides for a return to the charging sta-
tion after cleaning is completed.
•
It is not recommended to change the location of the
charging station, this may lead to inaccuracies in the
operation of the navigation system
•
For proper operation of the vacuum cleaner and return
to the charging station, it is necessary to provide a
free distance in front of the charging station of at least
3 meters; on the sides - at least 1 meter.
Delayed start 24 hours
•
Press and hold the button (39) «
» on the remote
control for 2 seconds to activate the “Delayed start
24 hours” mode, and you will hear a sound signal
confirming the command. After 24 hours the vacuum
cleaner will start cleaning in the automatic mode.
•
To cancel this mode, press the button (39) «
» again
for 2 seconds, the cancellation will be confirmed with
a sound signal.
Notes:
- in the “delayed start 24 hours” mode place the
vacuum cleaner on the charging station.
CLEANING AND MAINTENANCE
•
It is recommended to clean the dust bin (19) after
every use of the vacuum cleaner.
•
Before cleaning the vacuum cleaner, switch it off by
pressing and holding the on/off button (2) «
» for
more that 3 seconds, you will hear a sound signal, and
the button illumination will go out.
•
Disconnect the power adapter (34) from the mains,
remove the connecting cord jack from the socket (32)
on the charging station (29).
•
Remove the upper lid (4) and remove the dust bin (19)
from the vacuum cleaner body, then remove the filter
block (22) and clean the dust bin (19) from garbage
and dust (pic. 10).
•
Remove the microfoam filter (24) from one side of the
filter block frame (25) and the HEPA filter (27) from
the other side as shown on the pic. 11. If necessary,
rinse the filter block frame (25) and the microfoam
filter (24) under a stream of warm water, then dry
thoroughly.
•
Clean the HEPA filter (27) with the brush (28) (pic. 12).
Notes:
the brush (28) is stored in the special groove under
the lid (4).
•
Insert the HEPA filter (27) and the microfoam filter (24)
back into the frame (25) and place the filter block (22)
into the dust bin.
•
Remove the side brush (9). To remove the side brush,
take it by two cords and pull upwards. Wipe it with a
slightly damp cloth, remove dust from the brush (9)
installation place, if there is hair on the drive shaft,
remove it. Install the brush back to its place.
•
Clean the front wheel (10) from dust and garbage and
wipe it. Remove hair, if there are any, make sure that
nothing hinders the wheel (10) free rotation.
•
Remove the fixing frame of the central brush (13). To
remove the frame, simultaneously press on the frame
latches with your index fingers and pull upward, as
shown in pic. 13.
•
Remove the central brush (14). To remove the brush,
first lift the left side and then remove the right side from
the drive unit (pic. 14). Remove the support bearing on
the left side of the brush and place it separately.
•
Clean the frame (13) and the brush (14) from dust and
garbage, and if necessary, wash them in warm water. If
hair and threads wind up around the central brush (14),
remove them with the cleaning brush (28). For these
purposes, the brush has a comb and a built-in safety
blade. Make sure that nothing interferes with the free
rotation of the brush (14). Do not wash the brush (14)
in a dishwashing machine.
Содержание
- 11 Не разрешайте детям играть с полиэ-; ПЕРЕД ПЕРВЫМ ИСПОЛЬЗОВАНИЕМ; Сохраните заводскую упаковку.
- 12 Не устанавливайте зарядную станцию; ПЕРЕД ИСПОЛЬЗОВАНИЕМ ПЫЛЕСОСА; При установке пылесоса на зарядную
- 13 Пылесос отключается автоматически; если вам нужно убрать только одну
- 14 Отсрочка старта 24 часа; - в режиме “отсрочка старта 24 часа”; ЧИСТКА И УХОД; в специальном углублении.; ХРАНЕНИЕ
- 15 Световой сигнал во время работы
- 16 УТИЛИЗАЦИЯ; Срок службы устройства – 3 года
- 44 înseamnă că produsul dat a fost fabricat în iunie (luna a asea) 2006.
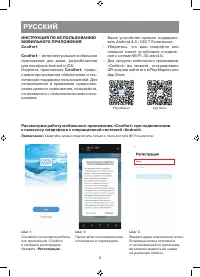
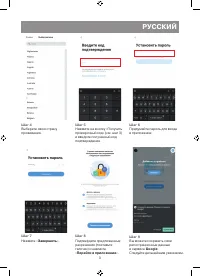
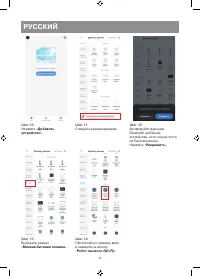
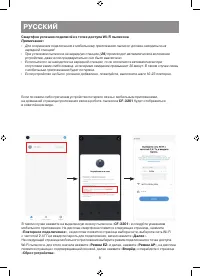
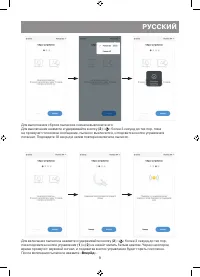
- 46 – Ваше устройство должно поддержи-; Play Маркет
- 48 Следуйте рекомендациям.
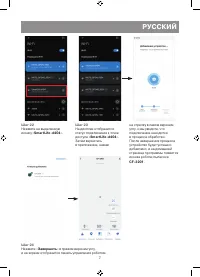
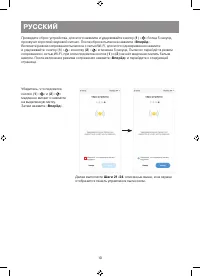
- 50 » в течение 5 секунд. Пылесос перейдёт в режим
- 53 » более 3 секунд до тех пор, пока; Для включения пылесоса нажмите и удерживайте кнопку (2) «; » более 3 секунд до тех пор,


